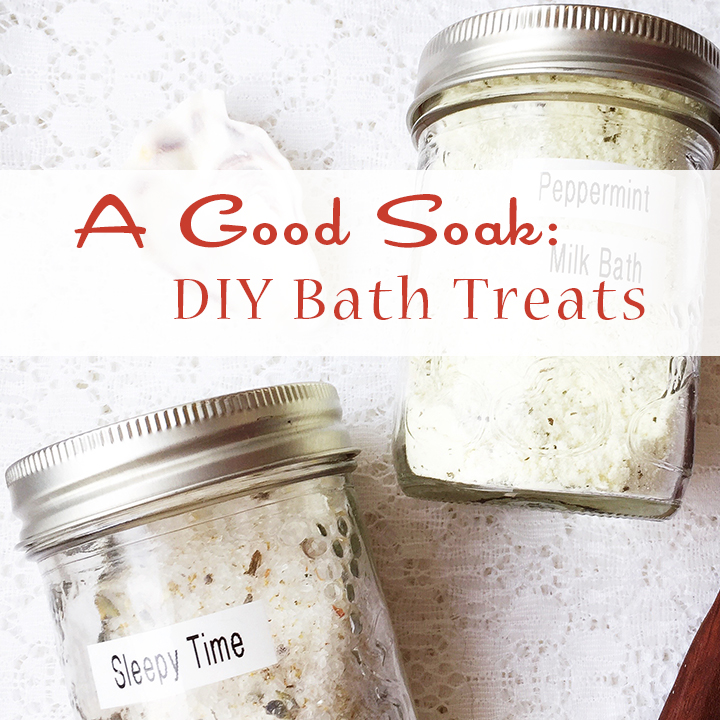
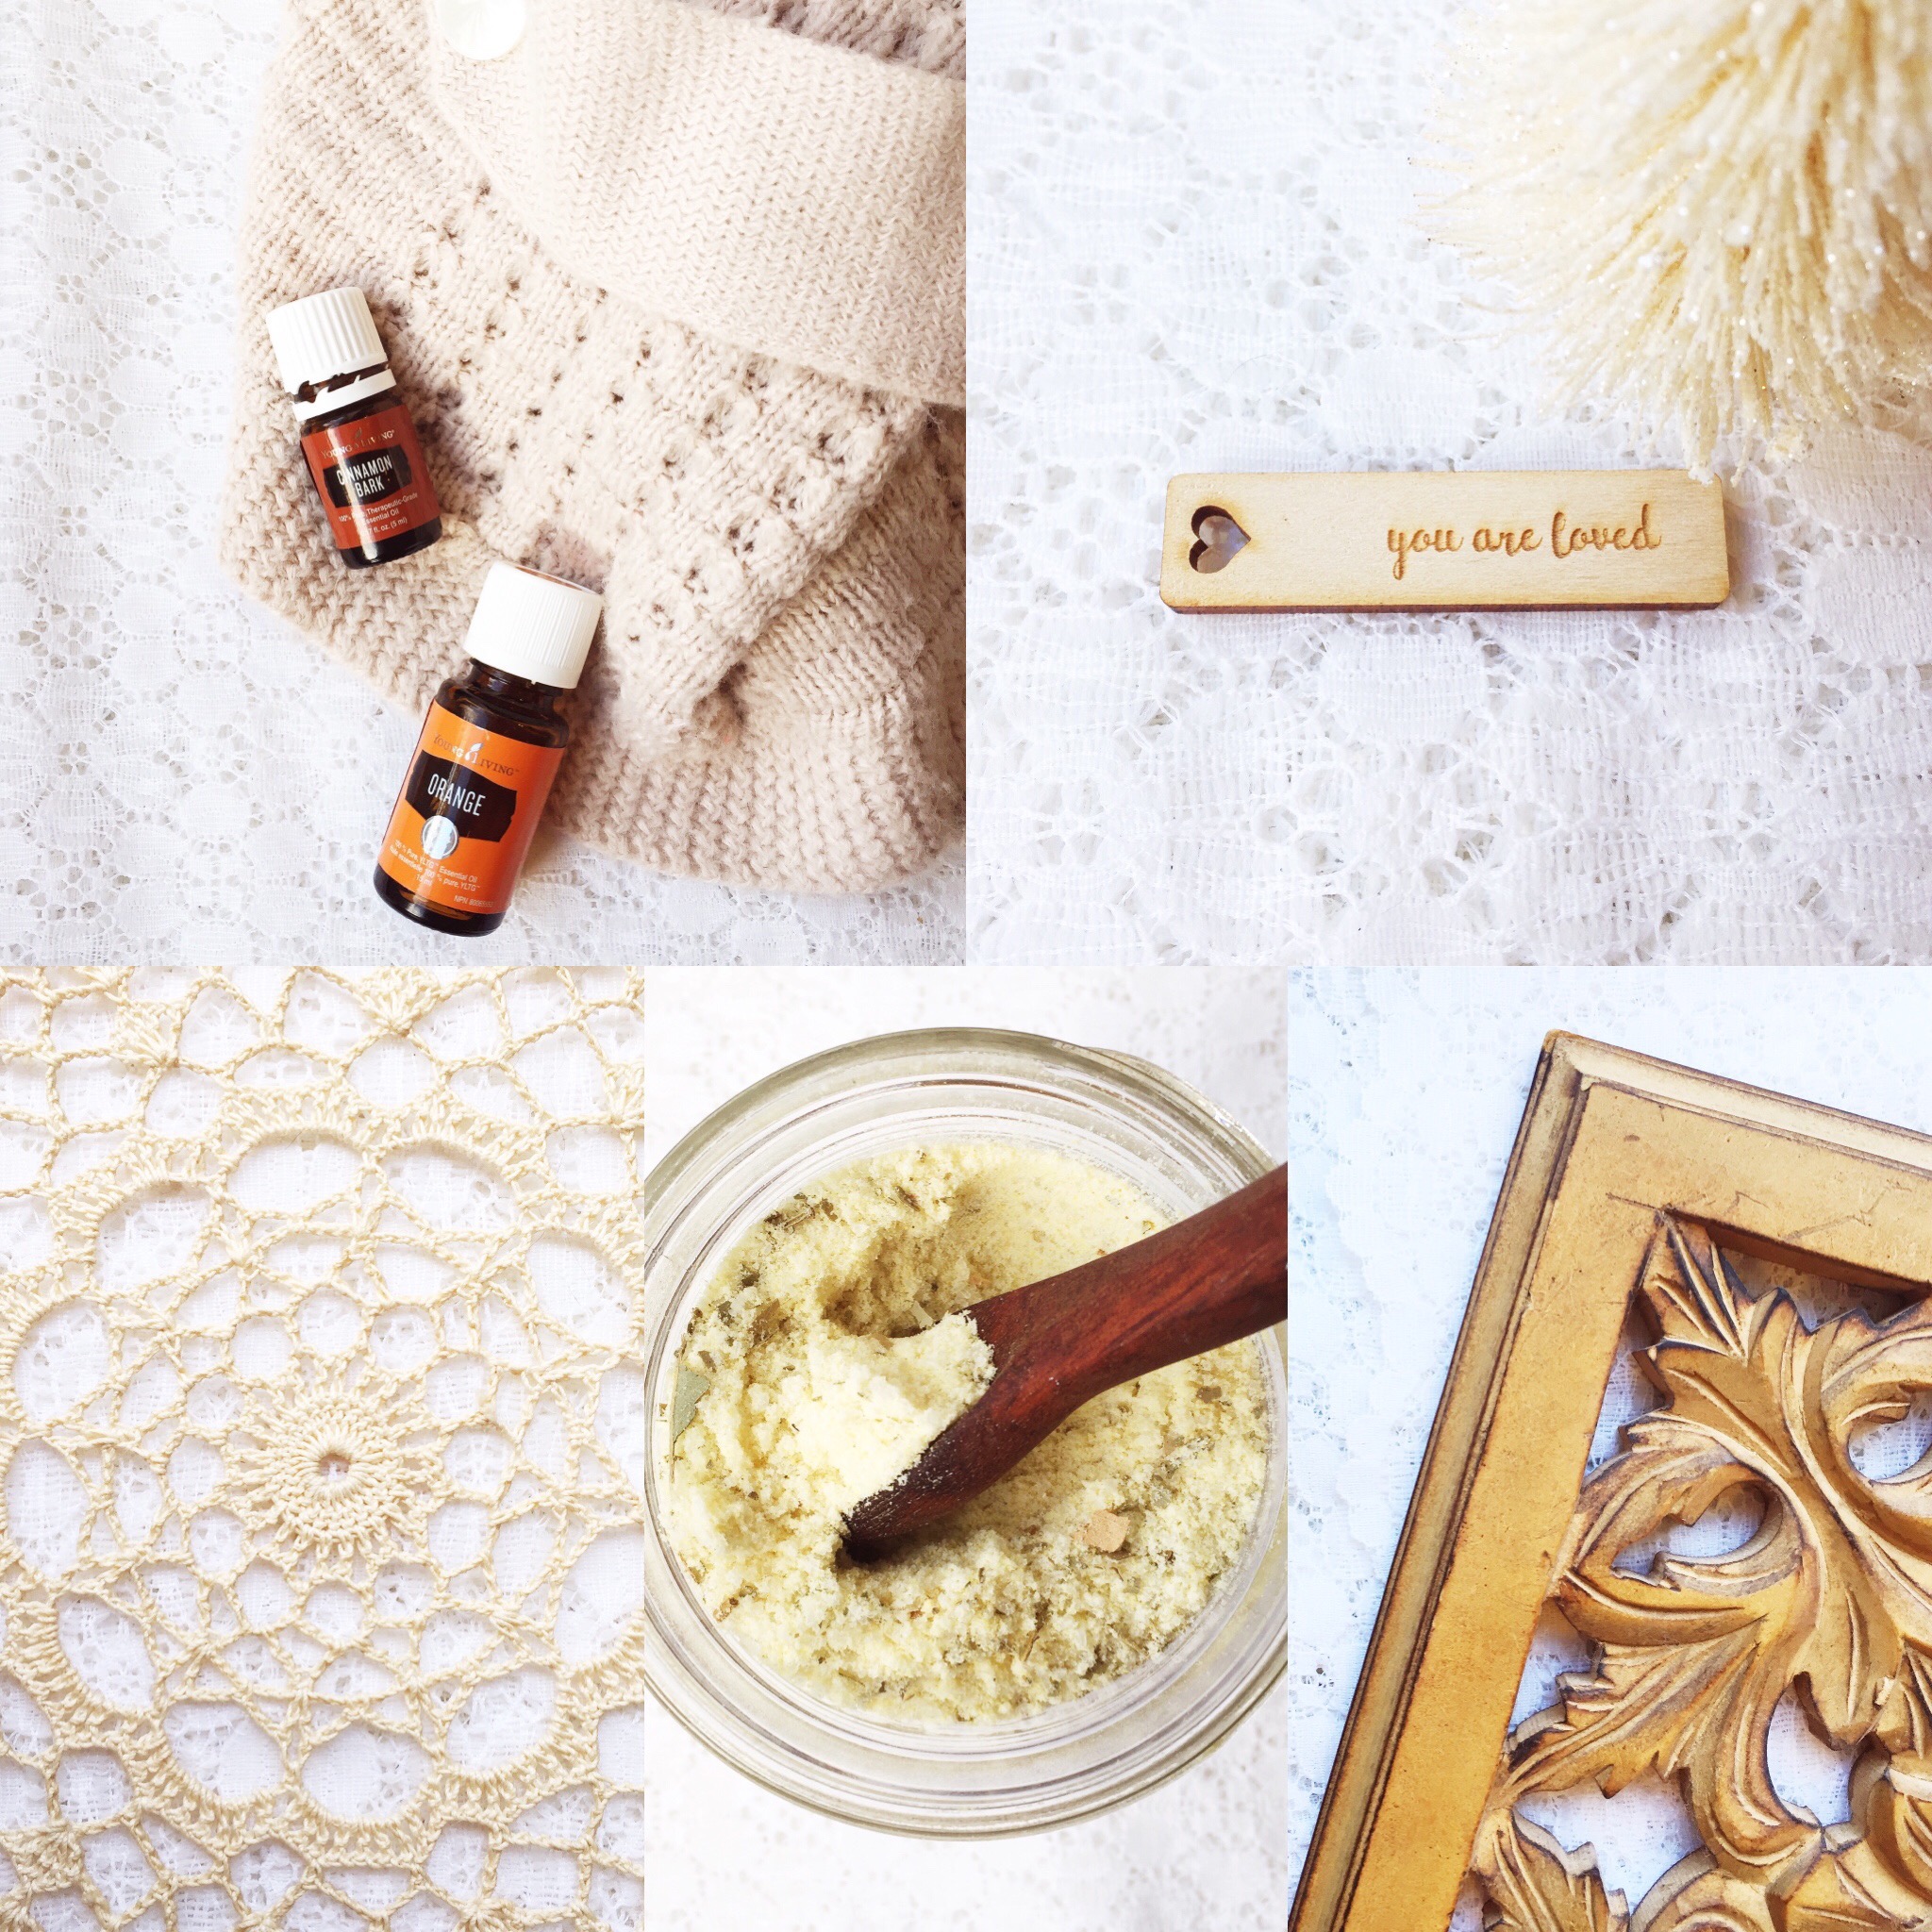
I’ve got to admit, I don’t get to sneak away for a warm soak in the bath tub too often. Even when I do, Mister Sam typically comes to “check” on me and conveniently brings a book along to read {he plunks himself down on the floor of the bathroom waiting for me to finish}. But even on those occasions, I get to enjoy a soak in some homemade bath salts or a milk bath mix. We keep a variety of ones on hand, stored in mason jars. Now that I think about it, it’s really Sam who gets the most use out of these, since I tend to sneak them into his regular bath. They make great gifts though too! So join me for a little DIY bath treat mixing!
There’s two bath treat recipes to share with you today. Both are newer concoctions, but we’ve like them so far {and yes, I’ve even managed to try both out for myself a couple times}. Of course, there are several other bath salt recipes on the blog and another milk bath recipe that I posted about last Christmas. All of which are great gifts to make for friends!
When I make bath salts for us to keep or even when I am gifting to friends, I usually put them in a mason jar. Jars are awesome for everything, they look cute, and are totally reusable. You can use whatever size jar you have on hand/prefer. I’ve played around with different ways to label things. Some cute, some colourful. In the end, I prefer a good ‘ol label maker. It’s not super “Pinterest-mom-perfect”, but it works for me {and they’re super easy to remove… no fuss, no muss}.
Sleepy Time Bath Salts
- 2 cups Epsom Salts
- 1/2 cup Baking Soda
- 10 drops Rosemary Essential Oil
- 10 drops Lavender Essential Oil
- 1-2 tea bags Chamomile Tea {I used Pukka Love tea, because it’s what we had on hand, but feel free to experiment with other Chamomile varieties}
- 1/3 cup dried Lavender
To make, simply combine dry ingredients in mixing bowl. Add essential oils. Stir well. Place in jar. Label. Done.
Peppermint Milk Bath
- 1 cup Milk Powder
- 1/2 cup Goat/Coconut Milk Powder
- 1 bag Peppermint Tea bag
- 5 drops Spearmint Essential Oil
- 7 drops Peppermint Essential Oil
Whole milk powder is much better than skim milk. This is meant to be a super moisturizing bath soak, so the more milk fat, the better. I made this up with goat milk originally because I was gifting some to a friend that keeps a completely nut-free home {coconuts can be an issue sometimes, so she asked me to avoid them}. I love coconut milk powder in my own mix though. To make, again simply combine dry ingredients in mixing bowl. Add essential oils. Stir well. Place in jar. Label. Done.
If you’re trying to figure out how to make these bath soaks more of a special gift, try pairing them with a unique scoop or spoon. I picked up a beautiful local, hand carved wooden spoon a couple years ago. We keep it next to the stack of bath salt jars in the bathroom. Every time I scoop bath salts into the tub, though, I have a vivid flashback to my Grandmother’s house. She kept a big bowl of bath salts next to the tub with a beautiful seashell to scoop them out. It was always such a treat to take a bath at her house & have the privilege of using the seashell scoop. Funny, the things we remember. I might switch our wooden spoon over to a shell.
Anyway, get creative with a unique scoop, tie it onto the jar or slip into a bag or basket of bath treats. It will make your recipient feel like a queen and very, very loved.
Happy Making!
]]>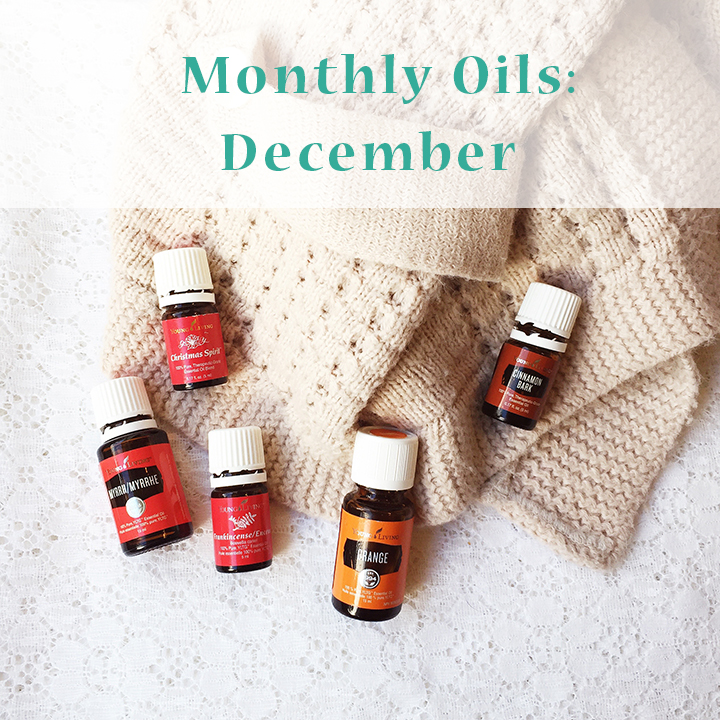
New month, new oils! And of course, December is very special because of the holiday season it includes! We’ve put together quite an awesome post for you. Not only are we sharing our essential oil picks of the month and downloadable diffuser recipes, we also have a tutorial on DIY candle making!! Perfect for hosting & gifting during Christmas!
In the true spirit of the season, we decided to let Advent be our oils inspiration this month. Advent is about anticipation, waiting, preparation, looking back {at the birth of Jesus} and looking forward {to when he will come again}. Significant cornerstones to our faith. In the most practical application, you can see the season divided up into two main themes {with lots of overlap}: 1) Preparing//hosting//welcoming 2) Celebration//giving//Christmas Spirit.
Preparing//Hosting//Welcoming
There are two main essential oils that stand out at this time of year for the diffuser, when you want to create a very cozy, welcoming home: Christmas Spirit and Cinnamon Bark. Both offer sweet & spicy scents. Christmas Spirit is actually a blend that contains Cinnamon Bark, along with Orange and Spruce, and is appropriately named because it literally smells of everything you associate with the holiday. Each of the Christmas Spirit and Cinnamon Bark oils combine easily with a variety of citrus oils {Orange, Tangerine, & Grapefruit} and also, Peppermint & Clove. It’s hard to go wrong, really. Whether hosting a large group of family or friends or just spending a quiet, mellow evening at home, we highly suggest these oils. We’ll certainly be using lots of them in the diffuser at our house! Download a recipe card with diffuser blends!
Preparing//Hosting//Welcoming ~ Download
Celebration//Giving//Christmas Spirit
As we focus on the season of Advent, it’s pretty hard not to include Frankincense & Myrrh, two of the original gifts given by the Wise Men. Frankincense is associated with things like increasing inner strength & spirituality, reducing anxiety, and creating a sense of calm. Myrrh is associated with promoting emotional balance, and a deeper sense of peace & spirituality. We’re also adding another special oil to this category, Palo Santo {also known as “sacred wood”}. It is both grounding & inspiring and helps with deeper connections, and warding off negative emotions. Let’s be honest, at some point during the holidays, you will find yourself in the midst of a busy, chaotic, stress-inducing situation, ripe with negative emotions. These oils will help you get re-focused & grounded, so you can get back to the peace of the season. We’ve got a recipe card for you to download and keep handy during the holidays!
Celebration//Giving//Christmas Spirit ~ Download
Which brings us to our next wonderful gift to you! Shauna put together a great, simple tutorial on candle making, using essential oils and soy wax. Candles are so symbolic at this time of year & offer so much comfort, especially during our long, dark Canadian winters. They are symbols of hope, Spirit, guiding stars, life, joy and so much more. You light candles on special occasions, for special guests, to remember a special life, to set a special mood, and to simply see in the darkness. Whether it’s Advent candles to count down to Christmas or candles to practice hygge, we’re embracing the light. Join us this season, by making your very own candles! To keep or to give.
DIY Soy Candles
- Soy wax flakes (I found mine at Soap and More in Calgary, but they’re in short supply around town. Amazon has a few options)
- Jars (any glass jar works, I like to use small, 250mL or 125mL mason jars)
- Wicks (I’ve played around with two varieties):
- Essential oils for scent (see below or use your own combo)
- Glue gun
- Wooden dowel or popsicle stick for stirring
- Glass Pyrex-type measuring cup
- Clothes pins or pencils (to hold wicks in place)
Essential Oil Candle Scents:
- Spicy Orange {6 drops of each}:
- Orange
- Cinnamon
- Clove
- Nutmeg
- Ginger
- Sweet Mint:
- 7 drops each: Peppermint, Spearmint, Wintergreen
- 10 drops: Ylang Ylang
- Rosemary/Lavender:
- 20 drops Lavender
- 10 drops Rosemary
- a sprinkle of dried lavender can be added to the bottom of your candle jar
- Pretty much any scent combination can work. If you enjoy it in your diffuser, it will work as a candle!
Happy Making & Oiling, This Advent!
]]>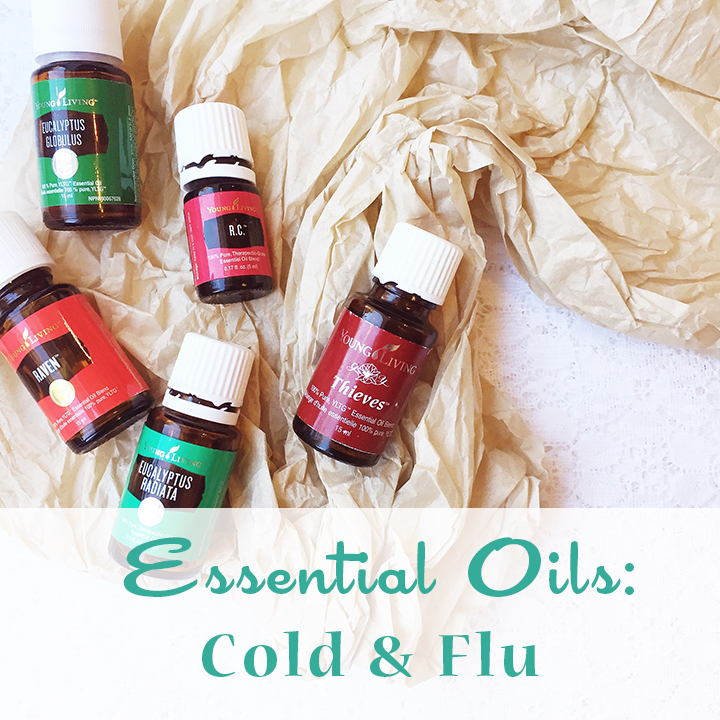
Oh yes, it’s fully that time of year. In our house, we’ve already battled a few rounds of illness {do any other mamas go a little nutty with how many colds the kiddos bring home from school?!}. Since discovering & playing around with essential oils, I’ve come up with some routines for the cold & flu season; both in preventative ways and soothing symptoms.
I’ve teamed up with Shauna to give you a glimpse at how we each use essential oils for this time of year! We’re each mamas, and we all understand the challenges with keeping healthy, keeping our homes germ-free, and loved ones comforted through illness. Don’t miss out on our FREE downloadable recipes at the end of this post to help do just that!
When we decided to collaborate on this post, the ONE oil that came to each of our minds, was Thieves, a unique essential oil blend from Young Living. It combines Clove, Lemon, Cinnamon, Eucalyptus Radiata, and Rosemary oils into a spicy blend. It is definitely the primary oil we each use for coughs, colds, & immunity building! Hopefully you get some ideas to try out in your own home:
Thieves in the Diffuser
Shauna:
- Purification and Tea Tree (when I’m really serious about getting rid of germs in the air
- Orange/Citrus Fresh/Tangerine (cozy, fresh and energizing)
Sarah:
- On a fairly regular basis, Purification with Thieves {4-5 drops each}, to help cleanse the air
- My favourite nightly blend for the bedroom, 4 drops Rosemary, 4 drops Lavender, 2 drops Thieves
- To help with congestion, 4 drops Thieves, 3 drops Eucalyptus Radiata, 2 drops Raven
Other Ways to Use Thieves
Shauna:
- Disinfecting tooth brushes (2 drops in a mug of boiled water, let sit for 5 min)
- Immunity Boosting Bath: 2 drops Thieves, 2 drops Lemon, 2 drops Peppermint with a cup of Epsom salts (I actually make up a larger mason jar of this & keep it in my bathroom for seasons of illness)
- Adults: Thieves tea (1 drop Thieves, 1 drop Lemon, 1 tsp of honey in hot water) and Thieves/Oregano/Copiaba capsule
- Thieves Roller: 15 drops of Thieves & fractionated coconut oil for feet & spines before bed (for the whole family)
Sarah:
- Applied regularly to bottom of feet before bed, Winter Wellness roll-on {find the recipe below}
- Adults take daily, *veggie capsule with 2 drops each Thieves & Oregano and diluted with coconut oil
- Applied to bottom of feet, when you’re the only one not sick, undiluted Thieves
Other Helpful Oils
Shauna:
- Early bedtimes…with humidifiers and diffusers with R.C./Eucalyptus (*cold type illness) or Thieves/Purification (*flu type illness) *never putting essential oils directly into the humidifier, but using them in correlation with each other
- Baths & showers with Eucalyptus and R.C. oil (1 drop of each for little people), the steamier the better
Sarah:
- A diffuser blend to help with congestion in our son’s room, 4 drops Eucalyptus Radiata, 3 drops Lavender
- Serious stuffy noses, in a warm bath, 2 drops Eucalyptus Globulus
- For serious coughs & congestion for our son: dilute 1 drop R.C. with coconut oil & apply to bottom of feet
- For serious coughs & congestion in adults: dilute 1 drop R.C. with coconut oil & apply to chest
- For kid’s fever {used in conjunction with Tylenol}: dilute 1 drop each Peppermint & Lavender with coconut oil & apply to bottom of feet
- In a warm bath to help with congestion, Breathe Easy bath salts {Find the recipe below}.
Breathe Easy Bath Salts
{for colds & congestion}
- 1 cup epsom salts
- 1/2 cup baking soda
- 2 tbsp mustard powder {fine dry mustard}
- 5 drops of Peppermint essential oil
- 5 drops of Eucalyptus Radiata essential oil
- 3 drops of Rosemary essential oil
Combine dry ingredients in mixing bowl. Add essential oils. Stir well. Place in bag or jar. Done.
Annnnd lastly, TWO awesome recipe downloads for you to keep handy this winter!
Enjoy & stay healthy, friends!
DIY Chest Rub ~ Download
Winter Wellness Roll-On ~ Download
*Ingest essential oils at your own risk.*
]]>
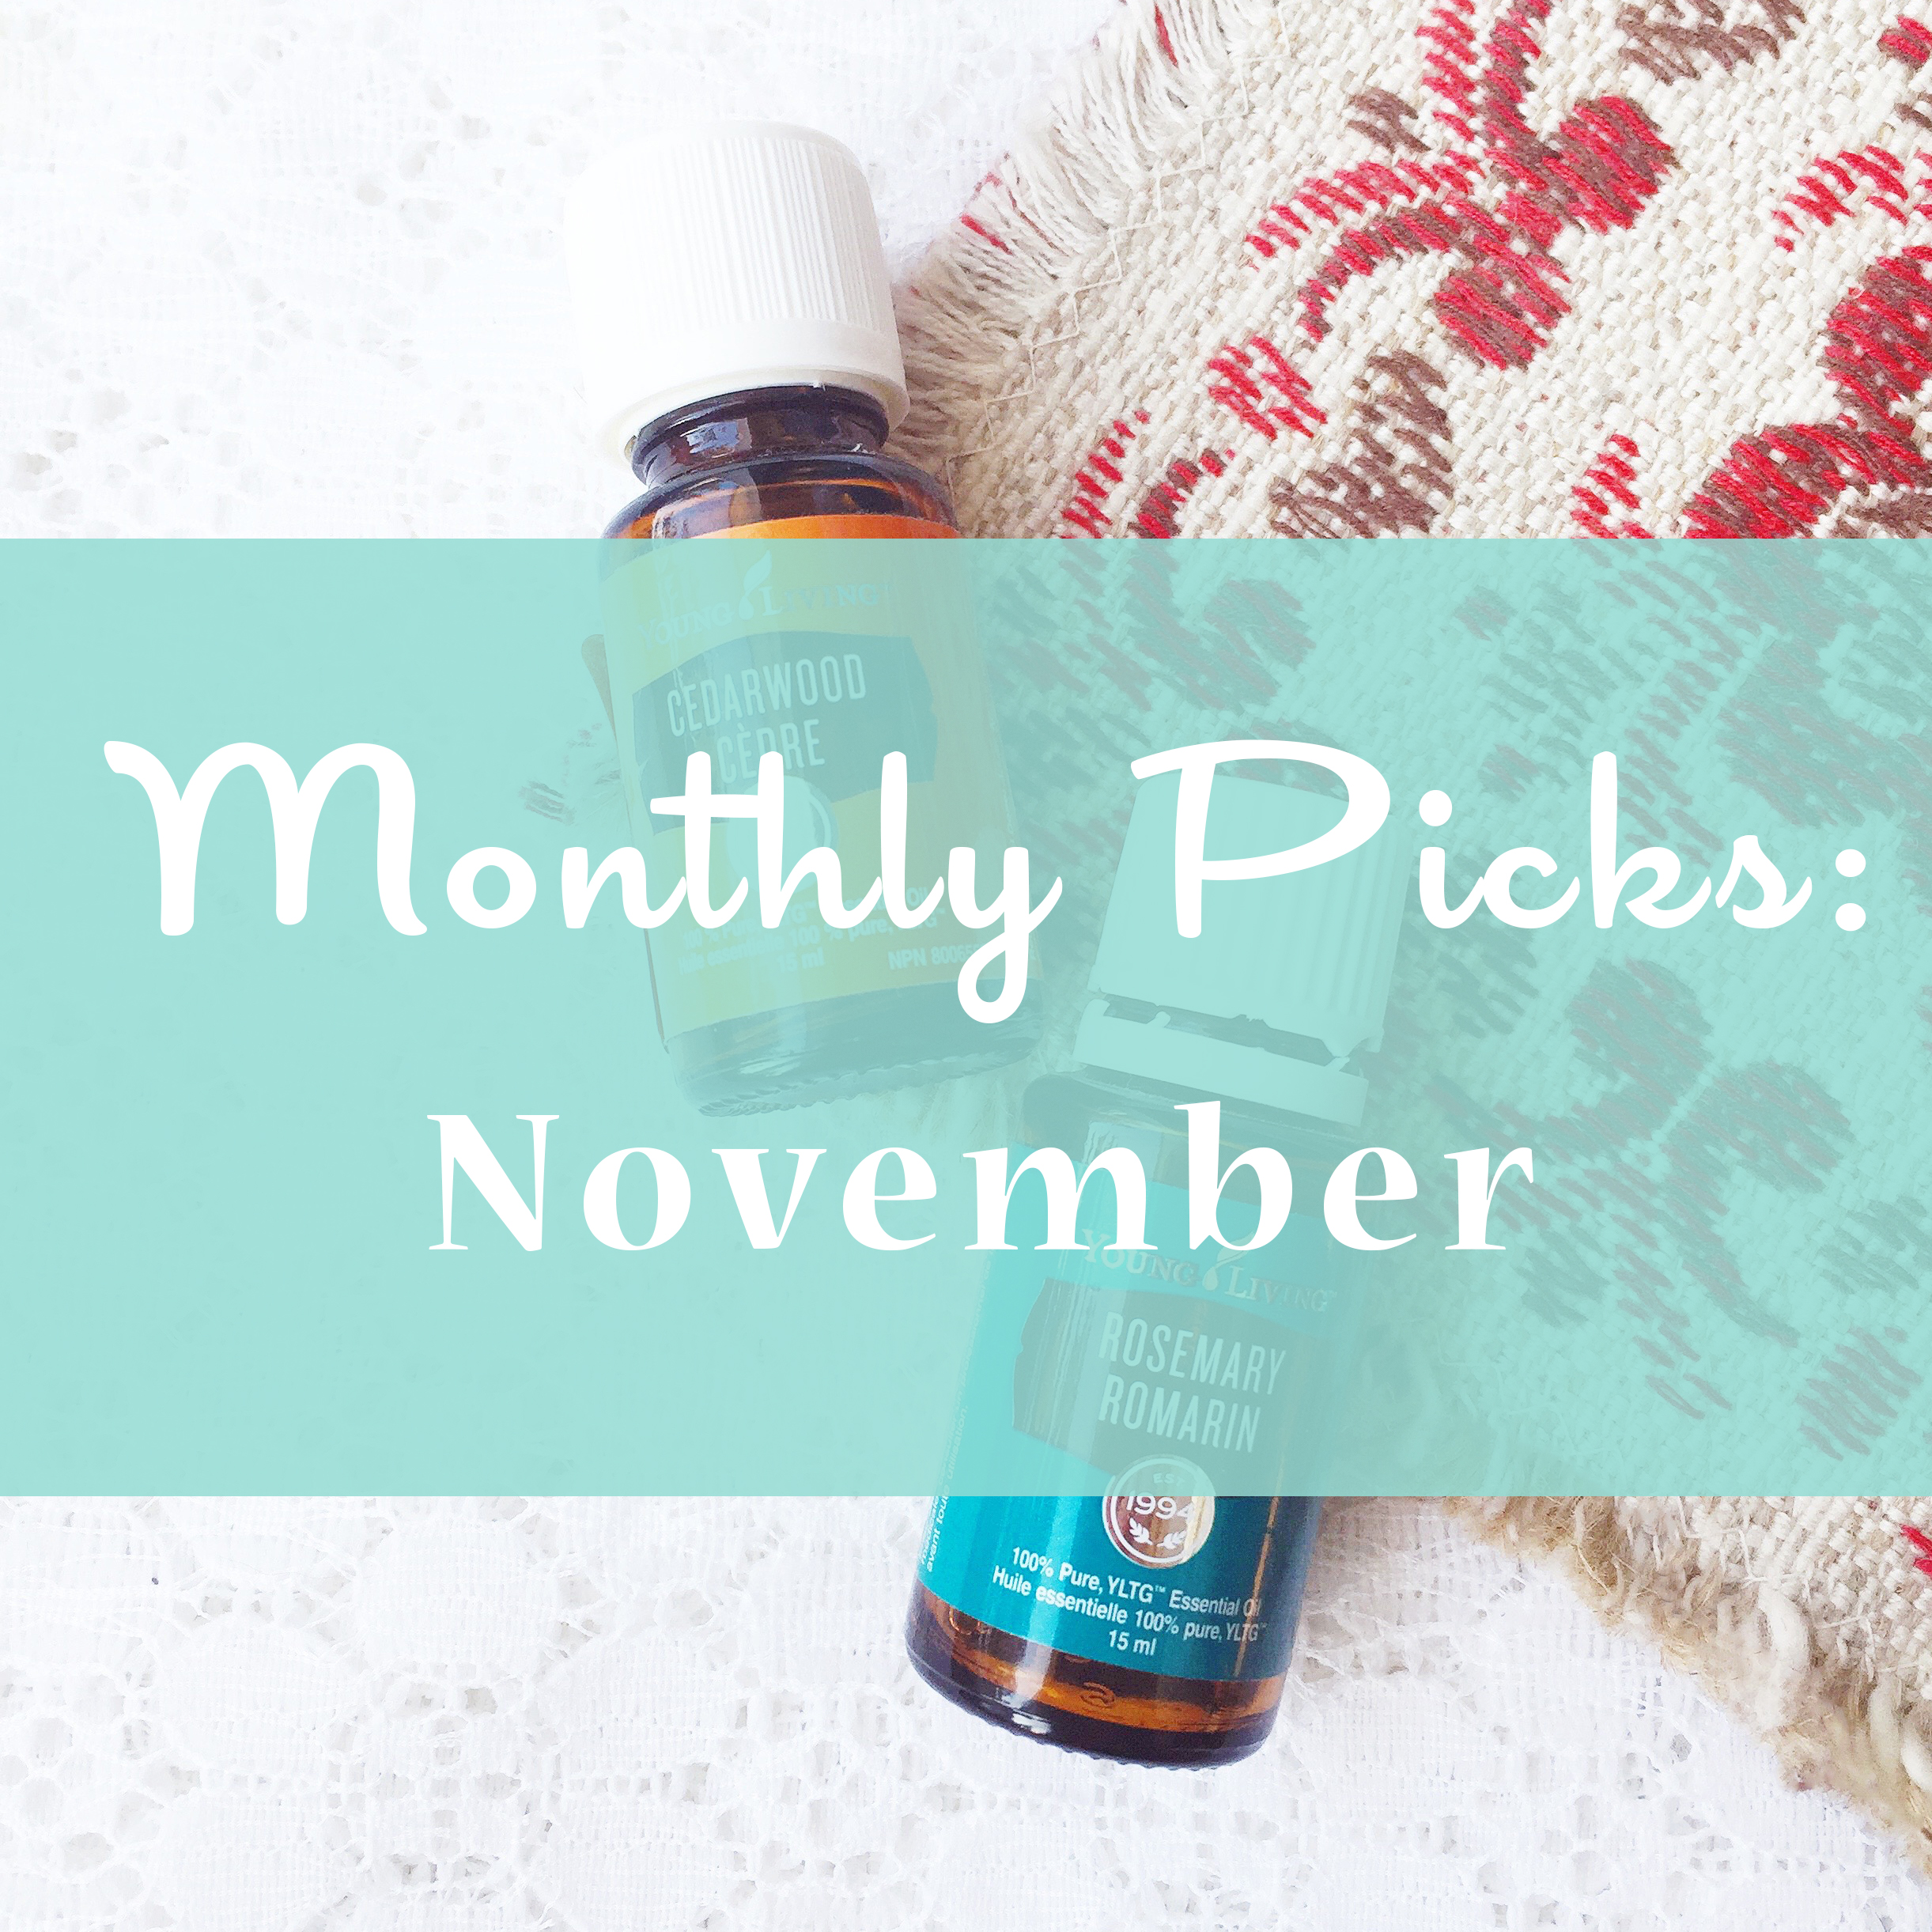
Last week, we welcomed winter to Calgary. Lots of snow & cold wind, which means we also had to embrace sleds, shoveling, snowsuits, and all the layers. November typically brings snow to the city and marks the beginning of the long haul to get to spring.
With this in mind, we have put together some monthly essential oil picks and diffuser recipes to fit the various moods of November. You might have noticed I said “we”. That’s because this month is the first time I’ve joined forces with my oils crew to bring you inspiration! We’re hoping to make it a regular thing.
Joining the blog team, and our post today, is our oils mentor, Jan! We’ll be giving Jan an official welcome to the blog next week, hopefully, as another inspirational contributor. For now, she’s here to get us educated on Young Living Essential Oils!
Every essential oil can have both physical and emotional effects on us. Right now Young Living sits in an exciting time for sharing the physical benefits that the oils can provide. With the introduction of Natural Health Product (NHP) registration from Health Canada, came a new era in how we can share the amazing health benefits of our oils.
What is a Natural Health Product (NHP)?
According to Health Canada’s website, “Natural health products (NHPs) are naturally occurring substances that are used to restore or maintain good health. They are often made from plants, but can also be made from animals, microorganisms and marine sources. They come in a wide variety of forms like tablets, capsules, tinctures, solutions, creams, ointments and drops.”
For products to meet registration guidelines they have been researched, tested and found to be a natural and effective health product for the registered health claim.
Our oil picks for this month are {drumroll, please}… Cedarwood and Rosemary!
I use Cedarwood…
All.
The.
Time.
And although I do have Rosemary, it is currently not one of my go-to oils.
As a learner at heart, I was excited and challenged to learn more about this oil so I could pass it along to you!
Sarah’s November Pick ~ Rosemary
{I like the sweet, earthy smell of Rosemary to comfort & relieve stress}
According to Rosemary’s NHP Registration, it can be used to:
- Relieve minor skin irritations due to cuts, scrapes, bruises or minor burns.
- Help with the relief of tired muscles or for joint and muscle pain associated with sprains, strains or rheumatoid arthritis.
- Provide relief from digestive discomfort such as gas or bloating as well as help smooth muscle contraction of the gastrointestinal tract.
- Help with symptoms of a cold, cough, sore throat or congestion.
Shauna’s November Pick ~ Cedarwood
{I like the mix of cedarwood ~ calm, grounding ~ with some citrus for a bit of uplifting}
According to Cedarwood’s NHP Registration, it can be used to:
- Reduce the symptoms of cold & cough.
- Relieve joint or muscle pain associated with sprains, strains & rheumatoid arthritis.
- Help to relieve minor skin irritation, cuts, bruises, burns.
- Assist in providing relief of the symptoms of acne or boils.
- Act as a nervine and calmative which enhances relaxation.
So many physical ways to use these products!
Ahhhmazing.
… But then comes the next (and very obvious) question… How do I use them to do THAT?
As far as usage goes, there are many ways to use these oils for the above health concerns. I always suggest to start out with the usage that feels most comfortable you. If you are not comfortable with your application method, resisting the process, the oils will not be as effective.
To make it simple, we will break application into two categories. The first way is aromatic, and the second is topical.
My favorite way to use an oil aromatically is with my diffuser. I usually use between 5 – 8 drops and then I get to reap the benefits of inhalation. If you don’t have a diffuser… or prefer to go “old school” direct inhalation or steam inhalation are also great options. When I want to get a good strong dose of an oil, I will put a drop in my hands, cup them over my nose and breathe deeply. In this method of direct inhalation I find the effects almost immediate.
And now to topical uses… which means putting those oils ONTO your body! Oh yes!! Local application over the area of concern can be very helpful for many of the health claims listed above. Sore legs from a strain, tight chest from coughing, a case of adult acne from eating all your kids Halloween candy?? Hmmmm… Maybe a little bit of experience here!! Put the oil where you need it! Feeling a little nervous? Follow bottle instructions, and you can always dilute an oil into a carrier oil {ie. coconut oil, shea butter, olive oil, sweet almond oil} for comfort. If you know me, you know one of my favorite places to be is in the bath, and so that is my favorite way to apply oils topically. Throw in some Epsom salts and call it heaven!
We’ve put together a FREE downloadable recipe card with some of our favourite diffuser blends using Rosemary and Cedarwood to get you started aromatically! Download, print and keep handy by your diffuser to try this month!
November ~ Diffuser Recipes ~ Download
Also, if you know me… you know I can’t resist a good little DIY! There are so many products that you can make with Essential oils to aid on topical application… and make it a whole lot of fun!
So… Here is a DIY that uses the oils of the month!
DIY Hair Serum ~ Download
We hope you enjoy trying new oils, rediscovering old favourites, and are just inspired to use them more in your daily life. Look for an oils feature {or two} every month from our crew!
]]>
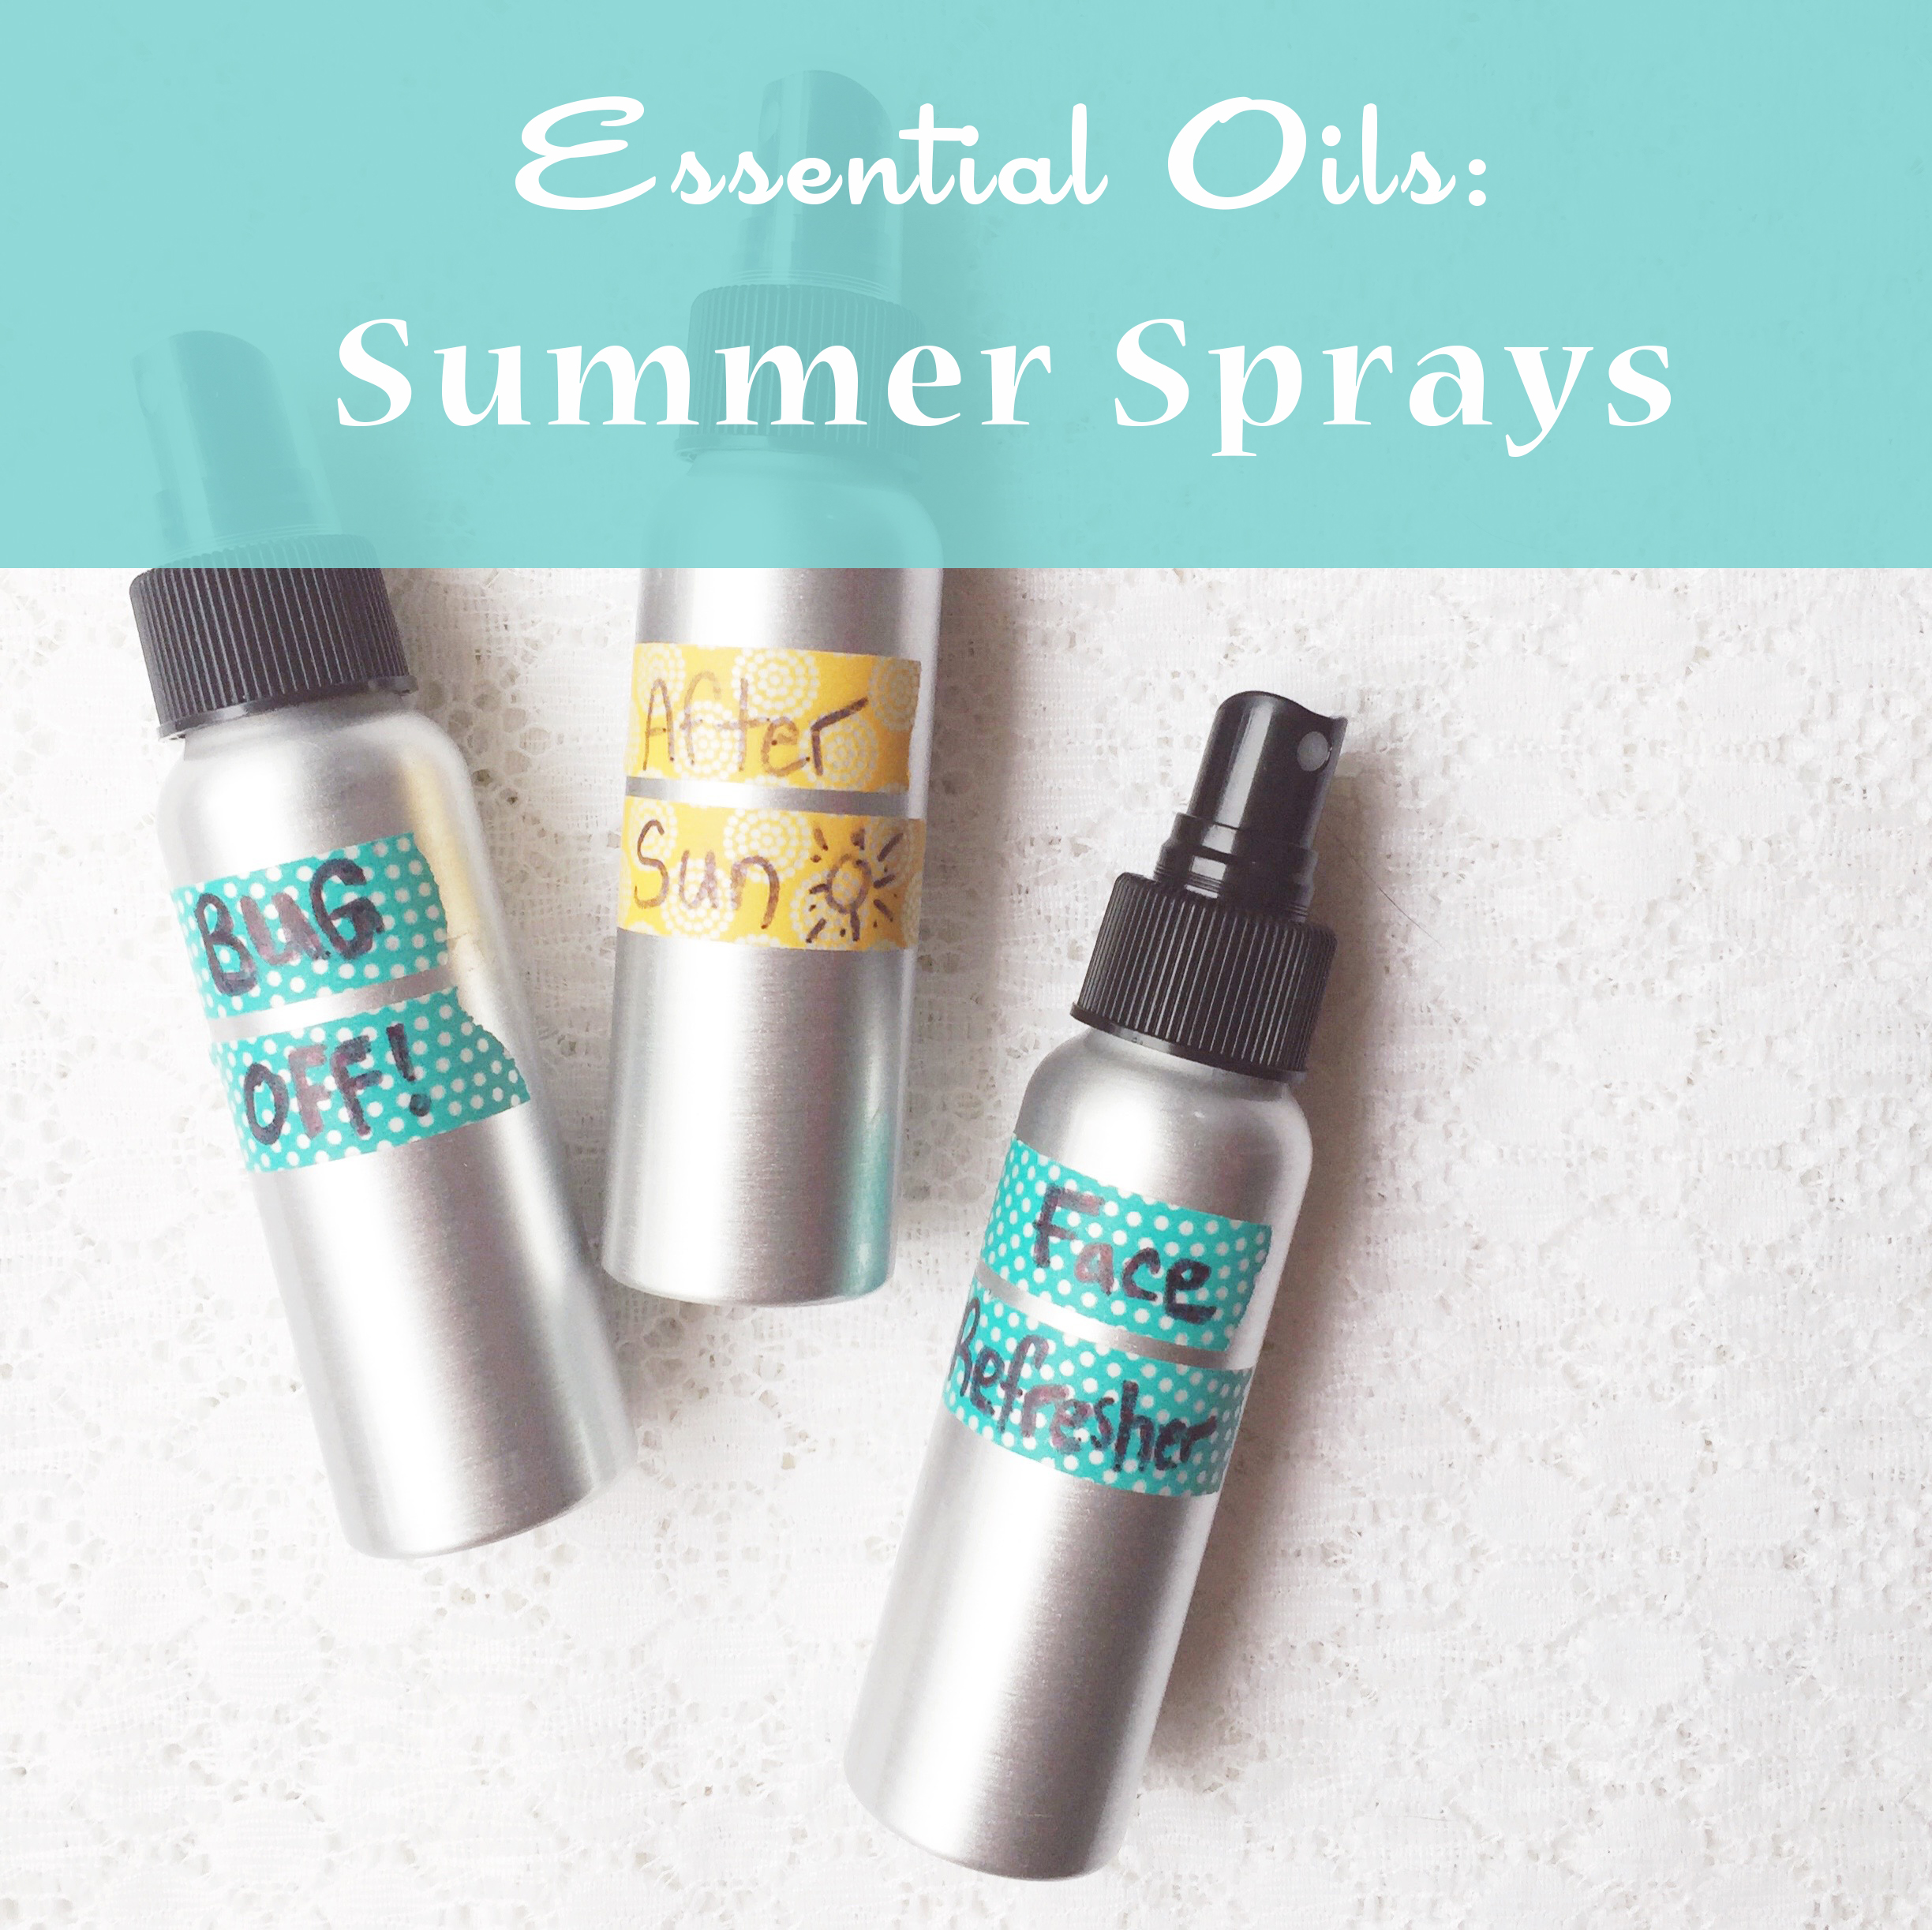
In an attempt to get us organized {and comfortable} out at the farm this summer, I made up a few essential oil sprays to keep on hand. An After Sun Spray to soothe skin, Face Refresher toner, and Natural Bug Spray. They have been really lovely to have out there, especially the After Sun spray and Face Refresher. Those two spritzed on a cotton pad, are sooo soothing to the face at the end of a day spent in the hot sun & wind.
Dust, wind, sun, and sweat can all be tough on the skin. I knew that’s what elements we would face most days on the farm, so I mixed up two sprays to help: After Sun spray and Face Refresher. Apply these directly onto the skin or onto to a cotton pad and then gently rub in.
Face Refresher {Summer Afternoon Toner}
*you’ll have to play around with exact measurements on this one*
- Aloe Vera Gel
- Rose Witch Hazel
- Rose Water
- Lavender Oil
- Lemongrass Oil
- Citronella Oil
- Spearmint Oil
- Fill with steeped green tea {squeeze tea bags to increase concentration}
After Sun Spray
- 1 part Aloe Vera Gel
- 8 parts Witch Hazel
- 10 drops Lavender Oil
- 5-7 drops Peppermint
- 5-7 drops Spearmint
Bug Off {natural bug spray}
- 1:1 ratio of Witch Hazel and Water
- 25 drops of Citronella Oil
- 10 drops Peppermint Oil
- 10 drops Purification Oil
- 10 drops Thieves Oil
- 5 drops Lemon Oil
*Mosquitoes really love me, so I don’t usually hesitate to douse myself in in Deep Woods Off spray. And I’ll be honest, I’m still using that heavy duty bug spray when I’m working on the farm in waist high grasses. However, this natural big spray is awesome for those time when you don’t want to smell like you just got back from a camping trip. It works decent enough for “city” bug coverage, in my mind.*
Hope these inspire you to create some little comforts of your own. So easy to concoct, once you figure out the bases. By the way, I just picked up my real, natural Aloe Vera Gel from Co-Op. Another local source is Soap & More.
Happy oiling, friends!
]]>
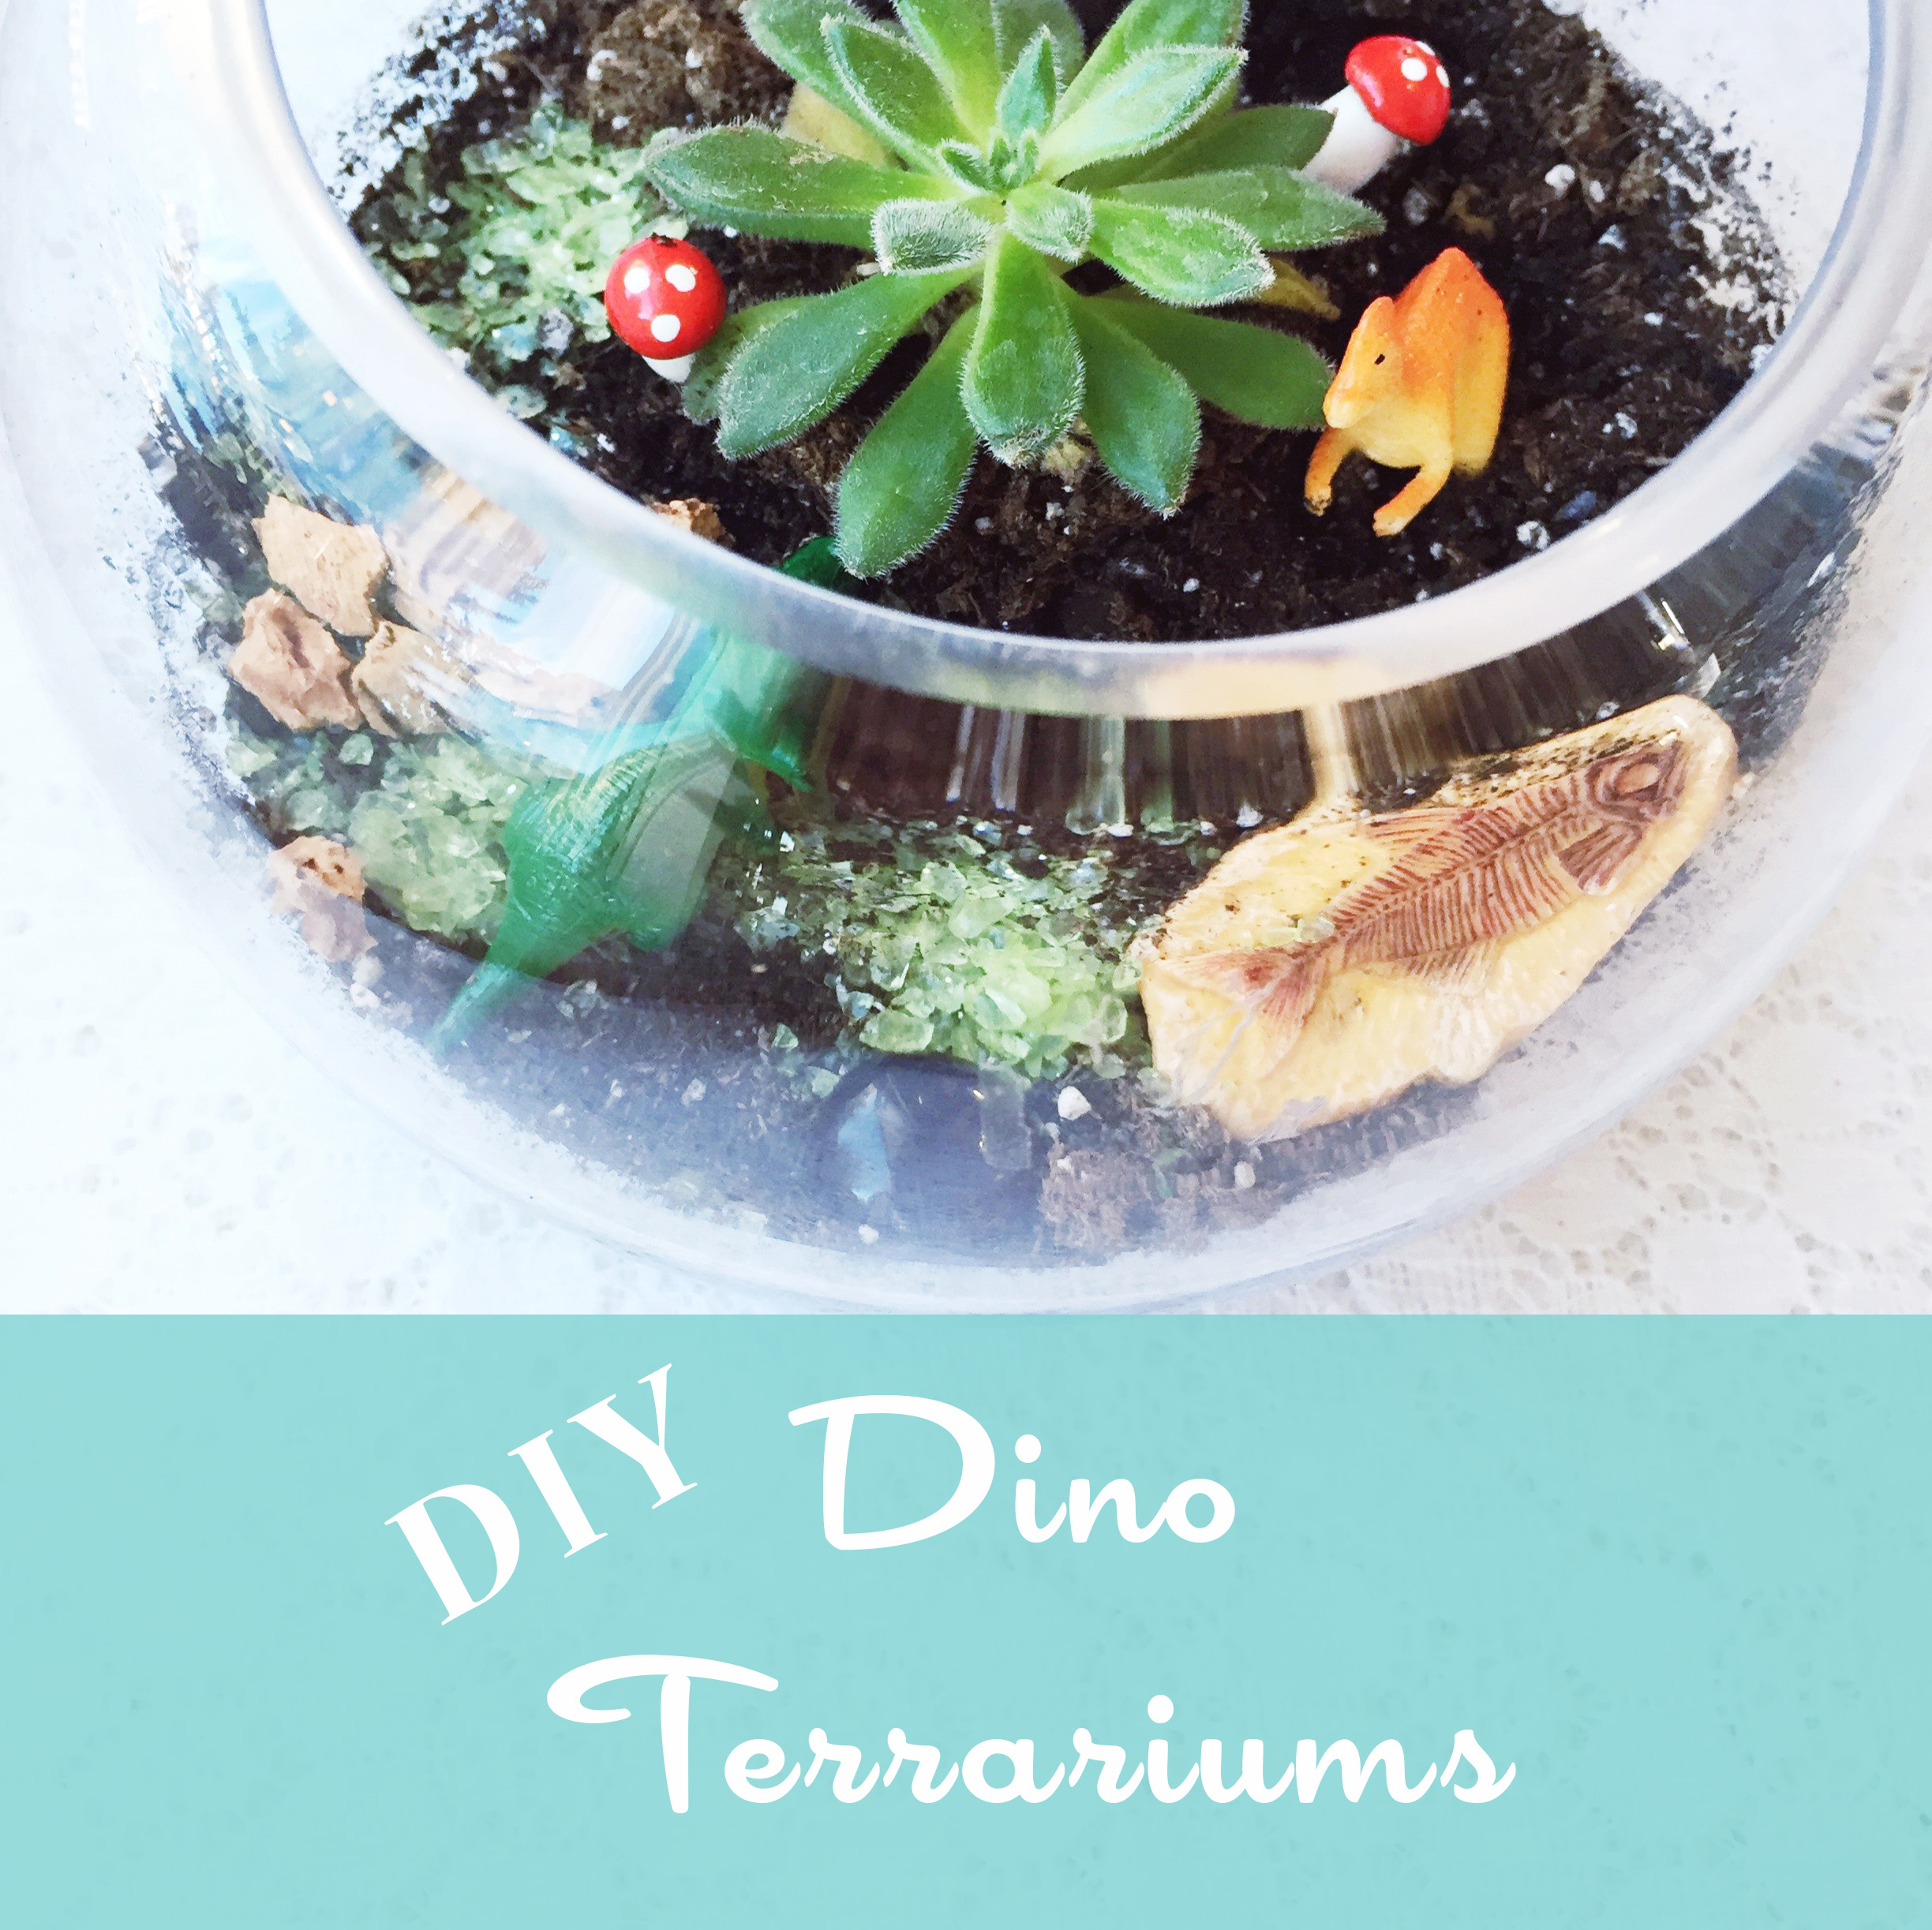
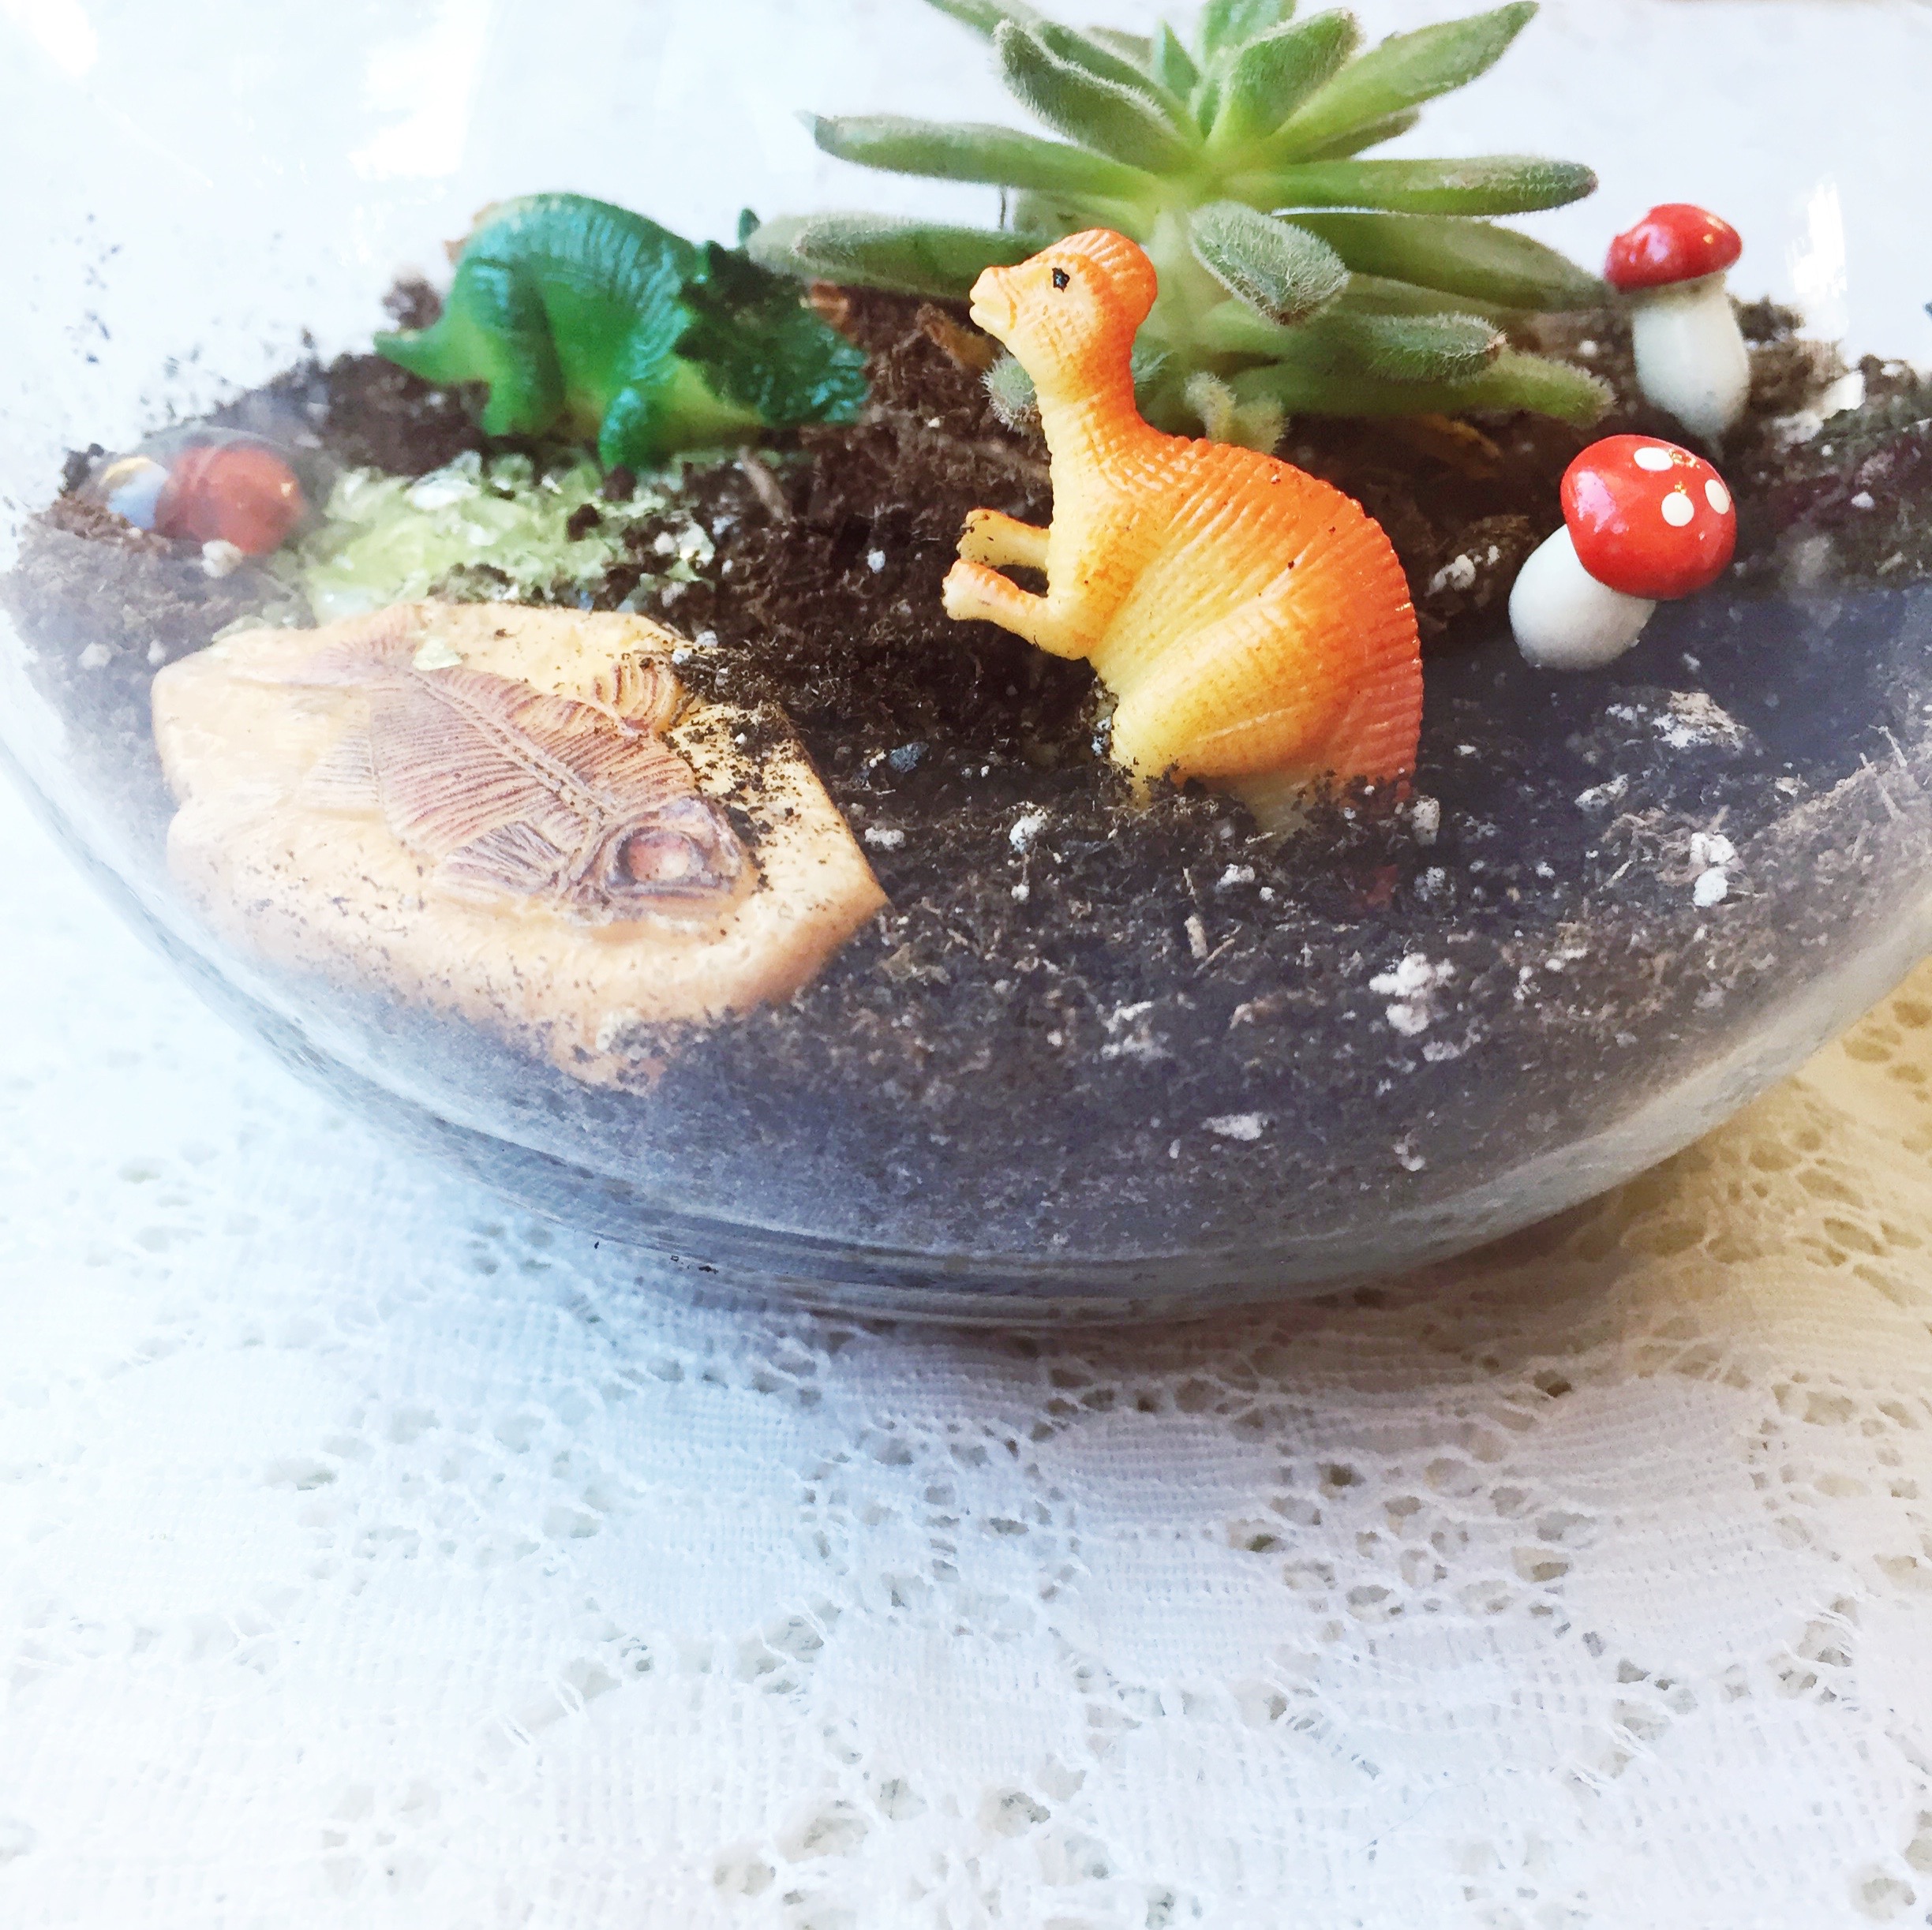
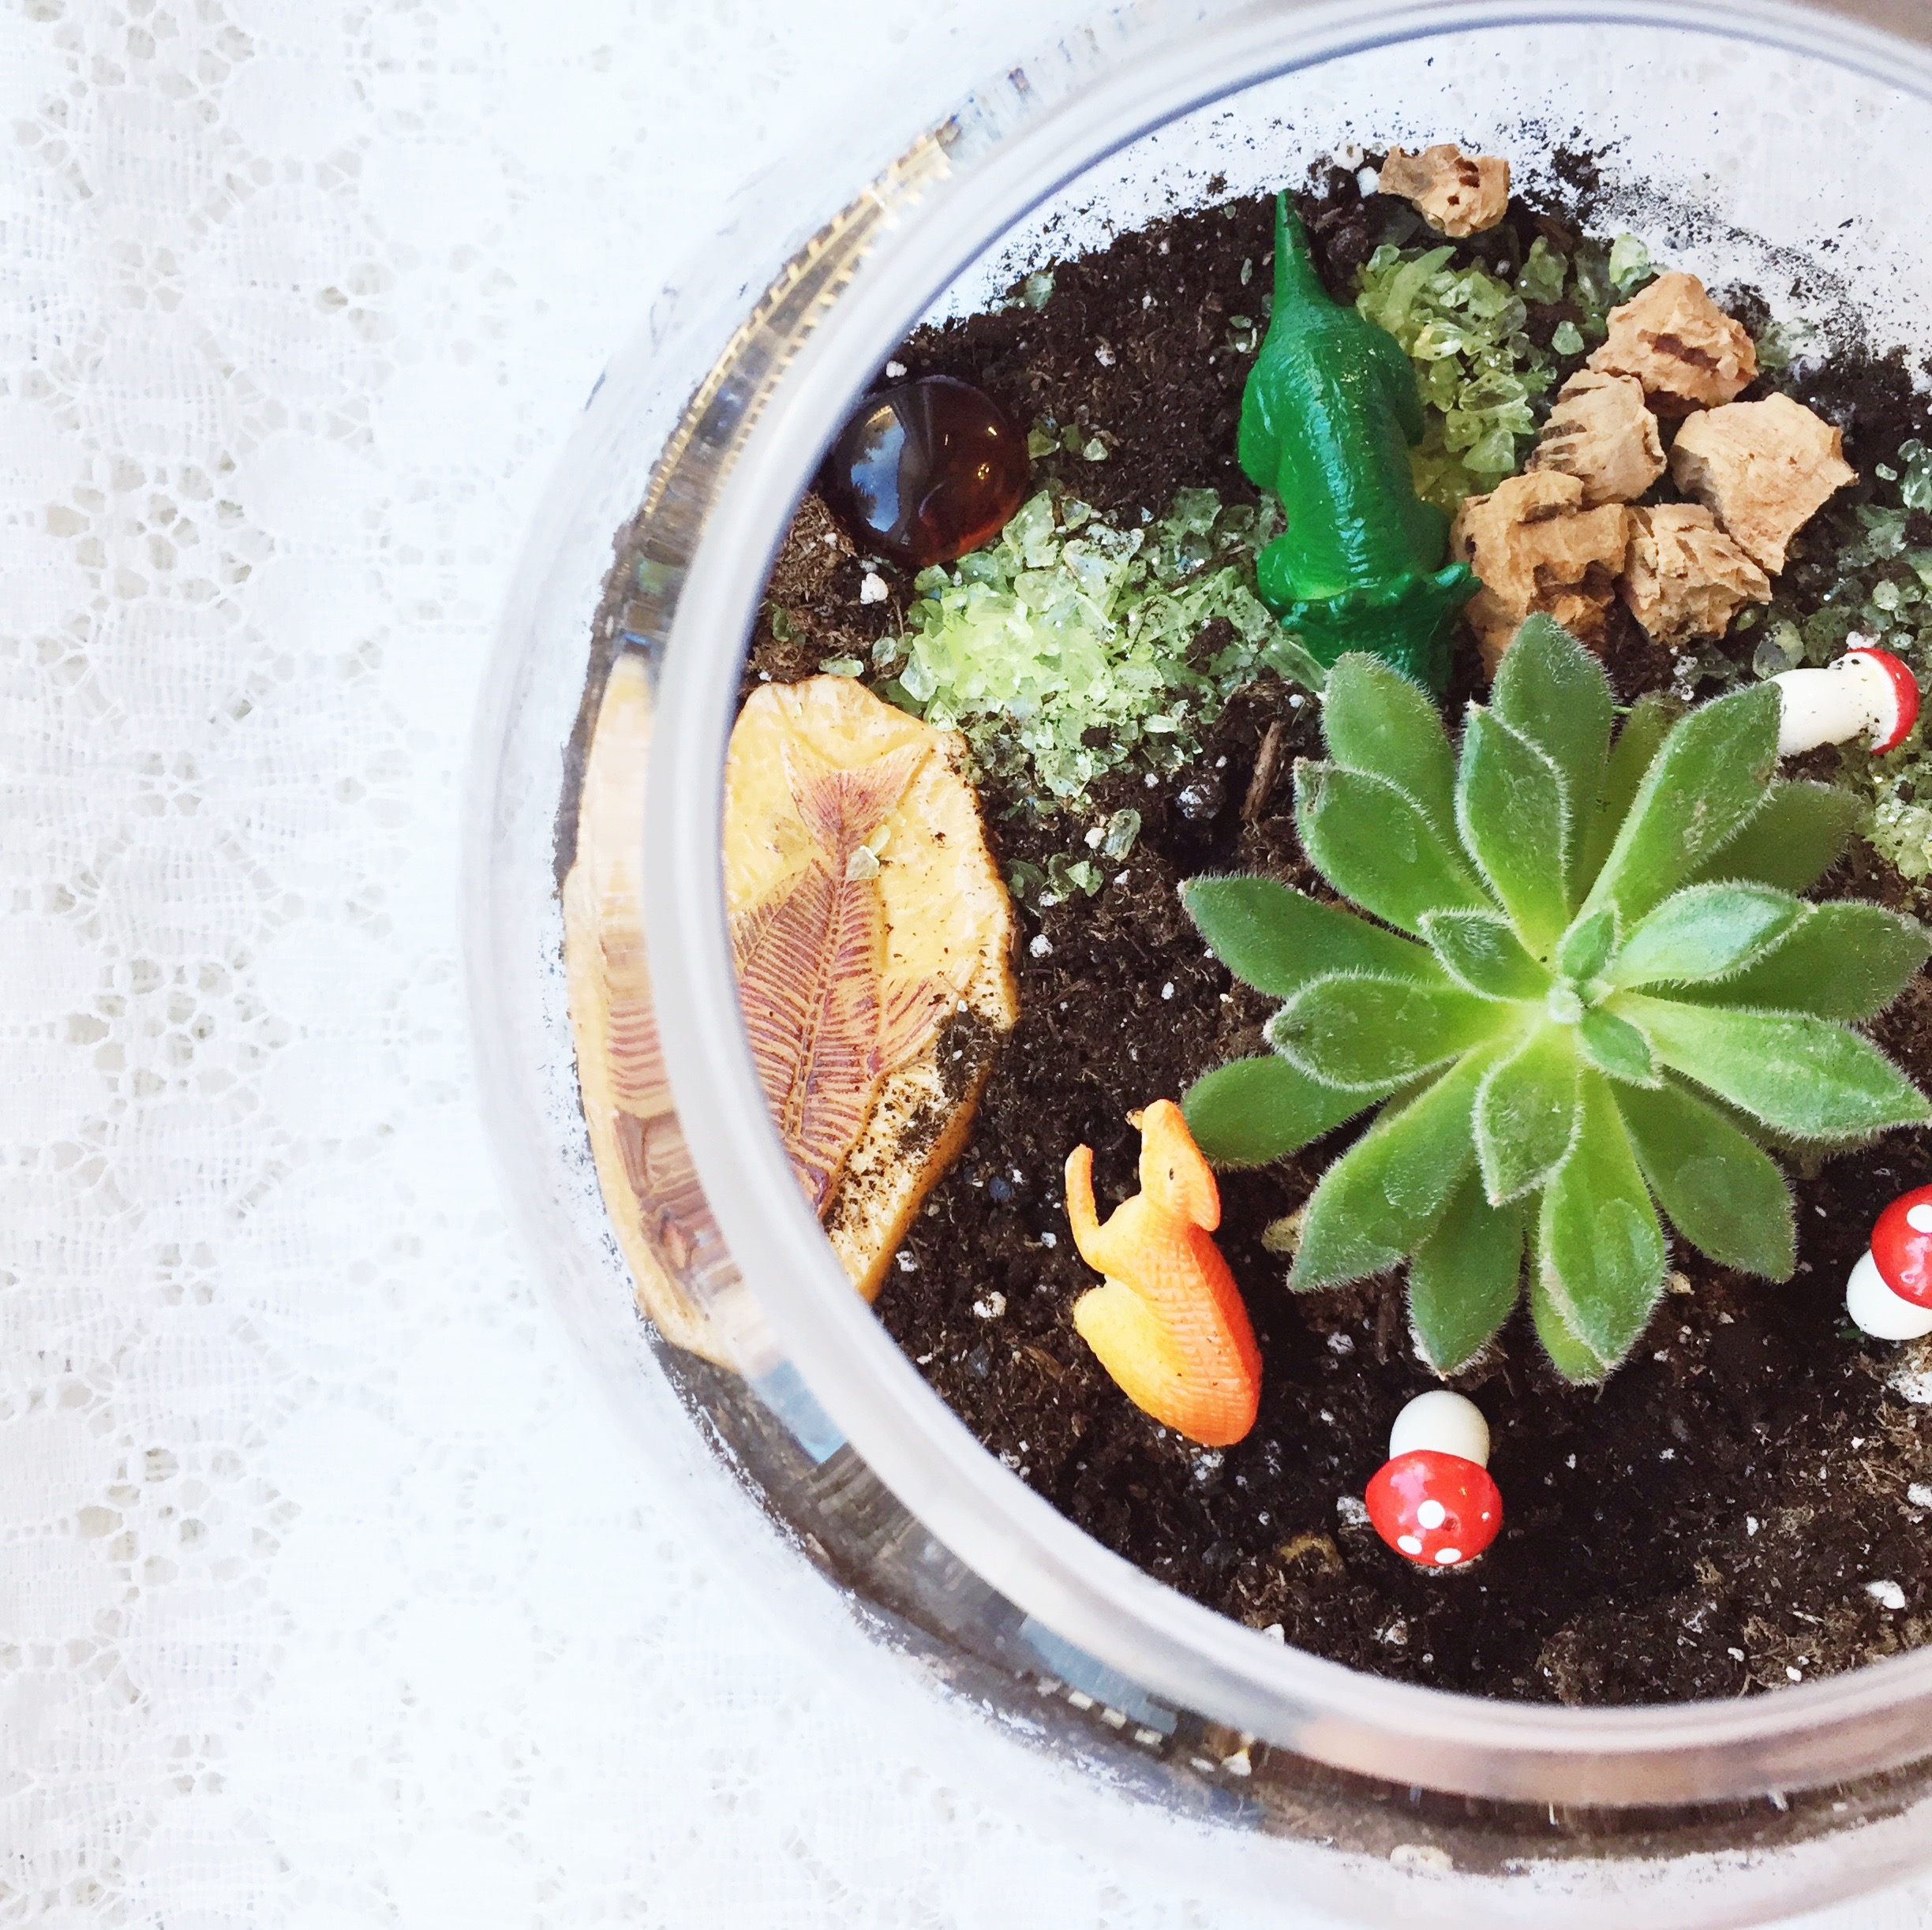
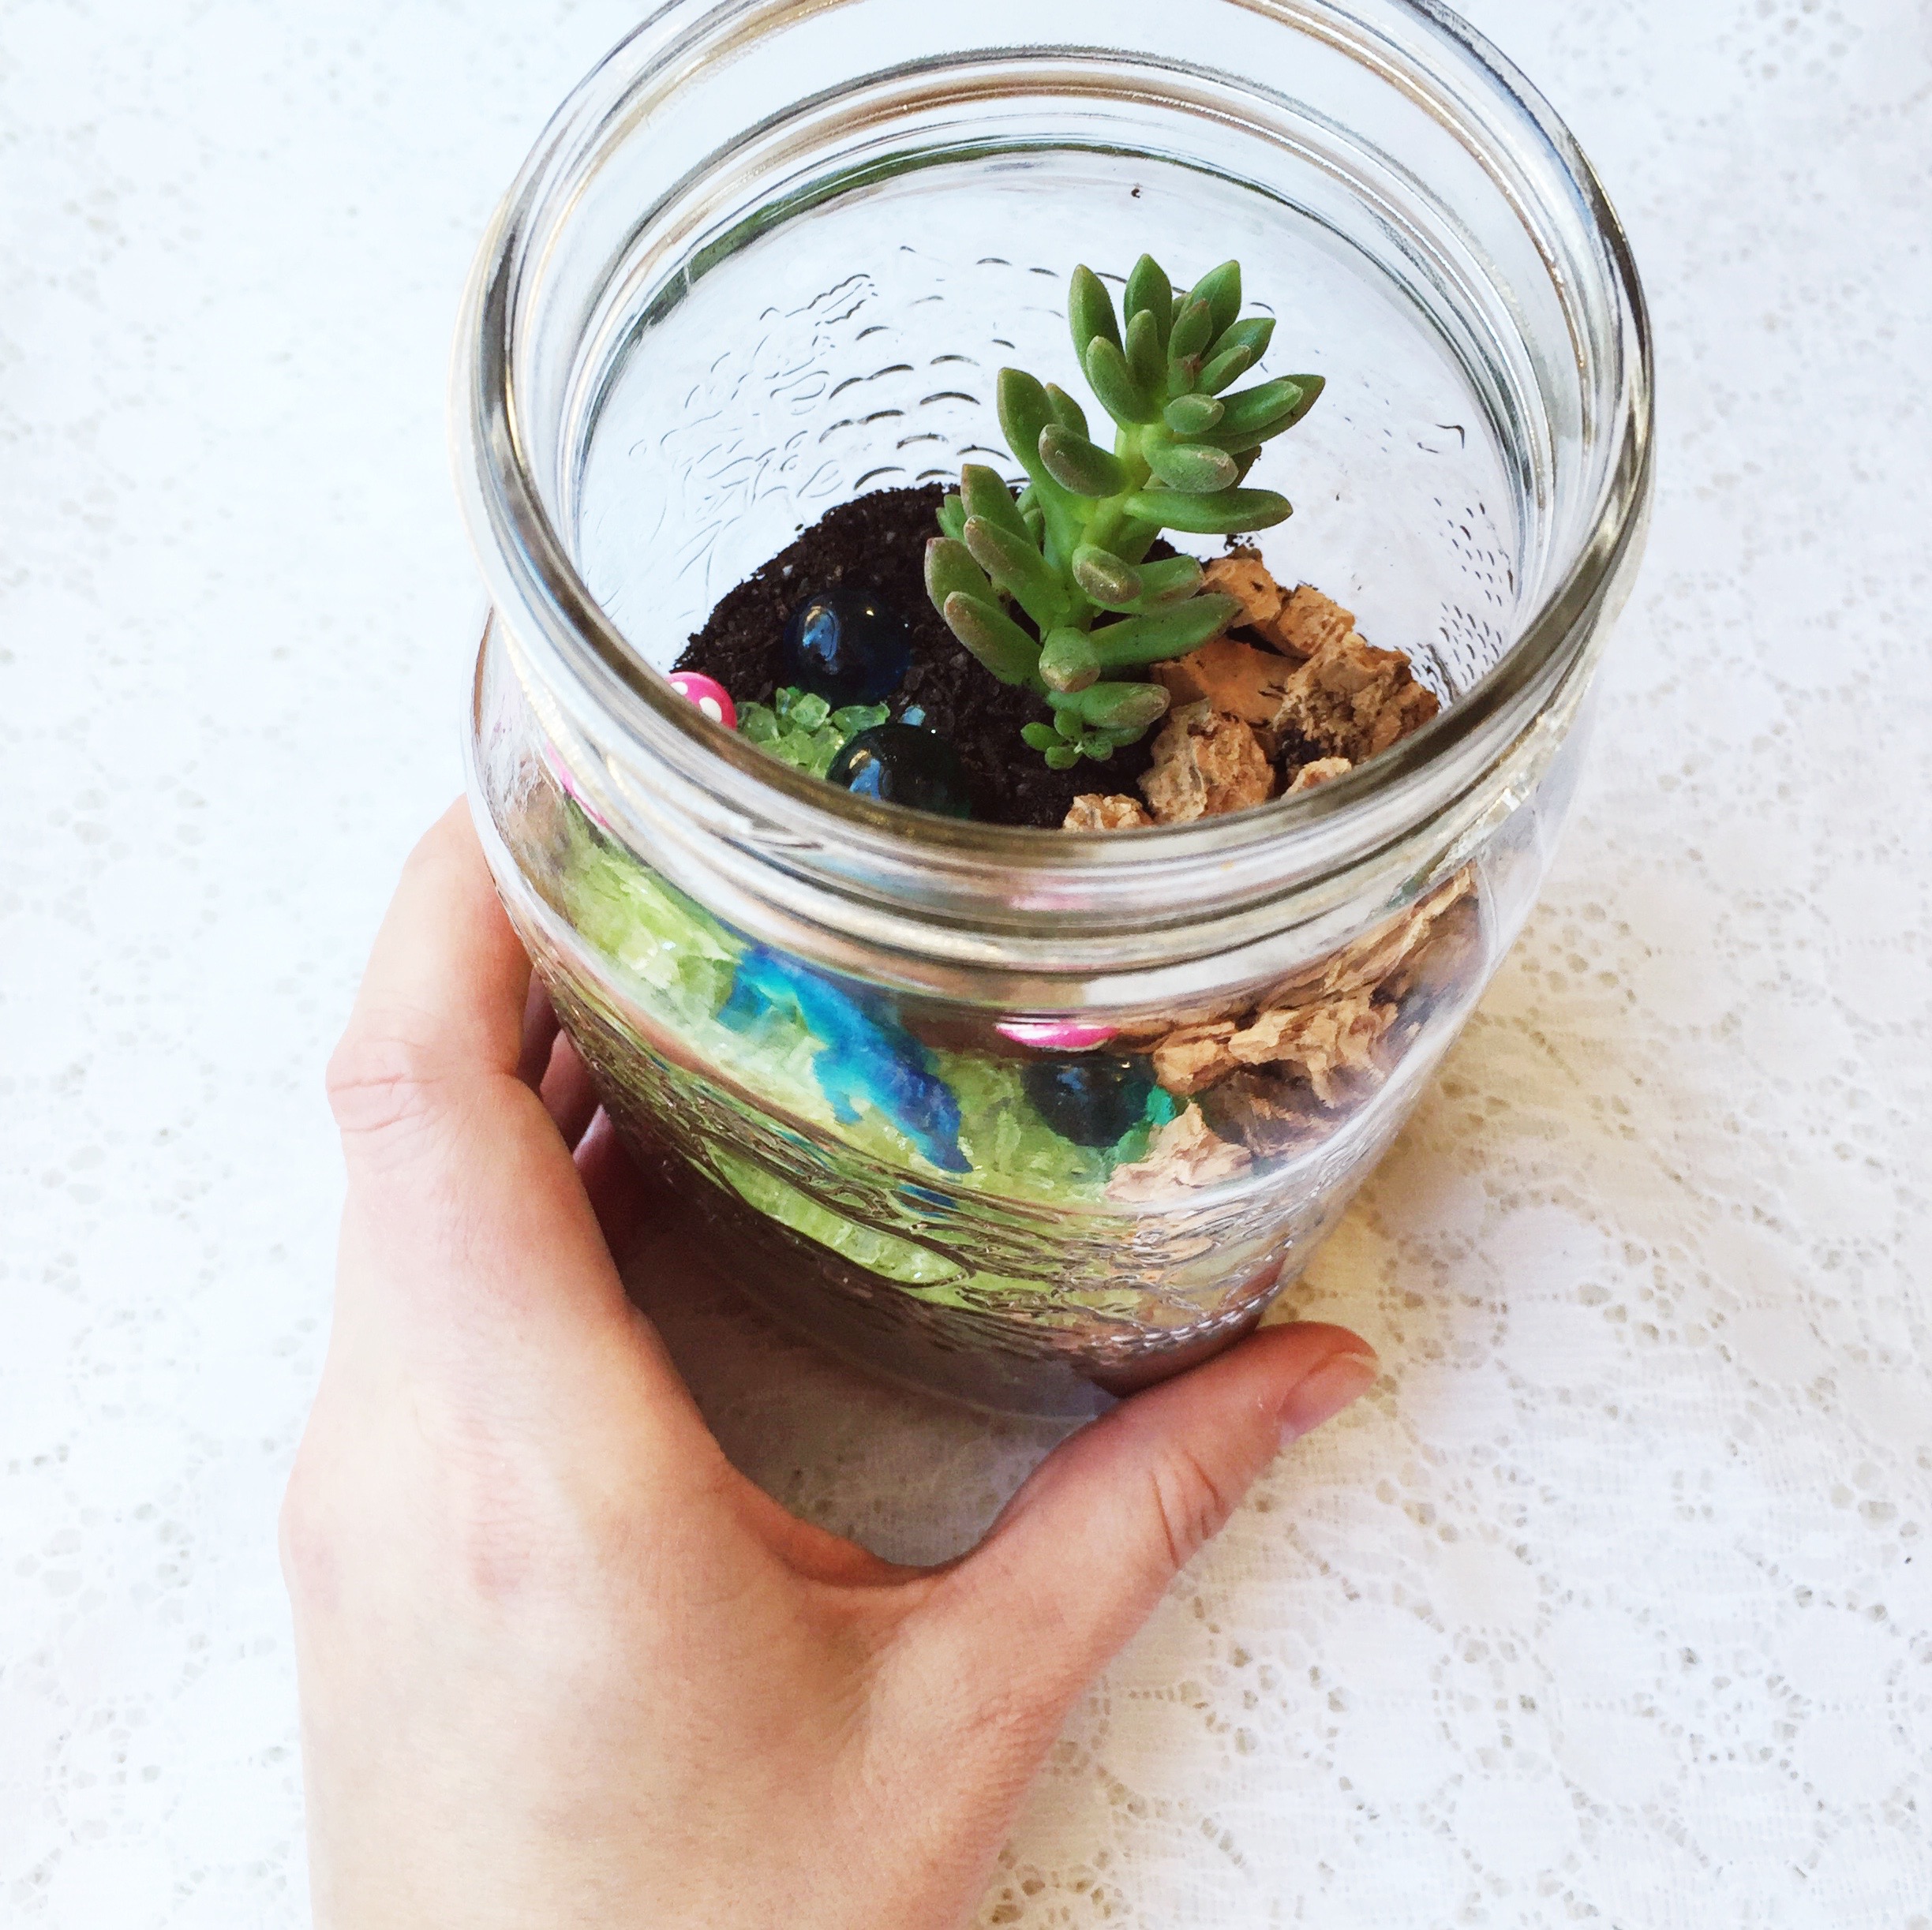
This was the second year in a row that Sam requested a Dino themed birthday party and when you’re kiddo is turning FIVE, you smile & embrace all the fun! Which for me, means diving into all the Dino Pinterest projects I’m constantly pinning.
I grew up in the age of birthday favors, but struggle a bit with them now as a mama. In the past, it has just been candy. This year, I really wanted something the kiddos could keep & enjoy. From that the Dino Terrariums started to take shape. I opted for spending more money on the favors, but made them serve dual duty as a party craft too.
Here’s a basic list of the items you’ll need {for any type of succulent terrarium}. We found many of these supplies at our local, specialty terrarium shop Plant:
- Glass container {any shape or size that you feel works}
- Small, pea-sized pebbles
- Activated charcoal
- Succulent soil
- Potting soil
- Small succulent
The above list gets layered into your glass container {1 inch of pebbles first, thin layer of charcoal, 1 inch succulent soil, 1 inch potting soil}. Determine the position of your succulent and make a small hole to place it in.
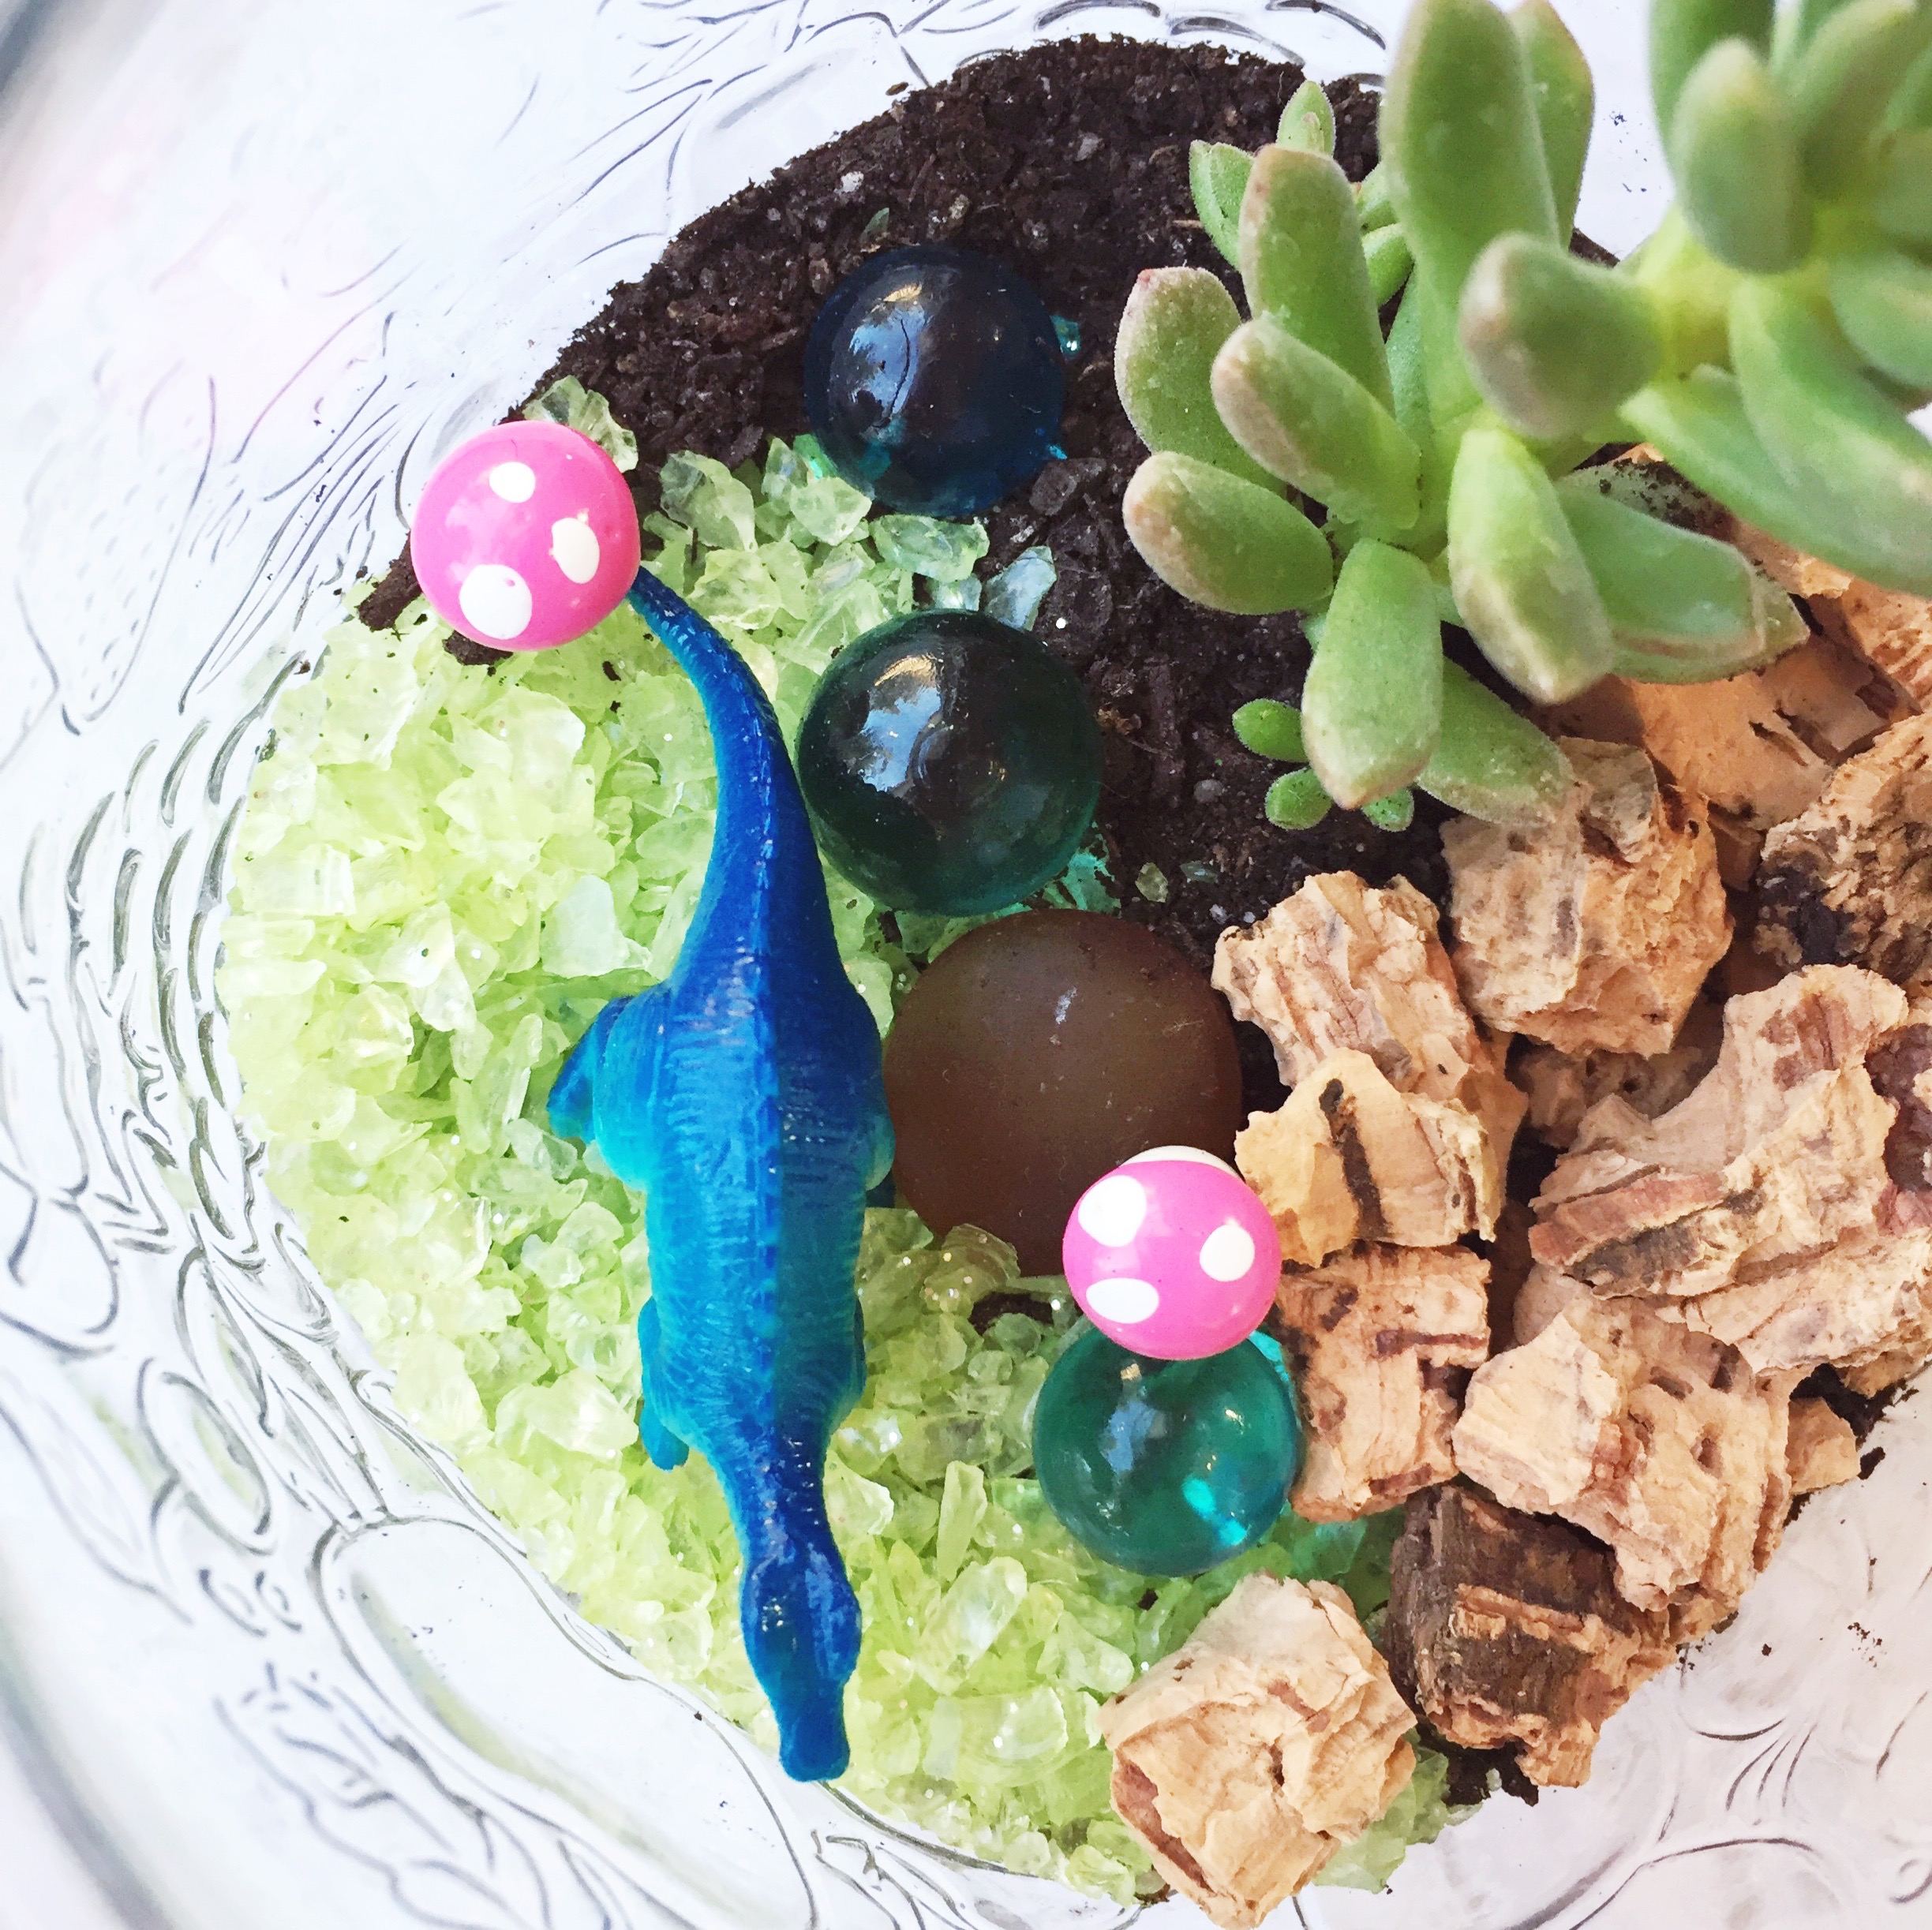
Next comes the fun part! All the landscaping & decorating. I just gave myself some time to hit up a couple of dollar stores and the craft store, shopping with an open mind. Get creative with it! Obviously, we were picturing some kind of Dino-scape, but you can easily alter it for any birthday theme {fairies, mermaids, Pokemon, cars/trucks, etc}.
I purchased a couple different sizes of dino sets, package of plastic fossils, bag of marbles, bag of glass plant pebbles, container of glitter rocks, canister of cork bits, package of tiny mushrooms, etc. Again, get creative with it!
If you’re doing this as a birthday party craft, here’s my suggestions:
- Have this setup at a table before the kiddos arrive
- Use a big plastic tablecloth for easy, quick tidying {we served cake at the same table}
- A second set of adult hands is extremely helpful
- Have one terrarium all complete so the kids can see what they’re making
- Put the various planting supplies in separate containers {large mason jars & buckets}
- Put the landscaping materials in separate containers
- Lay all the dinos & decorations on a baking sheet in the middle of the table, so the kiddos can easily pick their faves
- Show each step, then pass the supplies around the table {we did it with a group of 7 kids, who were extremely patient}
- Write out care instructions on small tags before the party
- As each kiddo finishes their terrarium, write their name on the flip side of the tag and simply set it in the container {then there’s no confusion during pick-up time at the end of the party}
And those care instructions… “Succulent Terrarium: sunlight, water every 2-3 weeks” Easy-peasy and no pressure on parents to care for them.
PS – The first Dino terrarium I tried, I used a large, wide-mouth mason jar {cause we have cupboards full of jars}, but it didn’t turn out so well. It was hard to see inside the terrarium, so I went on a hunt for glass containers. There’s plenty of affordable options, and honestly, the container is half the fun {at least for this mama}.
Happy making!
]]>
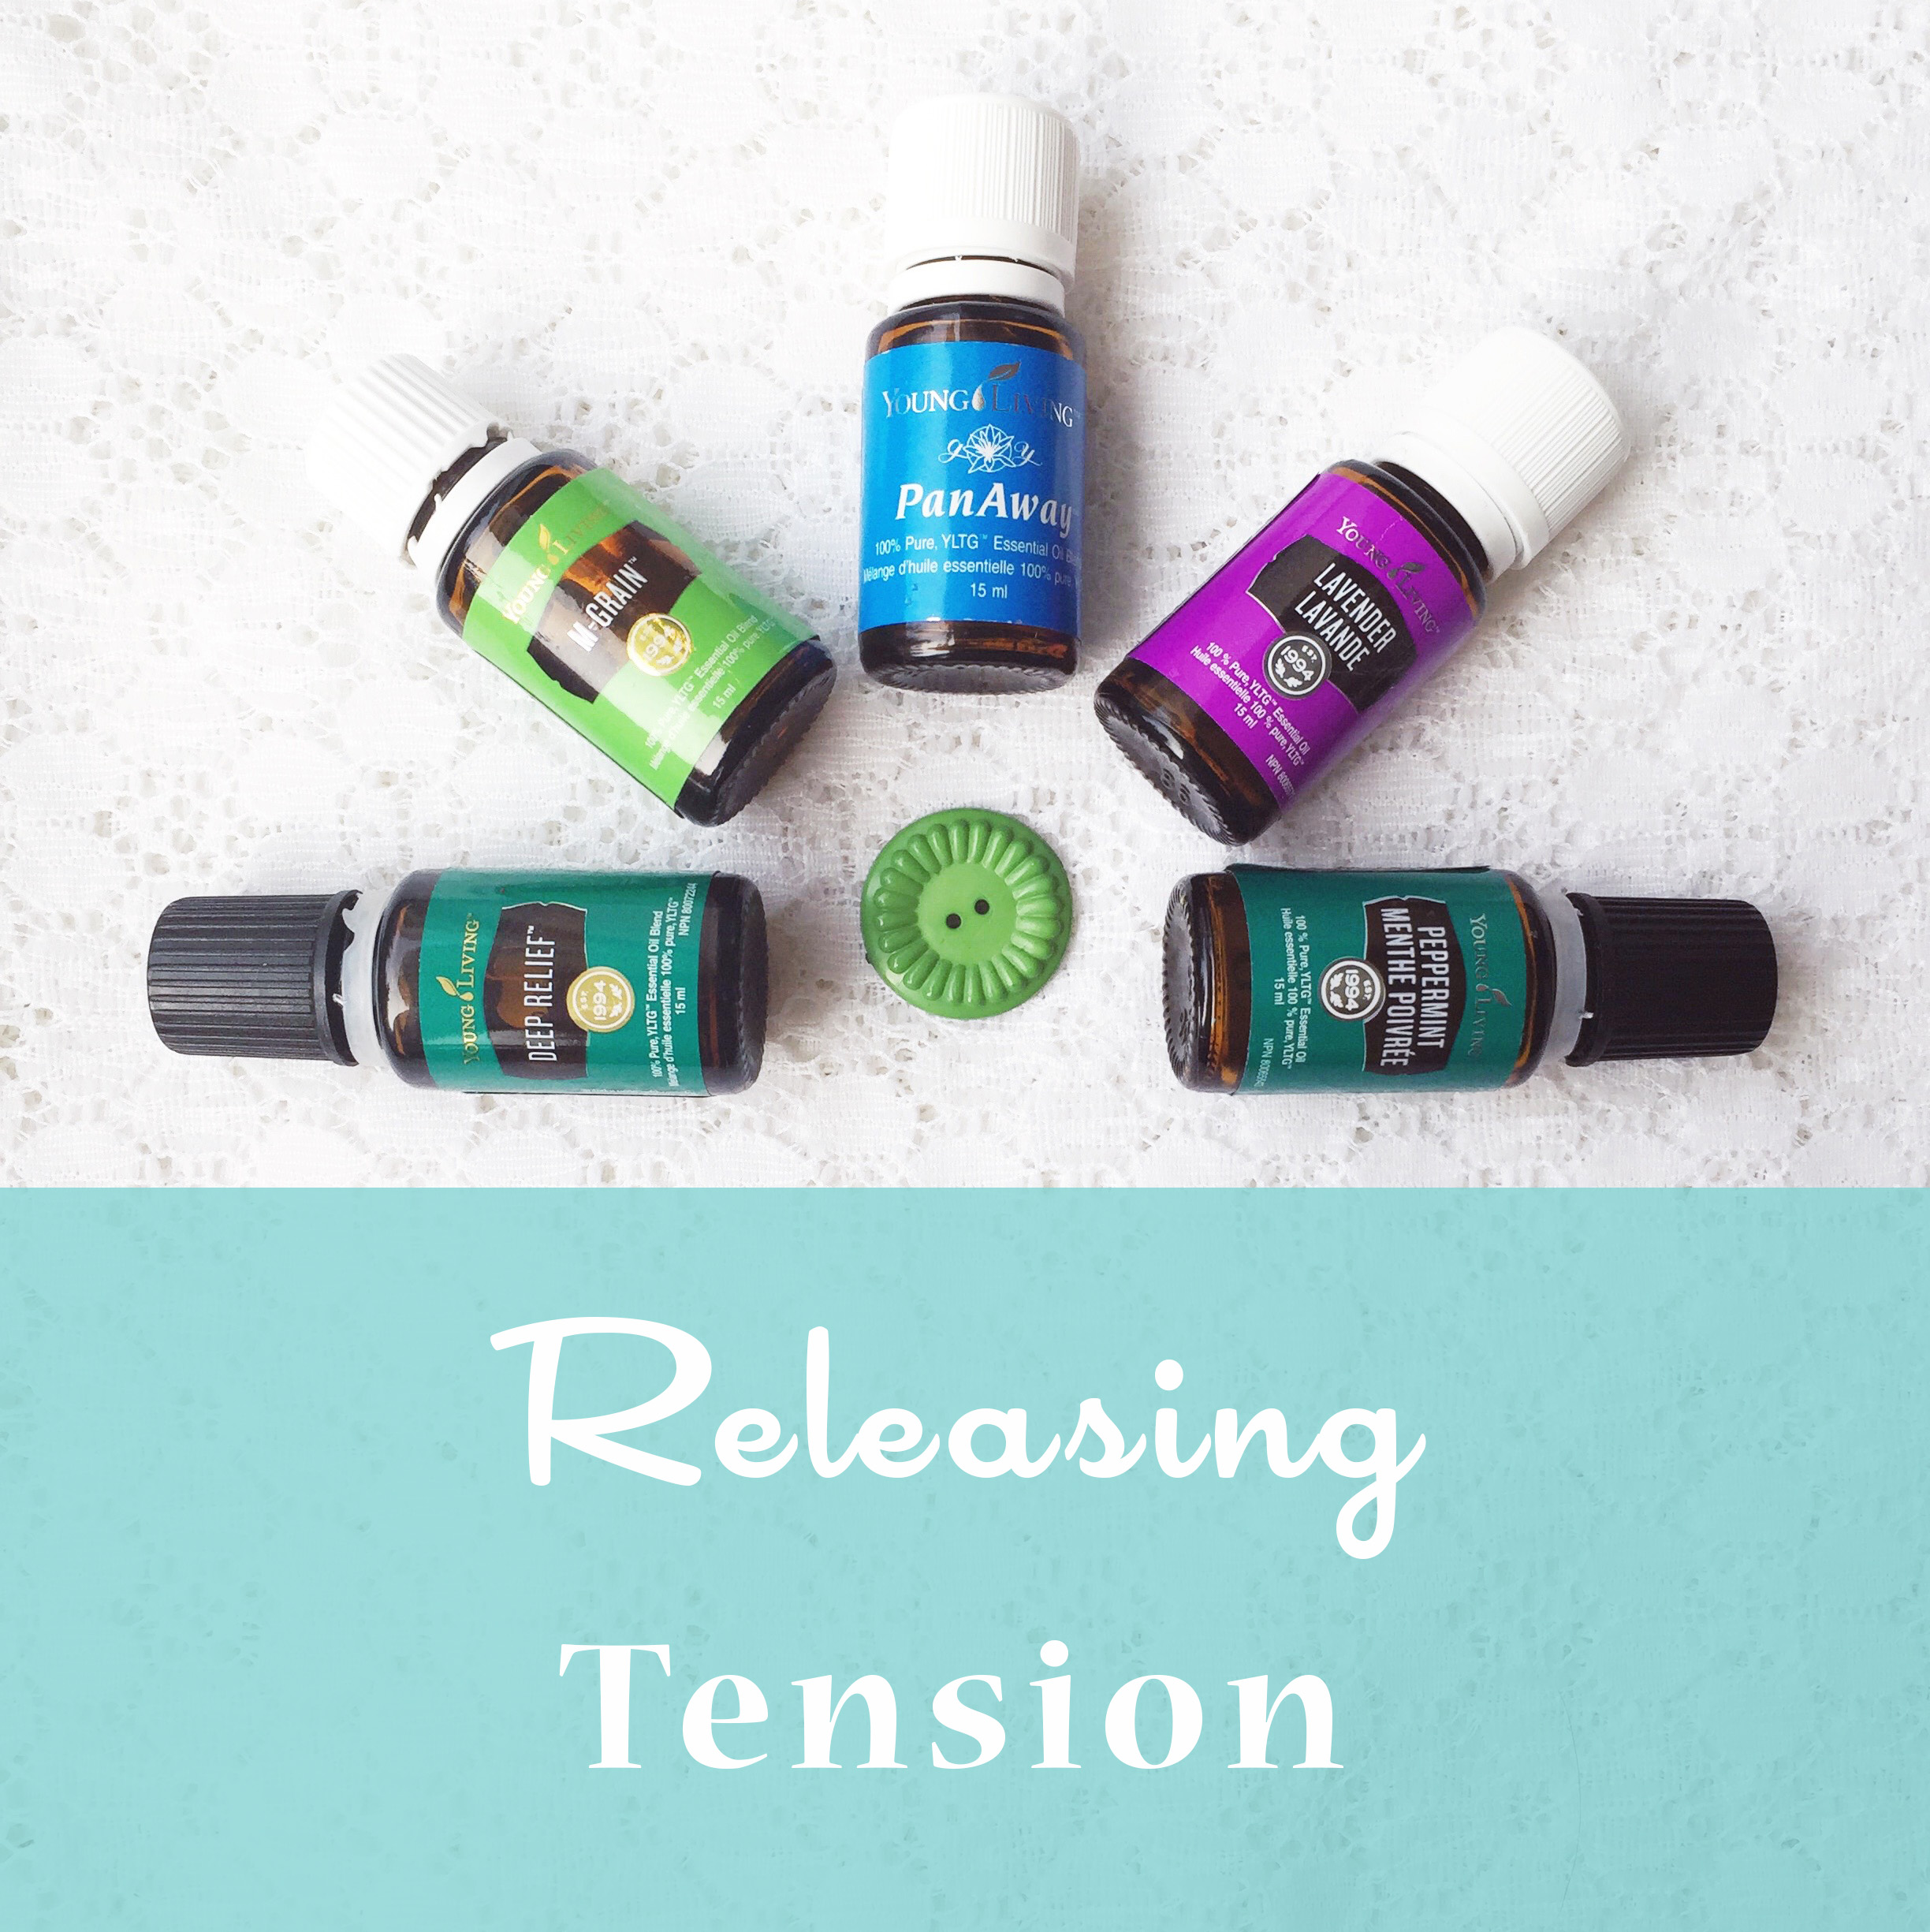
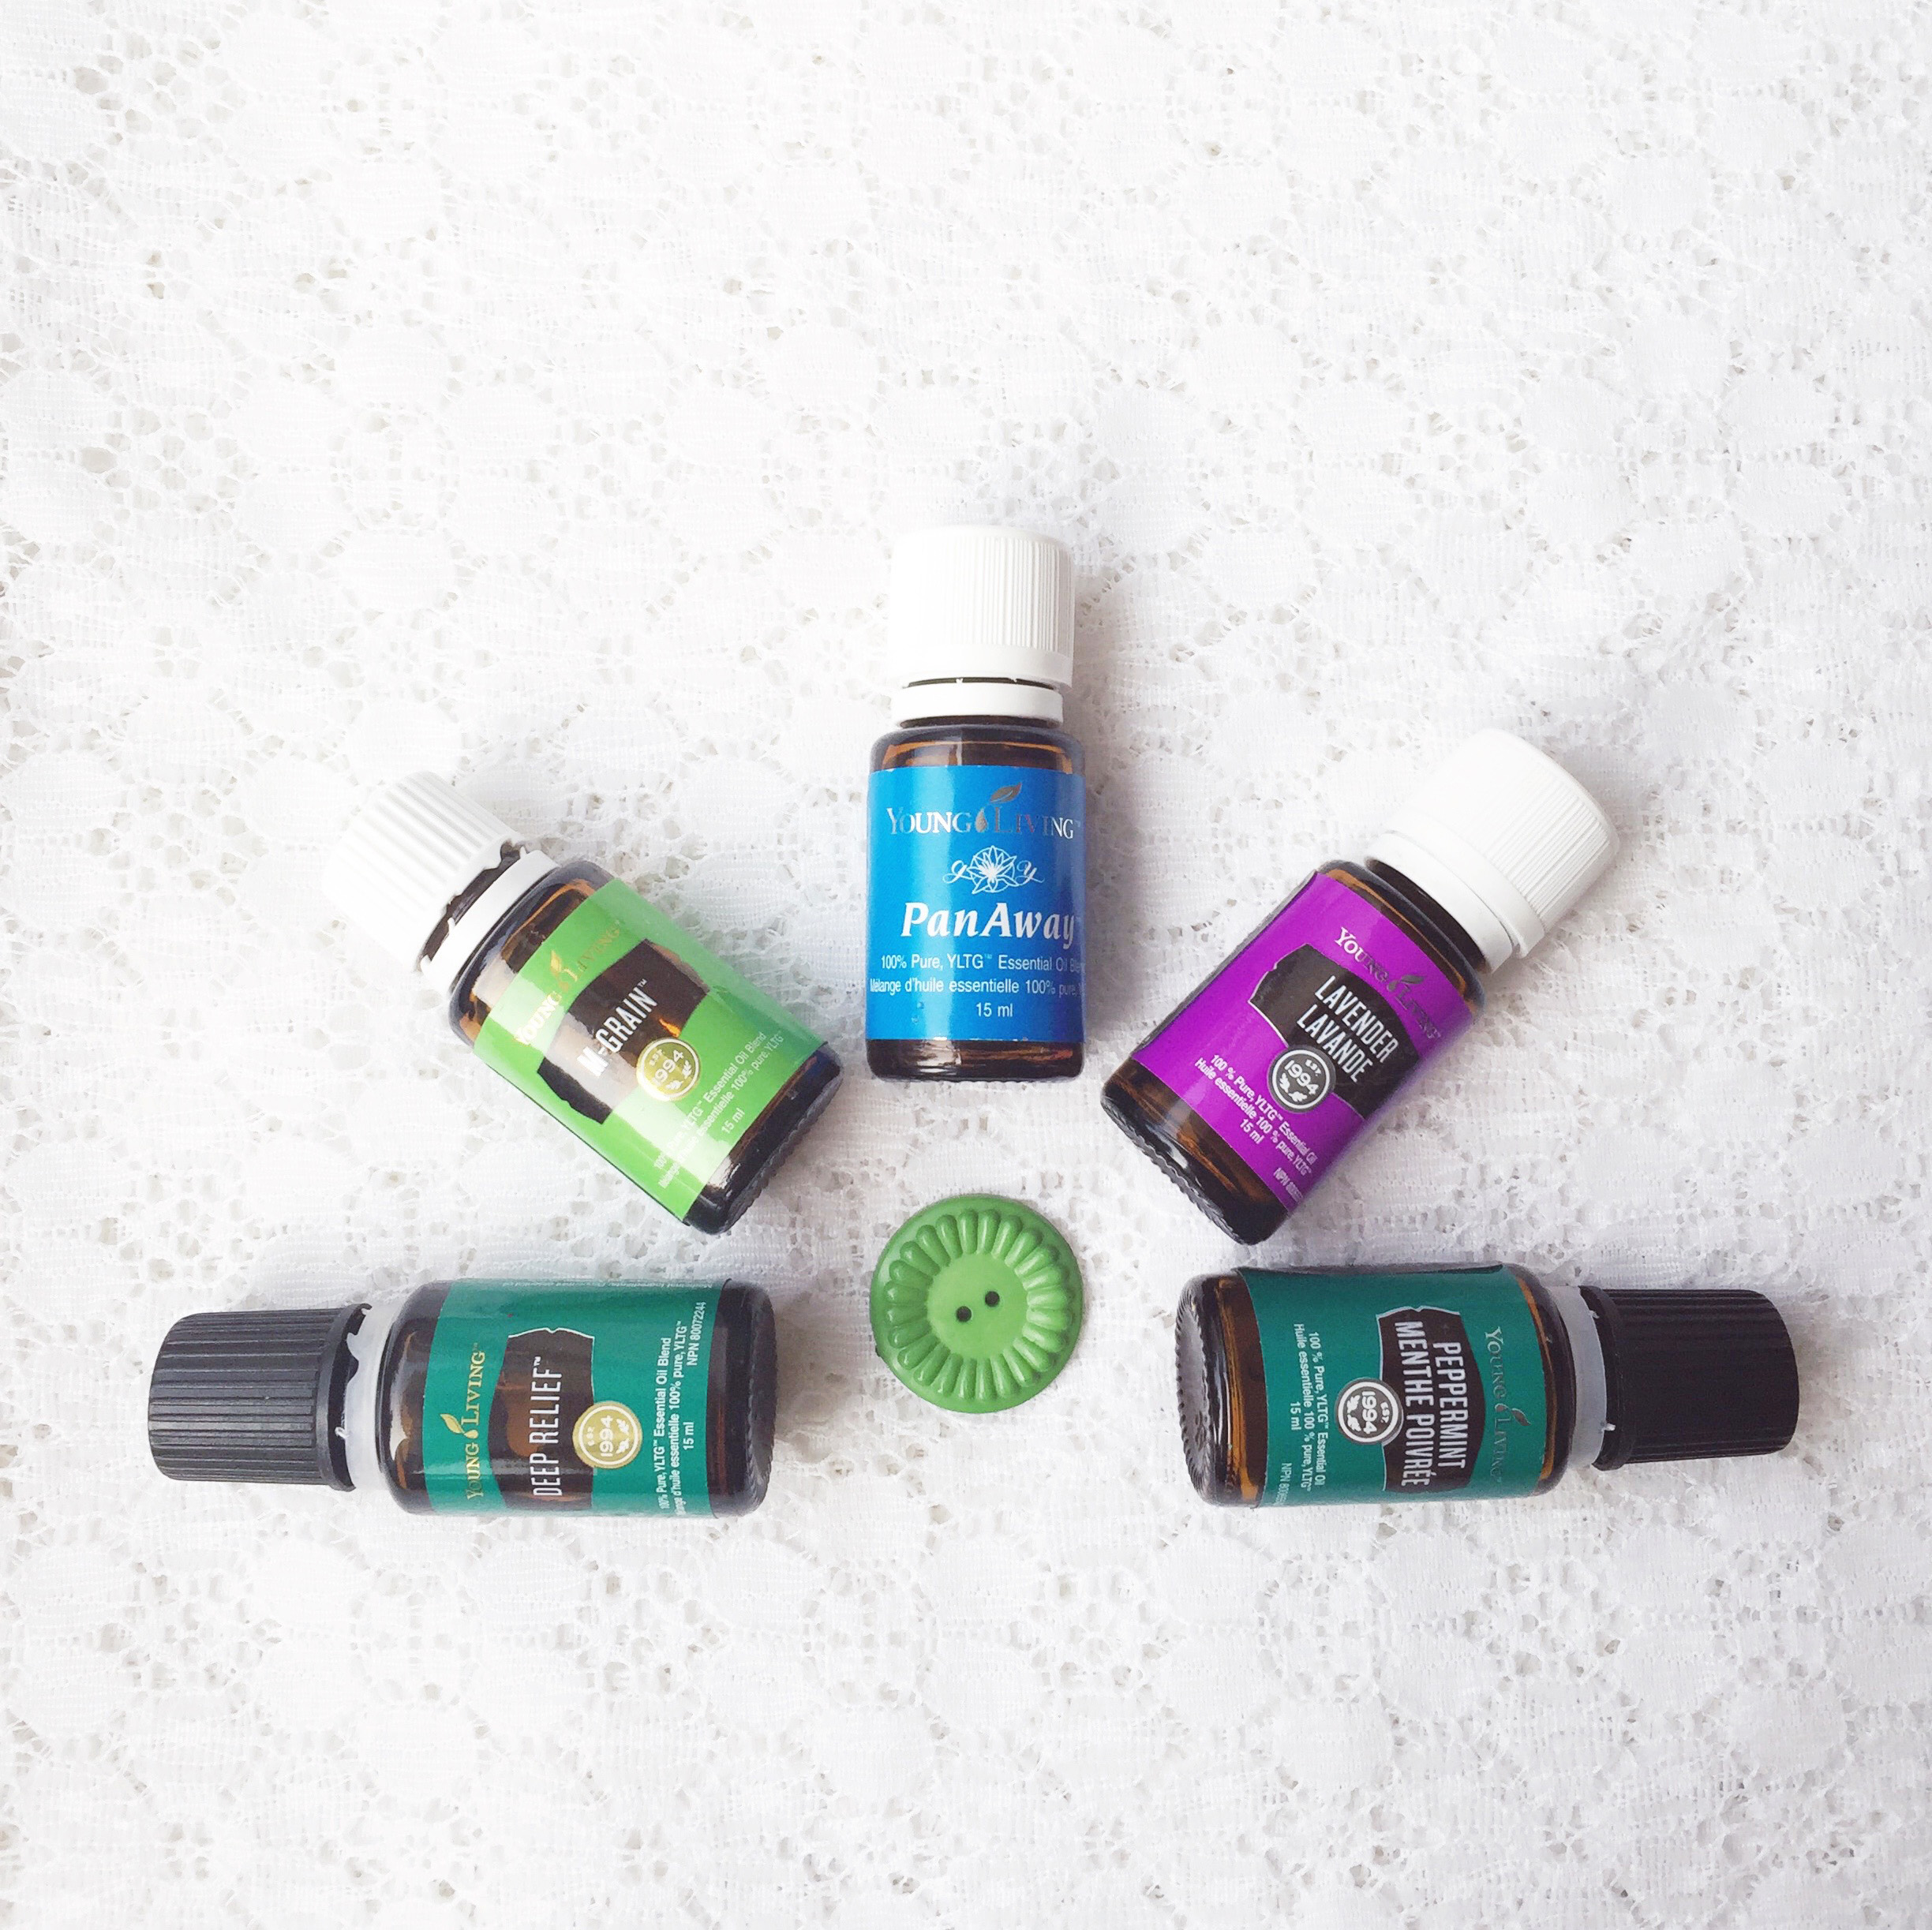
Ok, let’s face it. Lavender and Peppermint were my “gateway” essential oils. They were the two initial oils that got me hooked on trying more {and more}. And one of the many ways I used Lavender & Peppermint was for tension relief. Over the months, I’ve discovered a few more essential oils that work great for releasing different types of tension!
The two main types of tension I experience is muscle and headache related. Of course, there’s also emotional tension in life {which you can try alleviating by diffusing oils blends like Release, Gentle Baby, and Stress Away}. Today, I’m focusing on the physical, muscle tightness & tension, which can, in turn, bring on headaches.
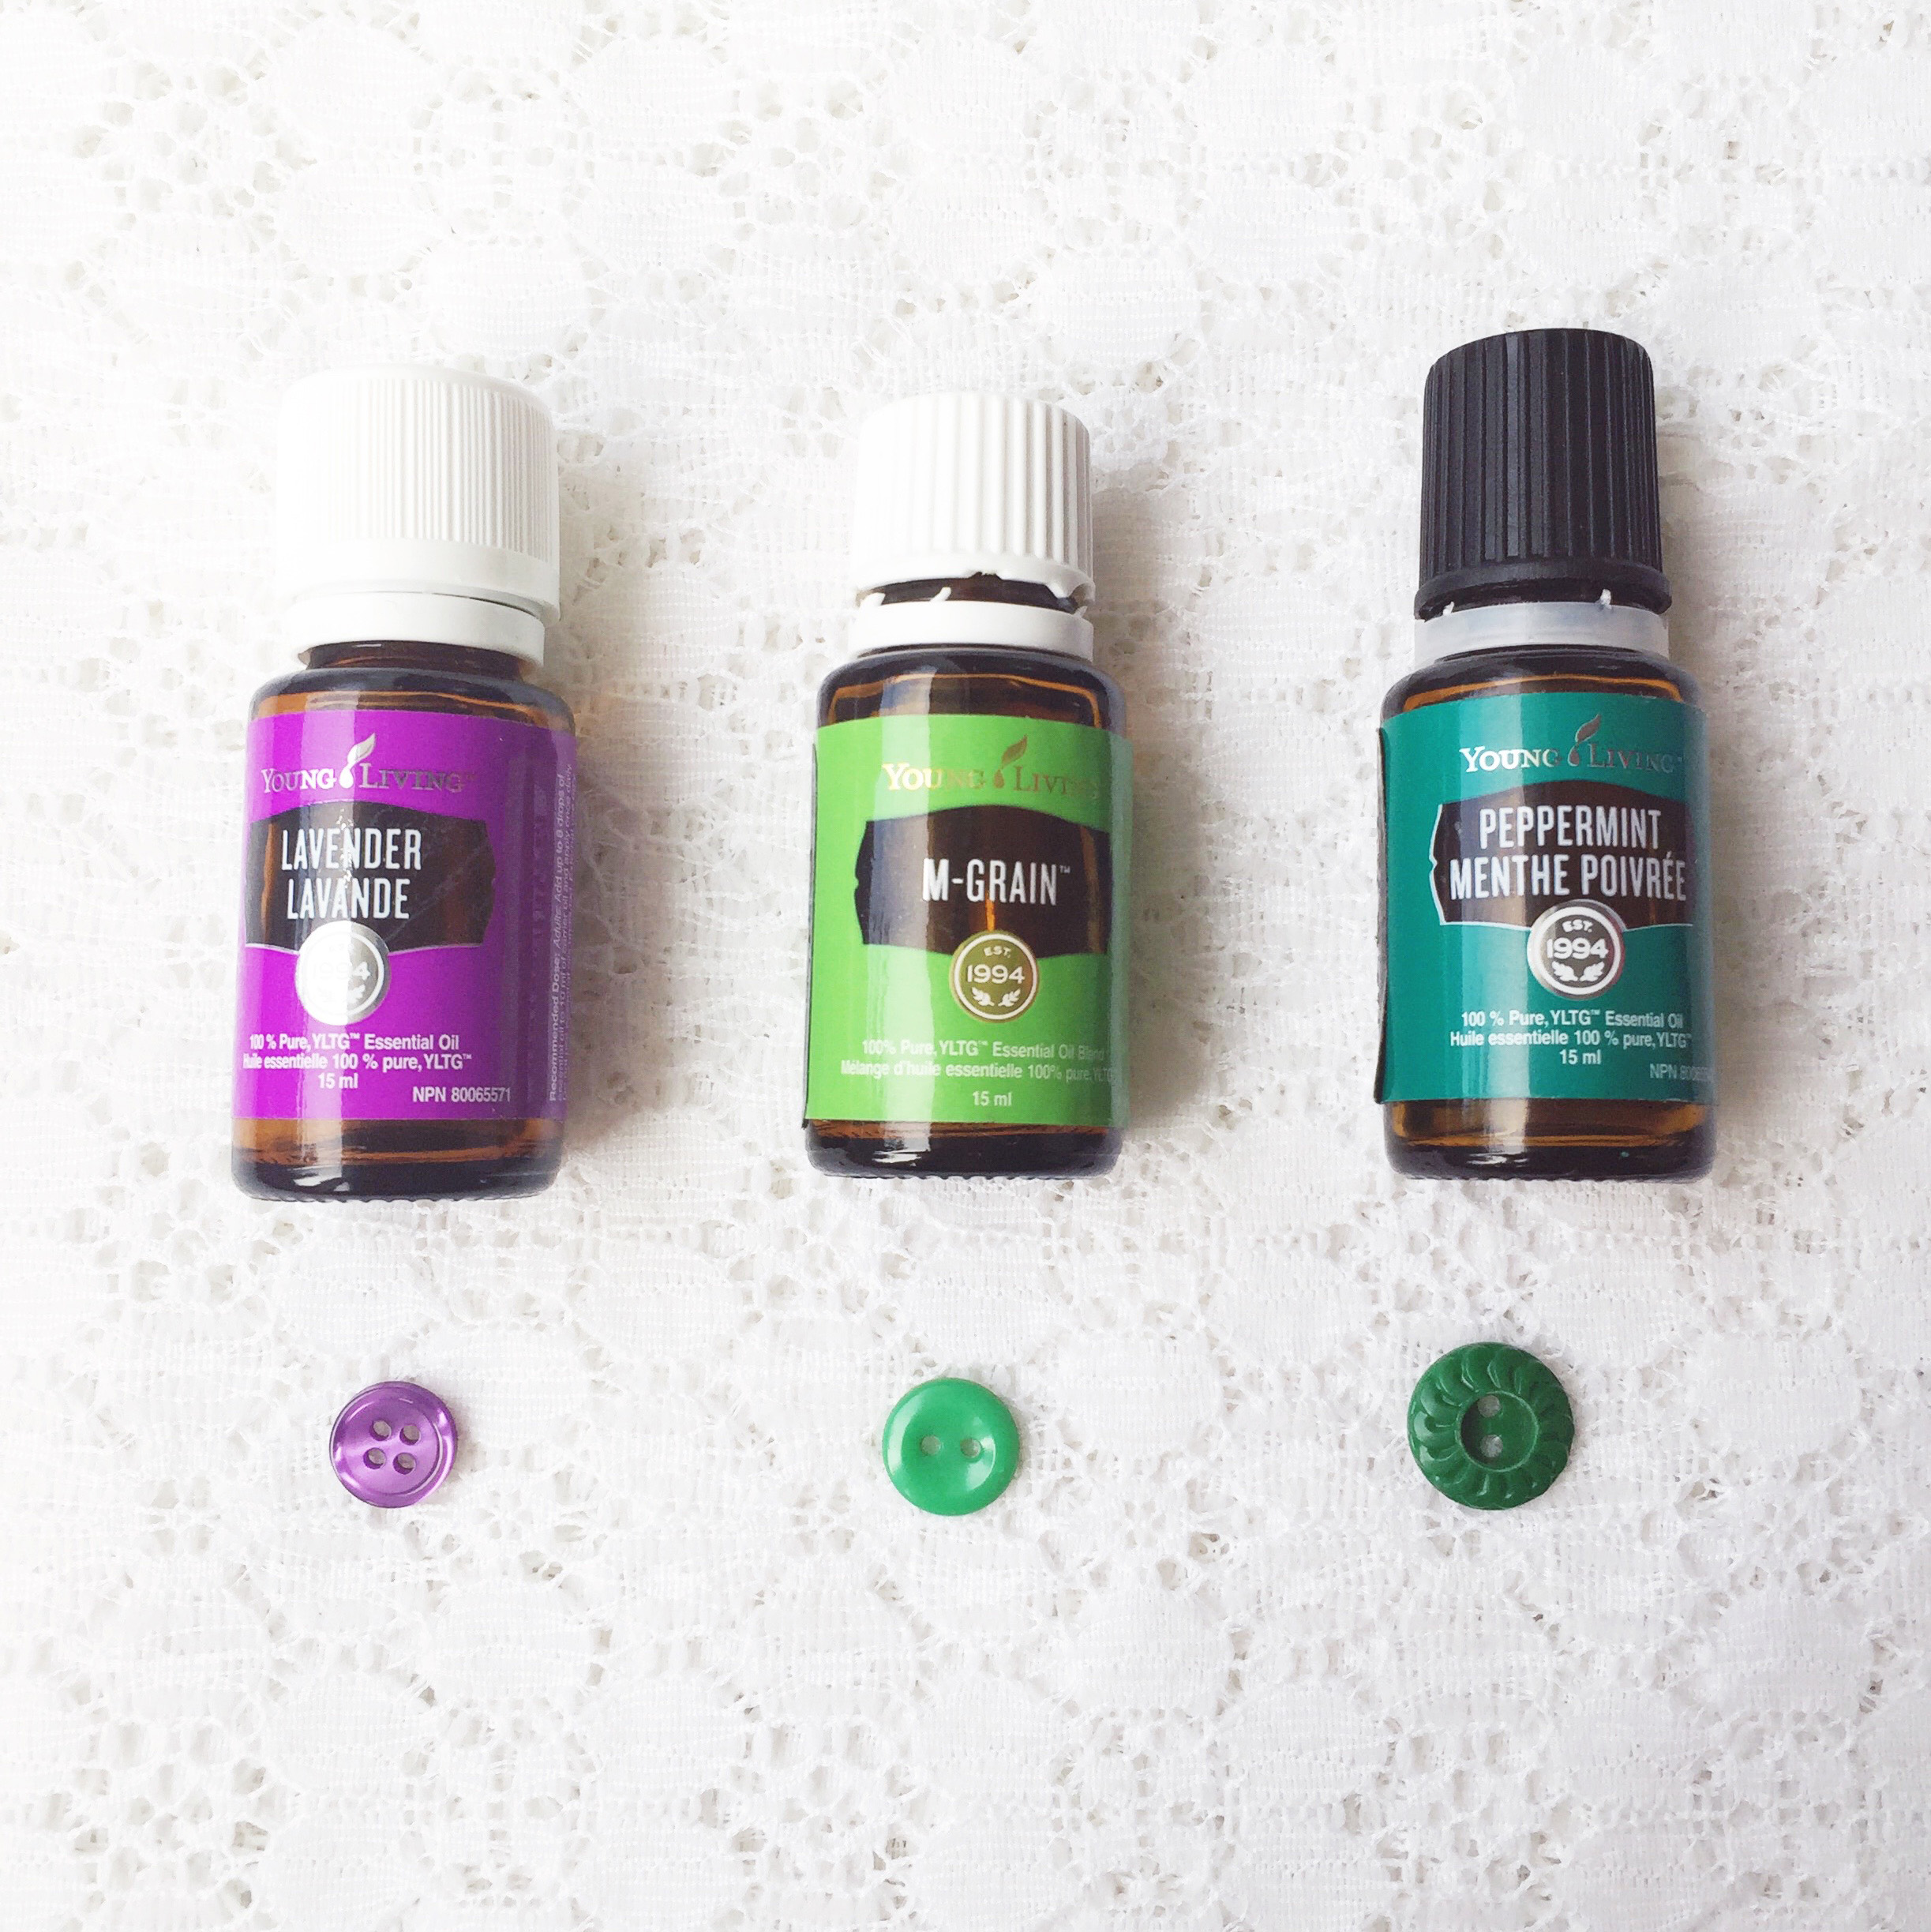
My main go-to for minor/mild headaches and neck tension is Peppermint oil. My hubby and I both carry a bottle of Peppermint around with us all the time. Yep, you read the right. I’ve got my hubby hooked on the usefulness of oils too! We put roll-on tops on our Peppermint oils, so that we can easily apply them on the back of our necks and across our shoulders. An interesting fact, some people experience Peppermint as a “hot oil” meaning it feels warm on the skin, and others, like myself, experience it as a cooling oil. When I need to cool down in a crowd or when I come in from a hot summer day, I put on some Peppermint oil.
Sometimes, my headaches turn into Migraines. Migraines suck BIG time. I generally have to hit up my Excedrin {modern medicine has its place}, but early on I apply M Grain essential oil blend. It is a hot oil, so use sparingly. I put two drops on a cotton pad, and gentle wipe it along the back of my neck and on my temples {but away from my eyes}. *If you ever get essential oil where you don’t want it, or it starts feeling uncomfortable, rub a little coconut or olive oil onto your skin.* After I take my Excedrin, I like to put a couple drops of Lavender oil on a cool cloth and place on my head.
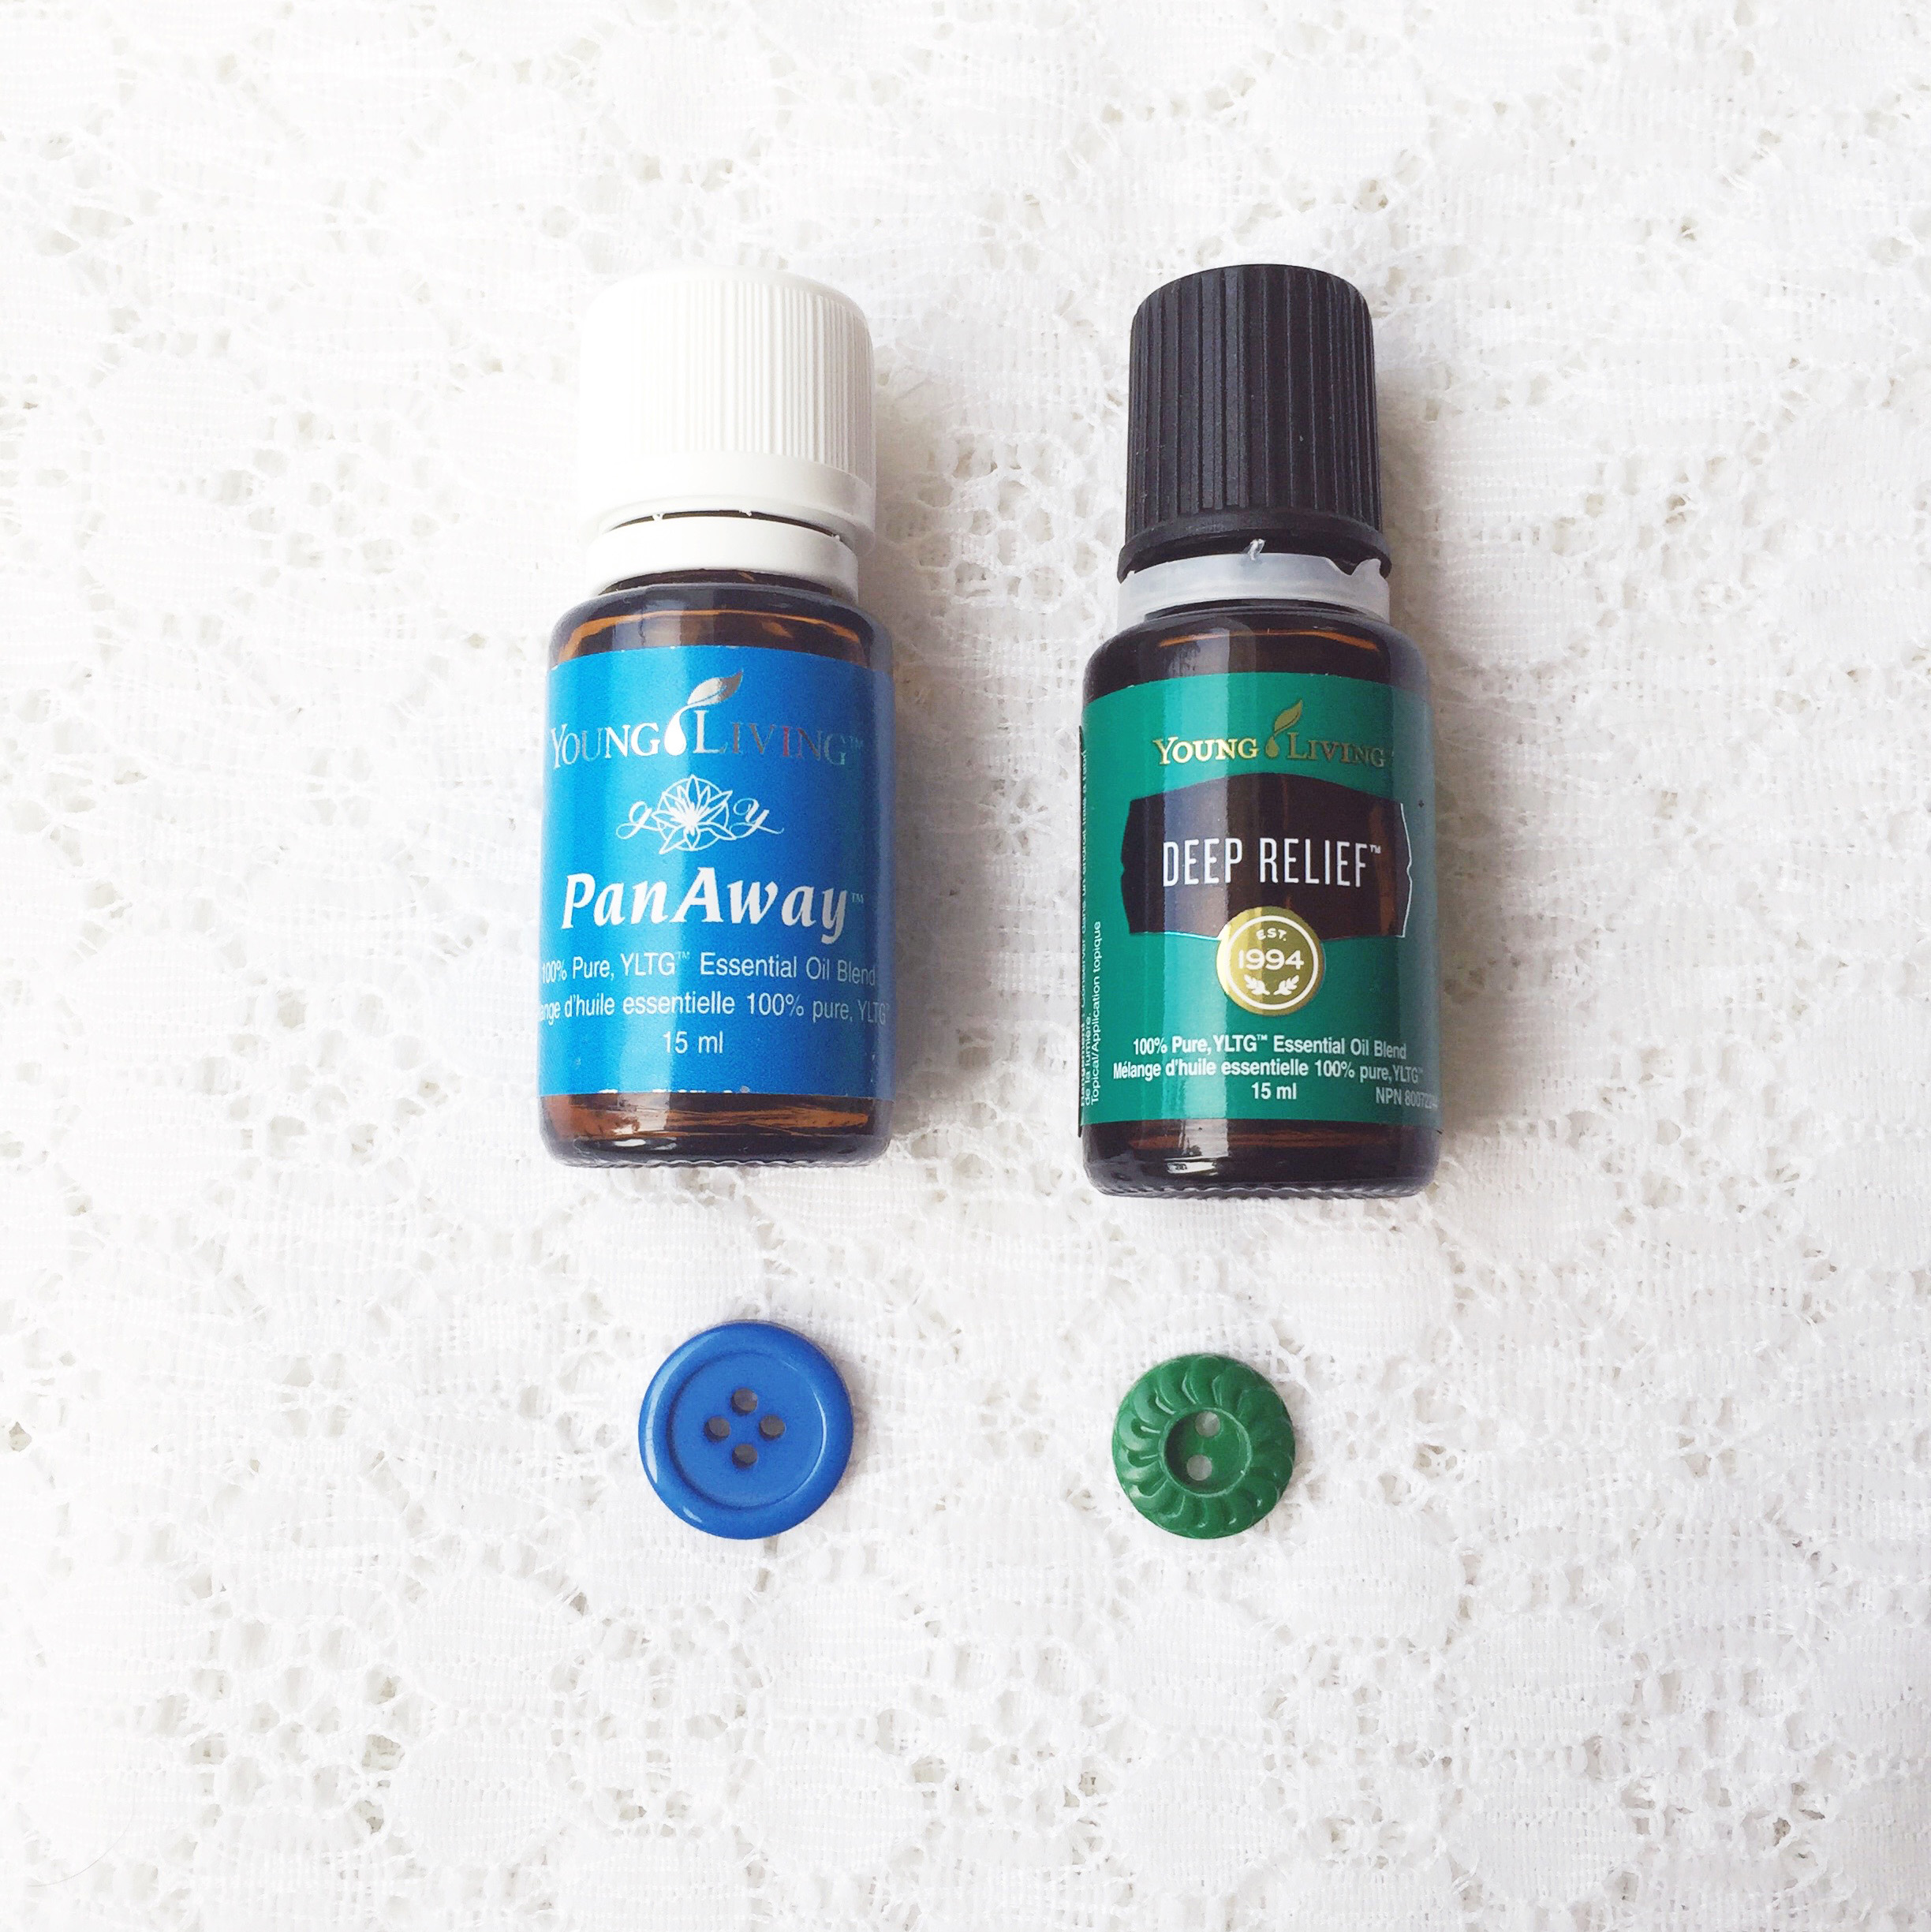
For deeper muscle tension relief {aka I had an awesome, but painful workout}, PanAway oil blend is AMAZING! I have a little roll-on bottle of it, diluted with coconut oil, that I use on knotted or strained muscles. You can roll-it on and massage it in. I do recommend diluting it with a carrier oil, as it can be a bit uncomfortable applied directly on. Side note – I diffused PanAway once and discovered it smells exactly like Rootbeer. Seriously.
There’s also quite a few blends you can make for yourself, which include PanAway oil for muscle tension relief. Just poke around on Pinterest. I have my Relax Away Bath Salts recipe up on the blog too.
I recently purchased and started using Deep Relief. It was recommended as a great blend for using right after a workout to refresh muscles and keep muscle groups from tightening up later. I might start using this on my Deadlift day, as I’m finding my Trapezius muscle getting exhausted, & tightening up more regularly at the heavy weights. Anyway, I fitted my Deep Relief bottle with a roll-on top and it is comfortable enough to apply directly.
If you are looking for some good alternatives to store-bought muscle rubs and Tylenol, I definitely suggest giving these oils a try. They have become staples in our oil collection. I don’t think I could live without Peppermint oil {I even carried a bottle of it around at Disneyland}!
Also, sharing an added BONUS today!
Sciatic Relief
10 drops Thyme oil
8 drops Wintergreen oil
4 drops Lavender oil
3 drops Peppermint oil
5 drops PanAway
Fill remaining 10ml bottle with fractionated coconut oil. Insert roll-on top. Roll and massage into sciatic area {aka good for the butt}.
Happy Oiling!
]]>

In my quest to use more natural products, I switched to a face serum a couple years ago. It felt great on, provided the moisturizing I needed in our dry climate, and smelled amazing. Until the oils went rancid, that is. I generally got through about 3/4 or 2/3 of a bottle before the oils went bad, even using it daily. Although I thoroughly enjoy supporting local, I decided to try my hand at making my own face serum, so I could make very small batches & hopefully waste less in the long run.
To figure out a good face serum for myself, I did some reading. We each have different skin types and needs for our skin health, so it’s worth deciding for yourself, which oil base & essential oils to use. I’ll be sharing my recipe, but you can easily adjust it for different skin types.
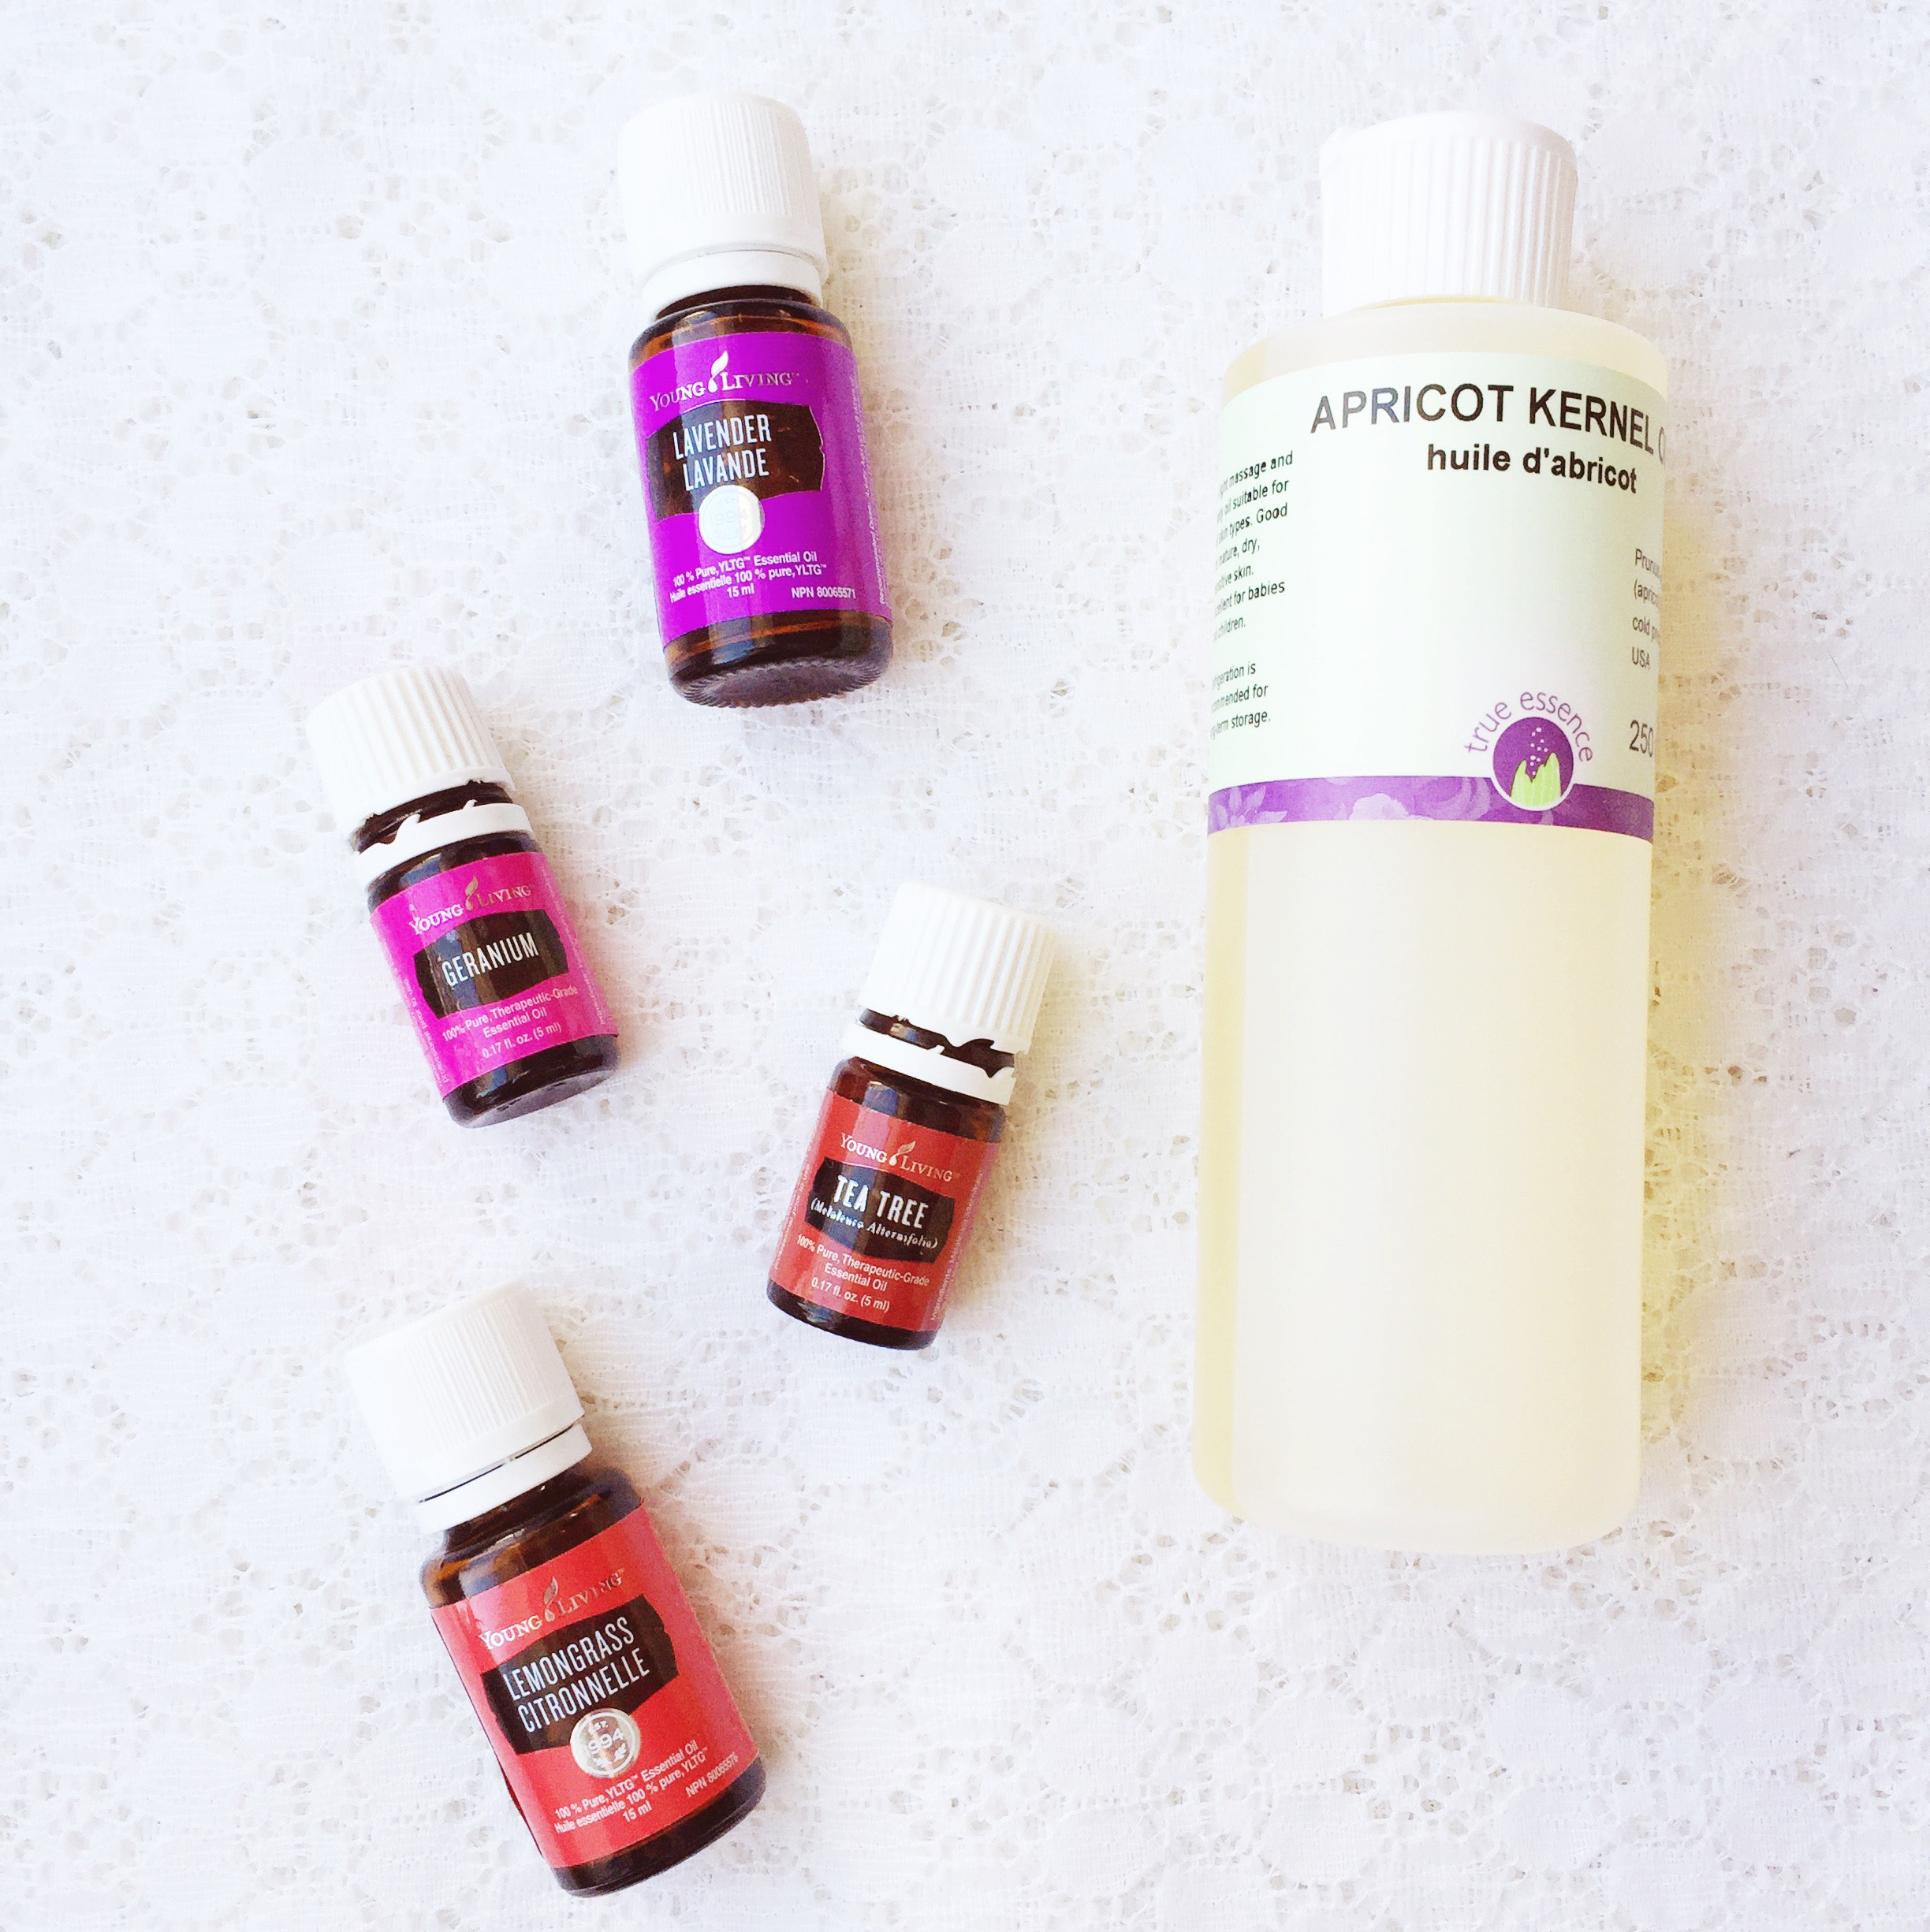
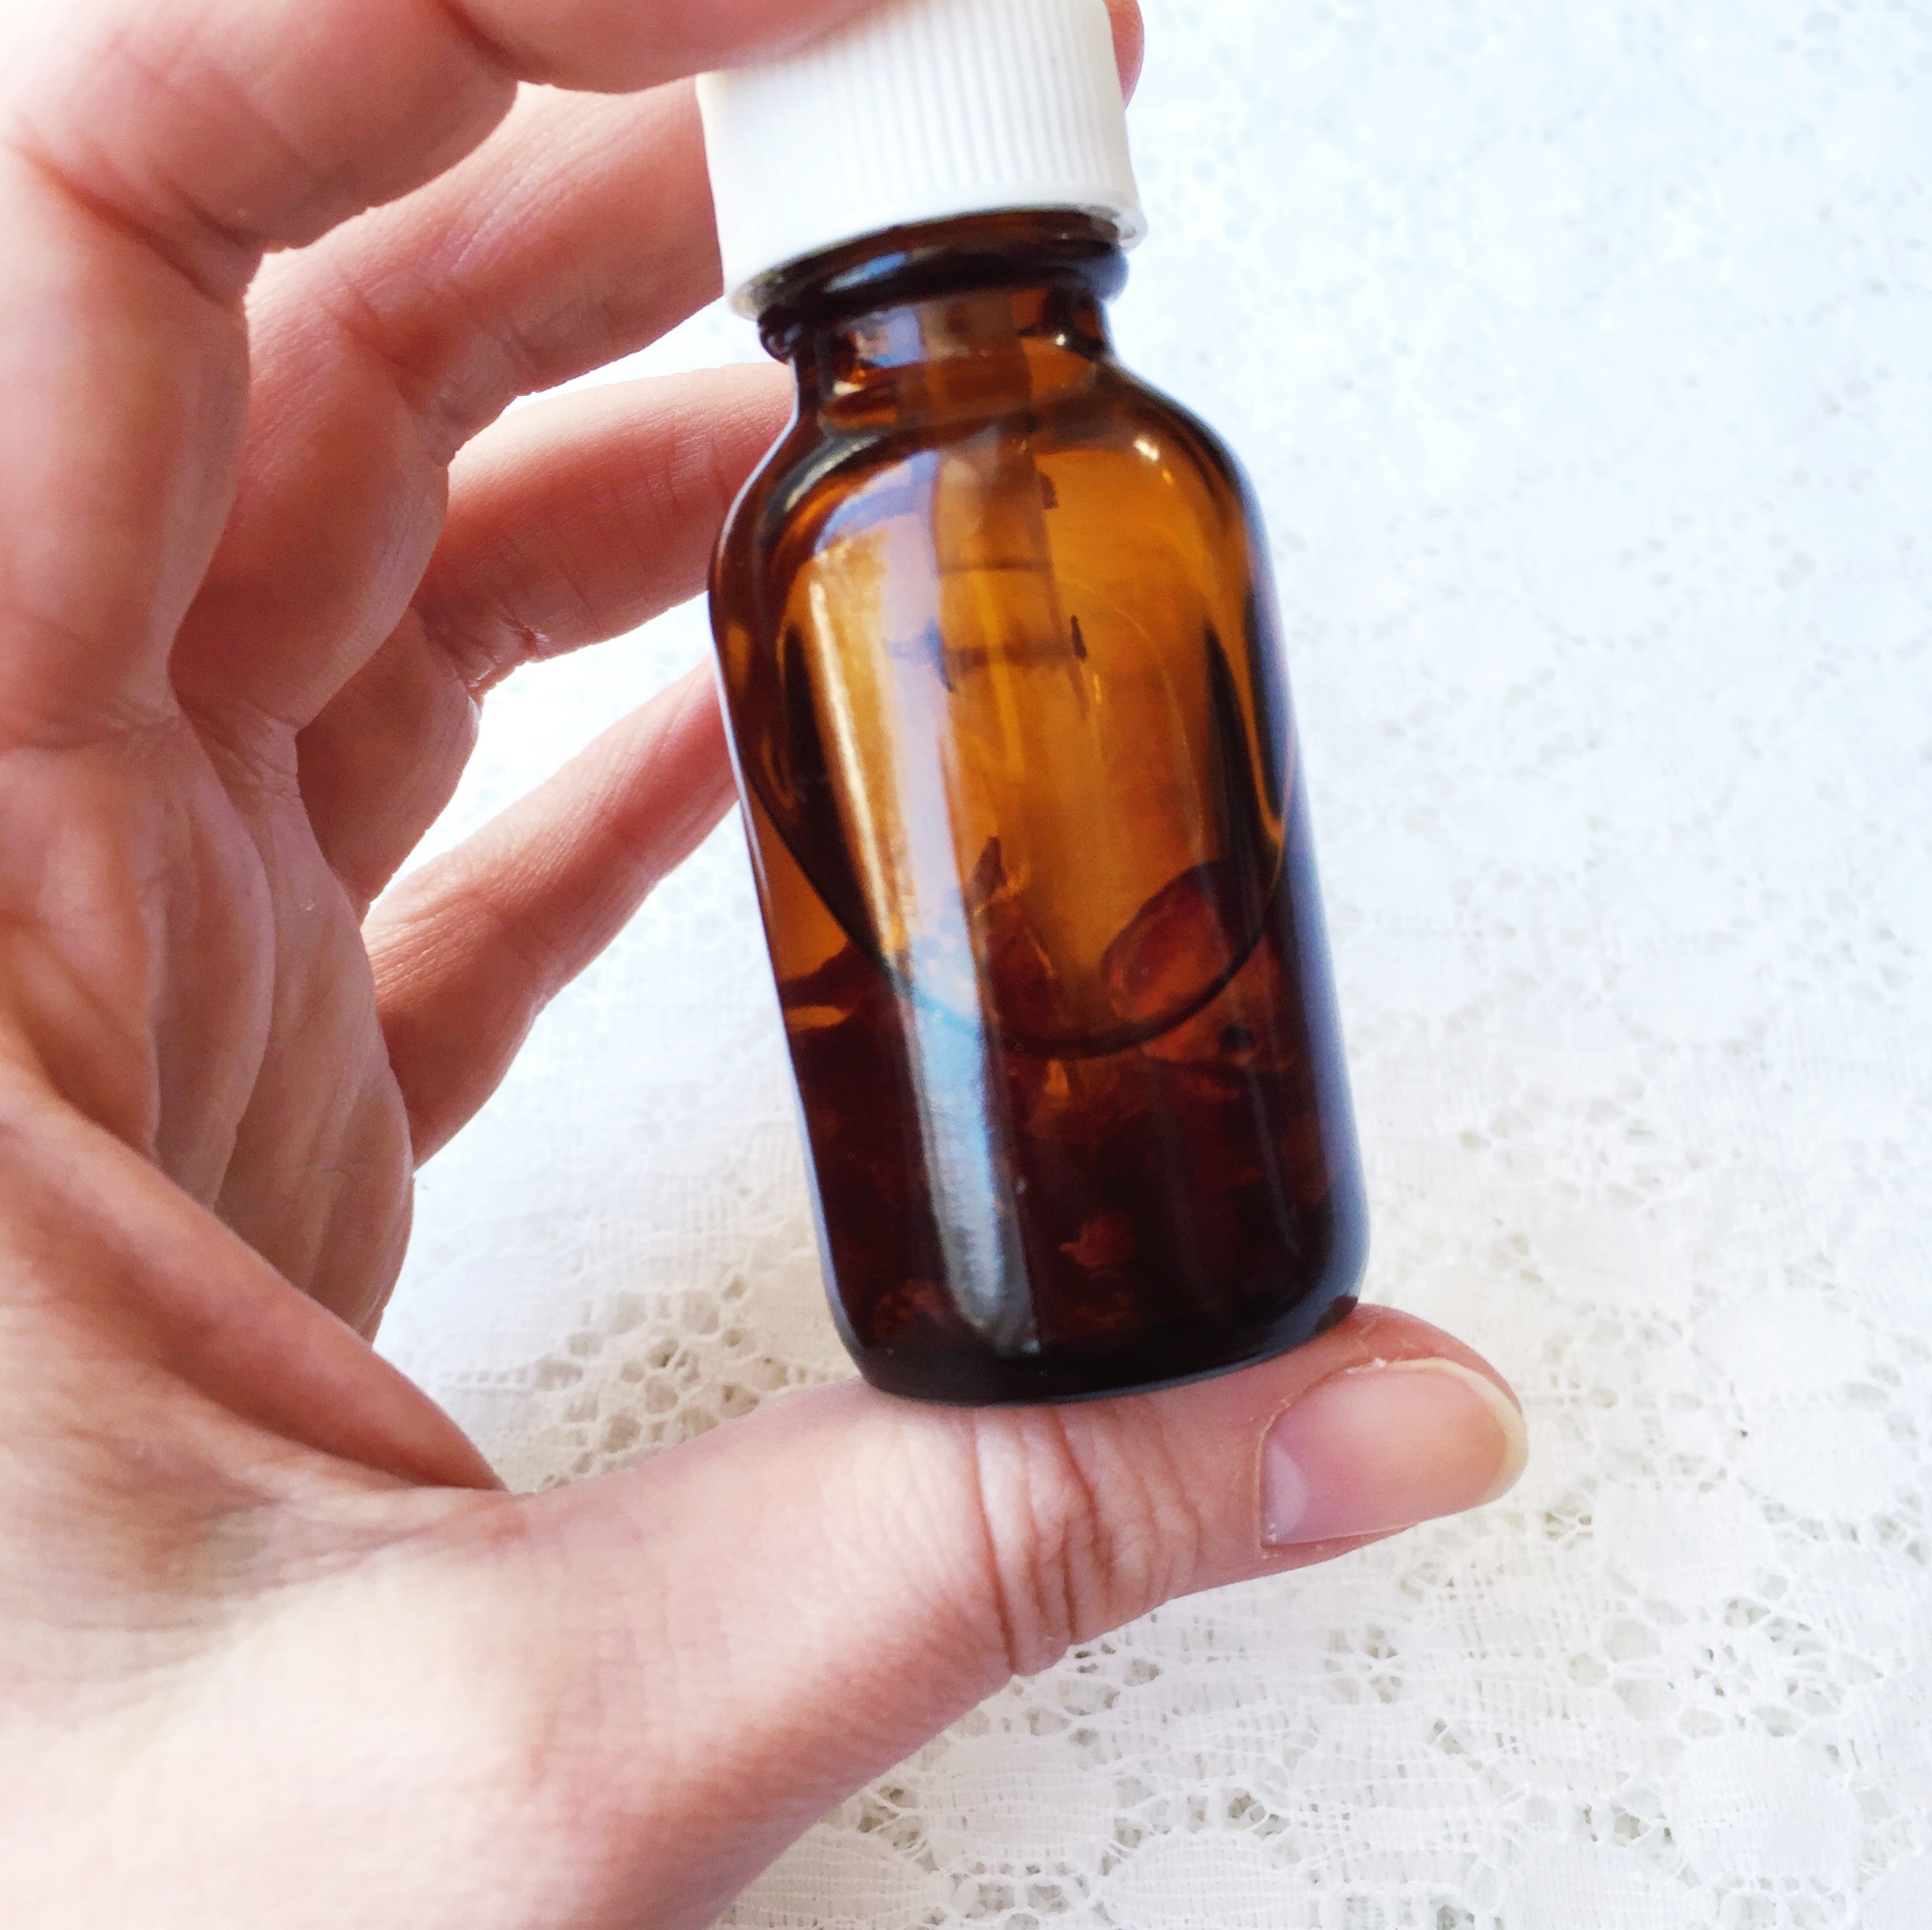
Here’s a list of the supplies you will need:
- Small glass bottle with eyedropper lid (10 ml or 25 ml)
- Apricot Kernel Oil (purchased mine from Community Natural Foods) or other carrier oil appropriate for your skin type
- Essential Oils (20-30 drops)
- Dried rose petals (optional)
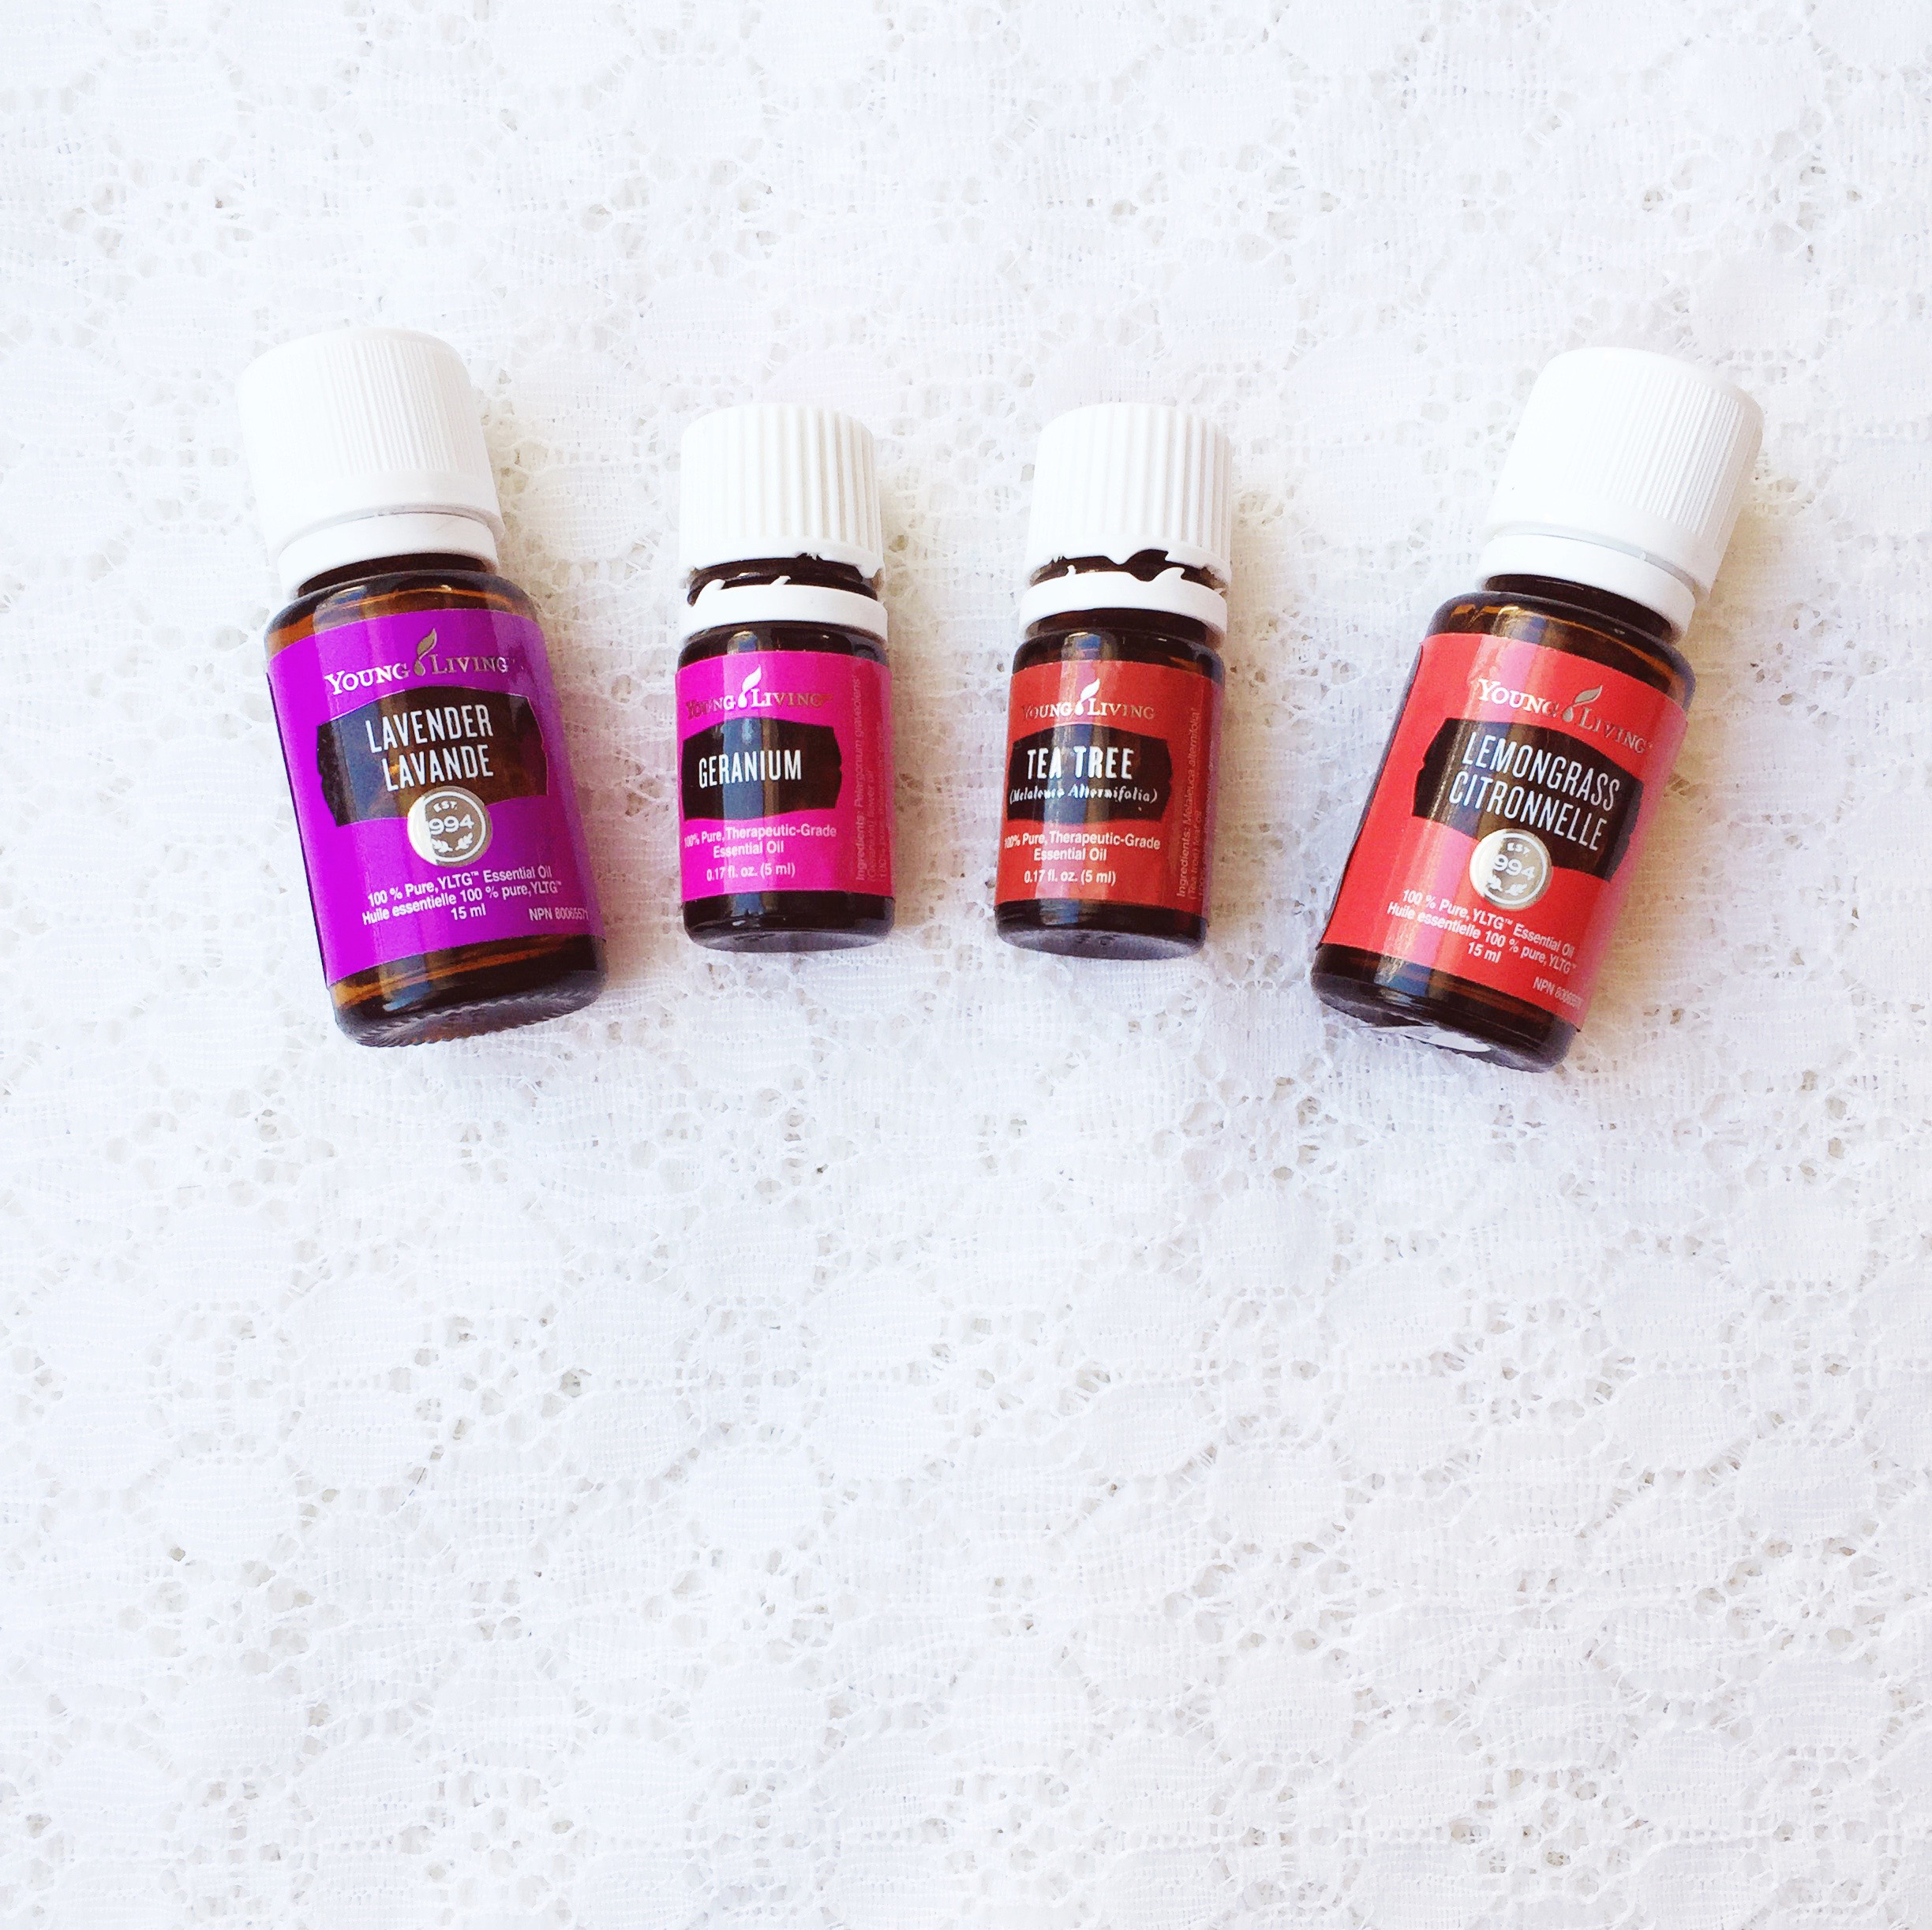
For my particular blend, I chose essential oils based on skin type, but I also kept in mind scent preferences too. I used Lavender (good for acne & dry skin), Geranium (good for dry, acne, & sensitive skins & preferred scent), Tea Tree (good for acne), and Lemongrass (acne & preferred scent).
- 8 drops Lavender
- 8 drops Geranium
- 5 drops Tea Tree
- 5 drops Lemongrass
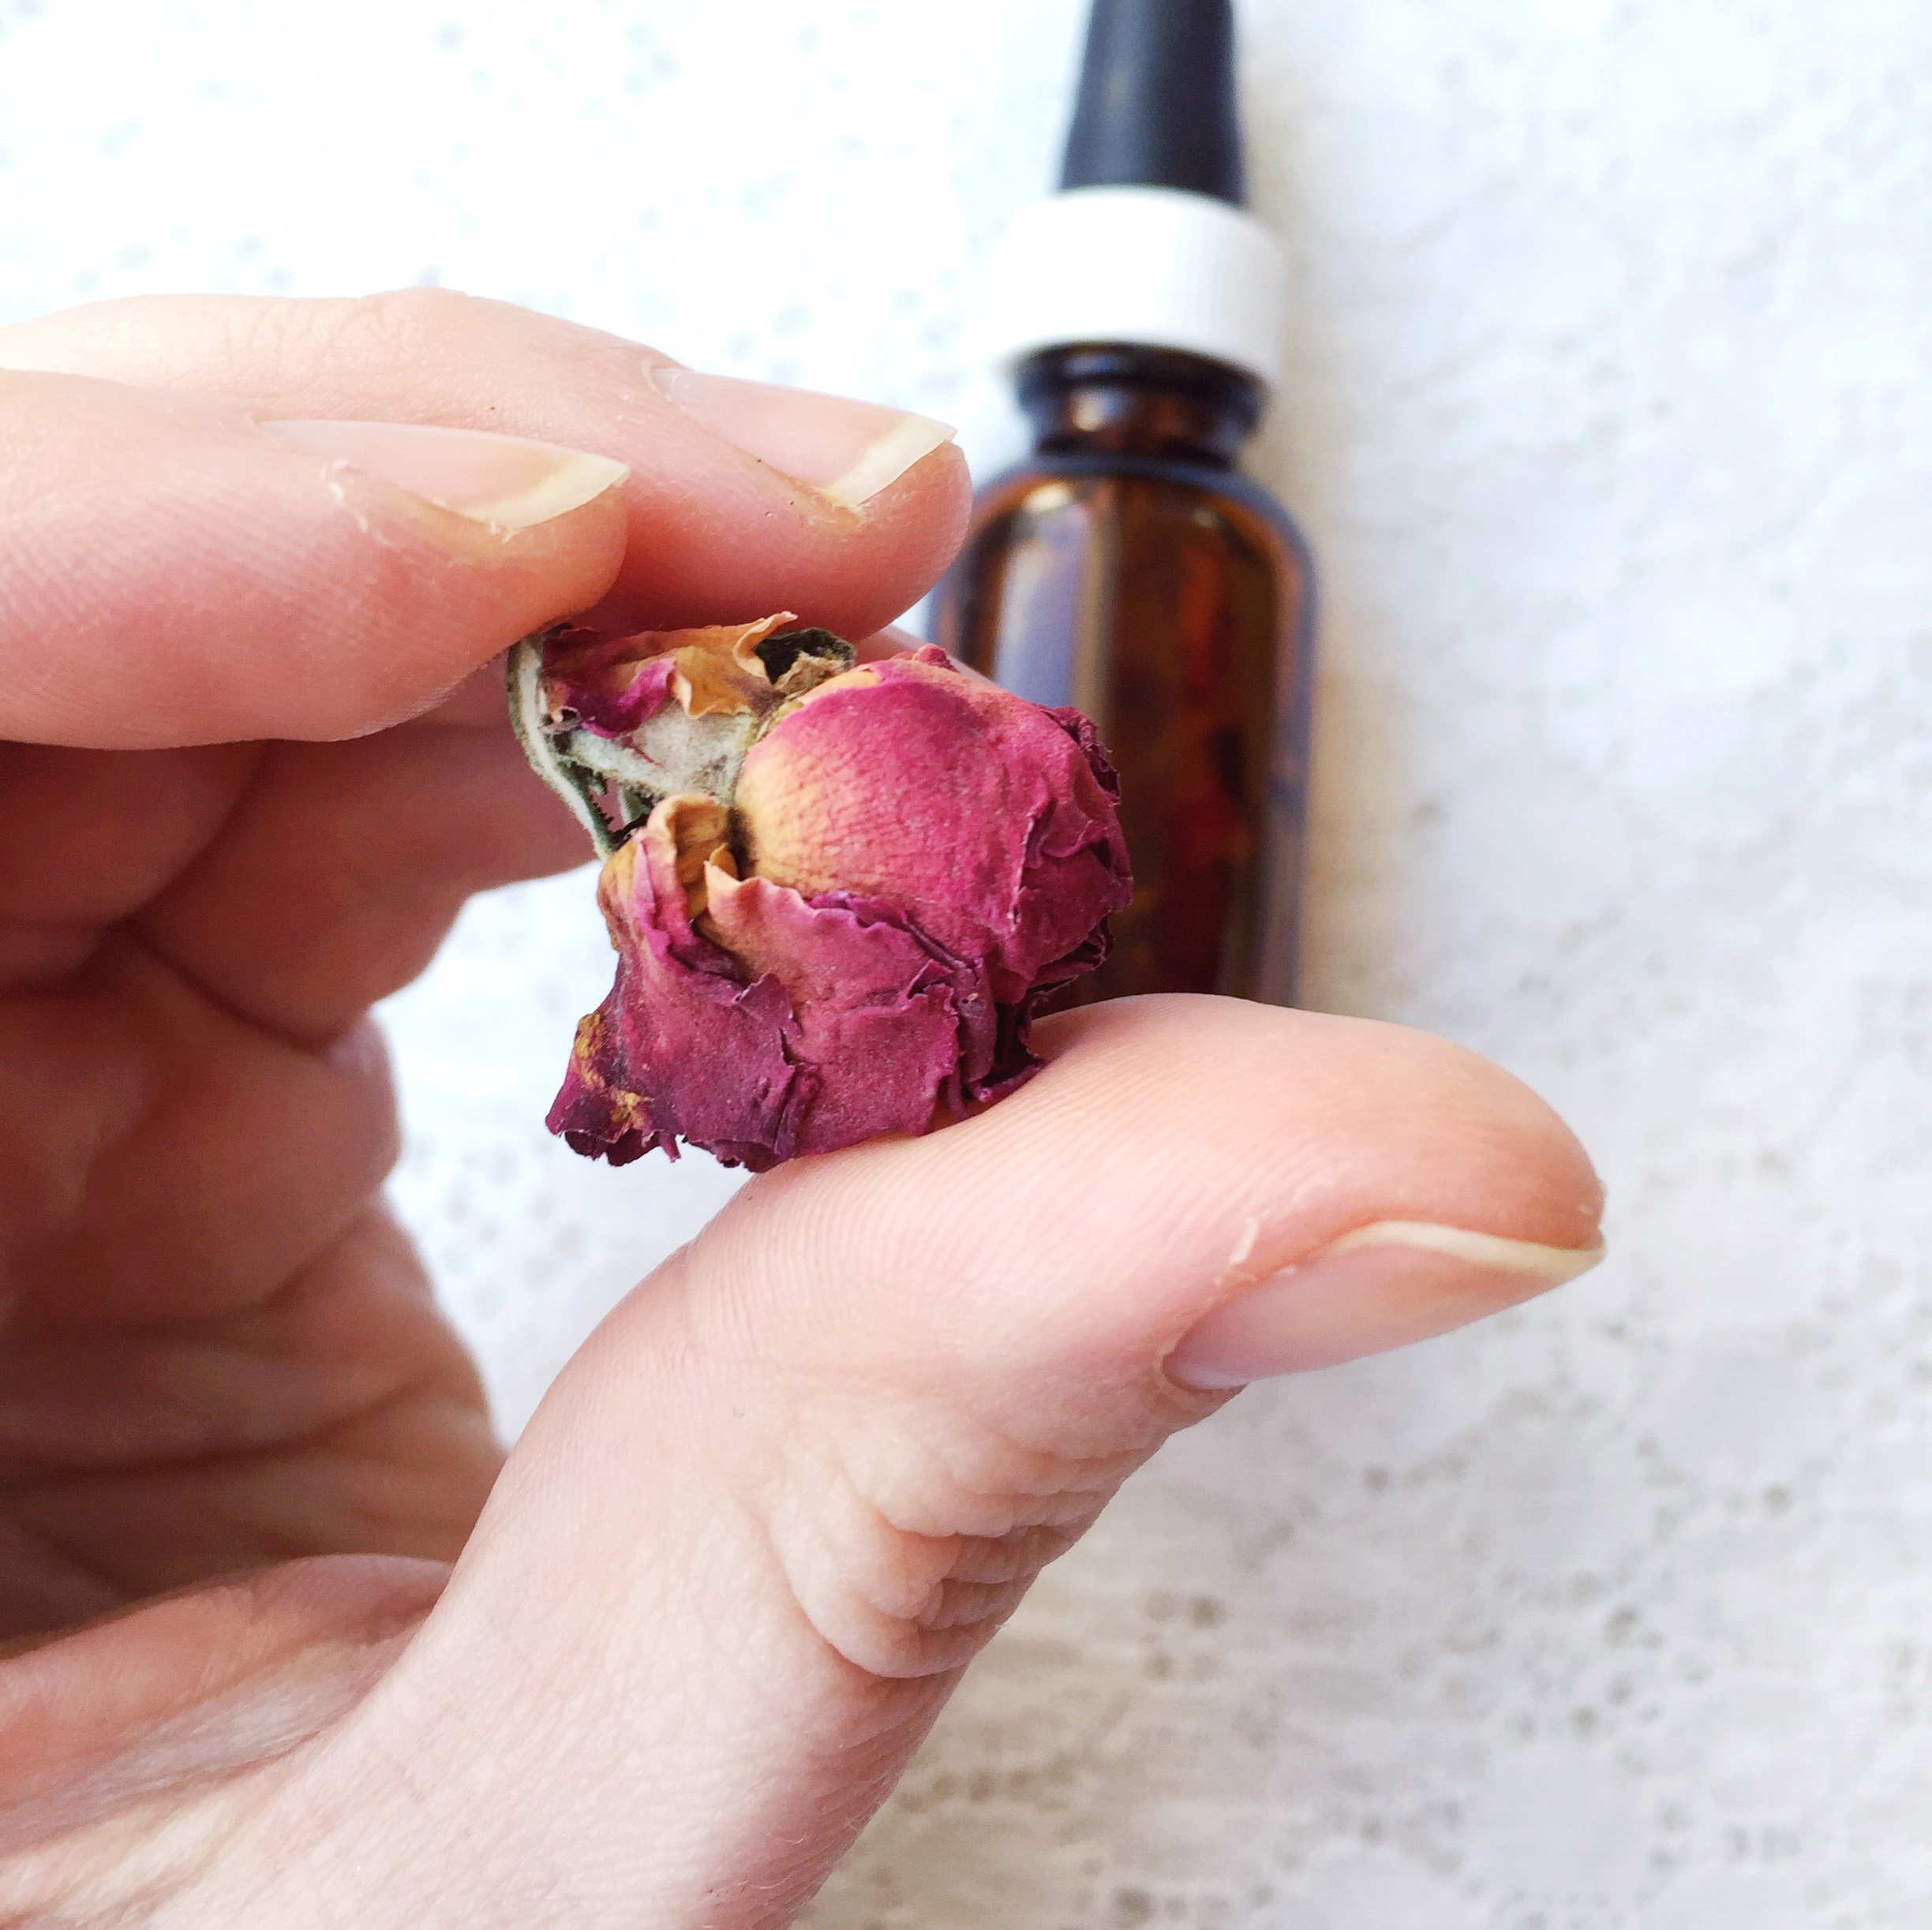
I had a bunch of dried flowers still around from all my bath & body making at Christmas time, so I decided to put some dried rose petals right into the jar with the oils. Not sure what that will do to the face serum oils over time, but we’ll see. It definitely gave the serum a lovely scent after a few days.

Once all the ingredients are added to the bottle, put the lid on and gently shake to mix. You’ll want to give it a gentle shake each time before use to mix the oils nicely. Then you’re ready to use. Simply put a small drop onto one finger tip, rub across remaining finger tips and gently press into face. I usually start with my nose, cheeks and between my eyebrows, then my chin & forehead. Go from most dry area of the face to least dry.
Happy oiling, friends!
]]>
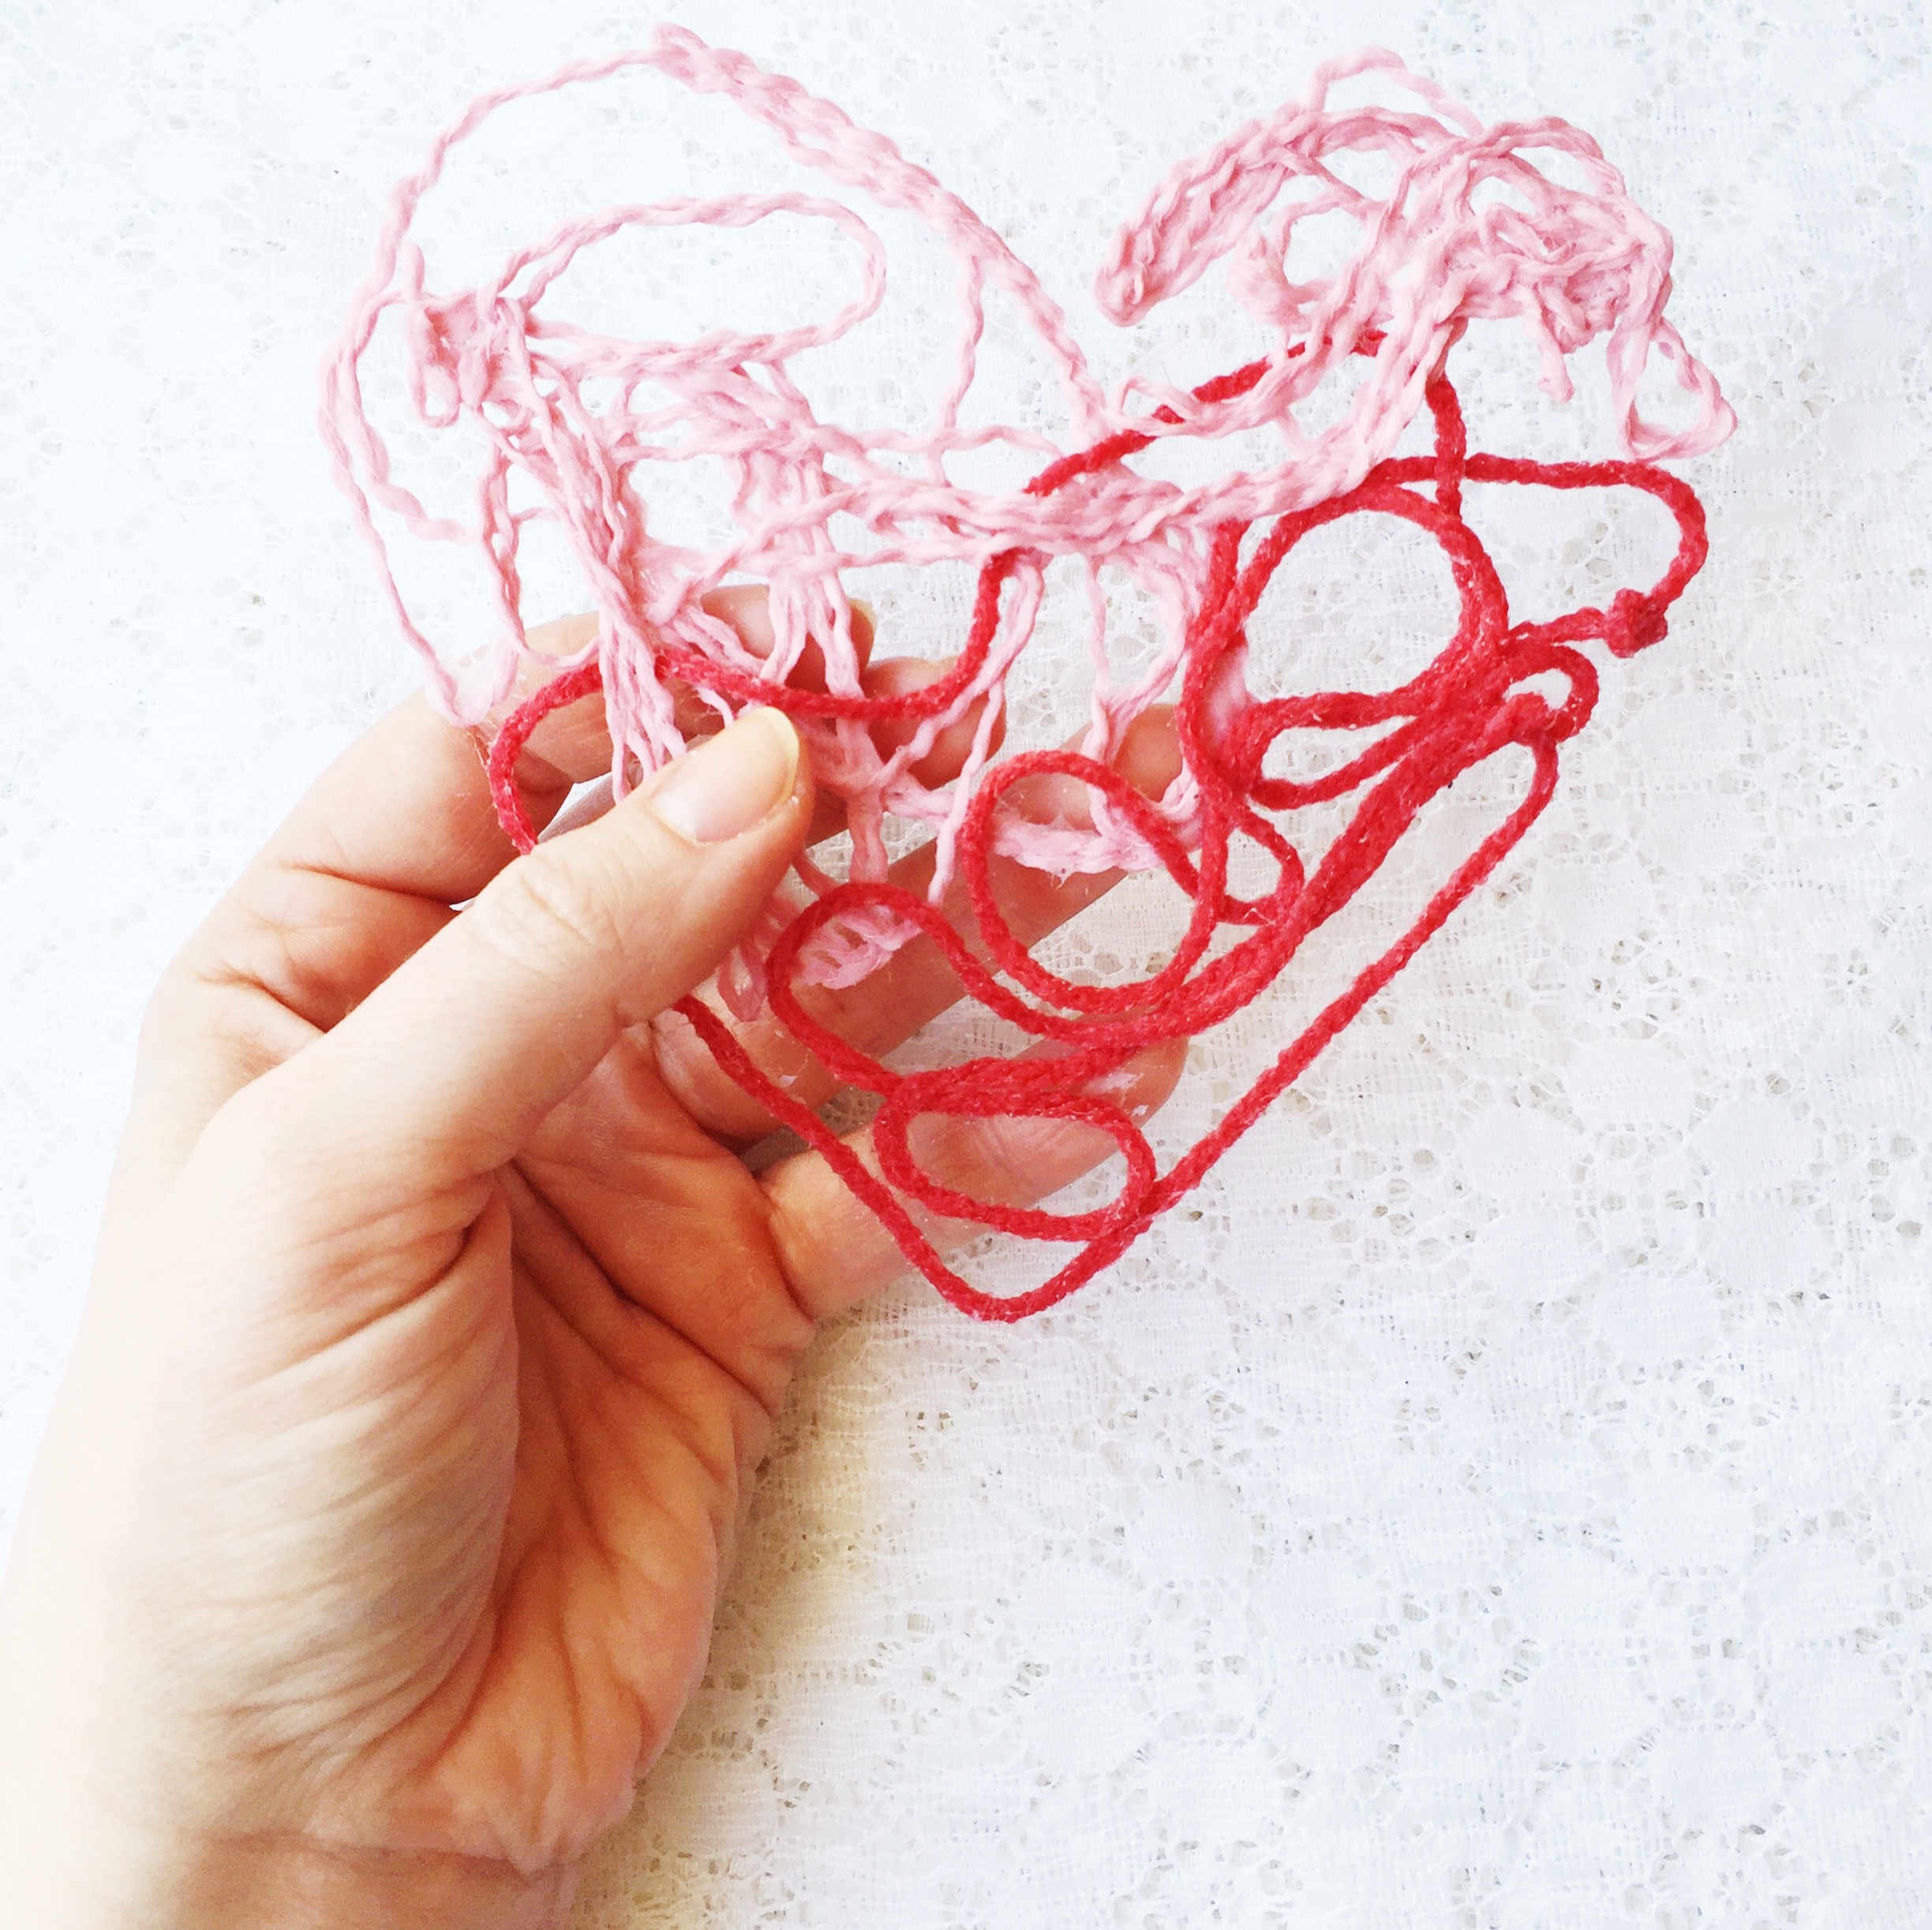
We made these yarn hearts last week. Yarn dipped in white glue and placed on wax paper in a heart shape… trace a heart shape on the wax paper to make it easy. Let dry over night. Peel off. They’re flat enough you could attach them to cards or pop in an envelope to mail.
]]>