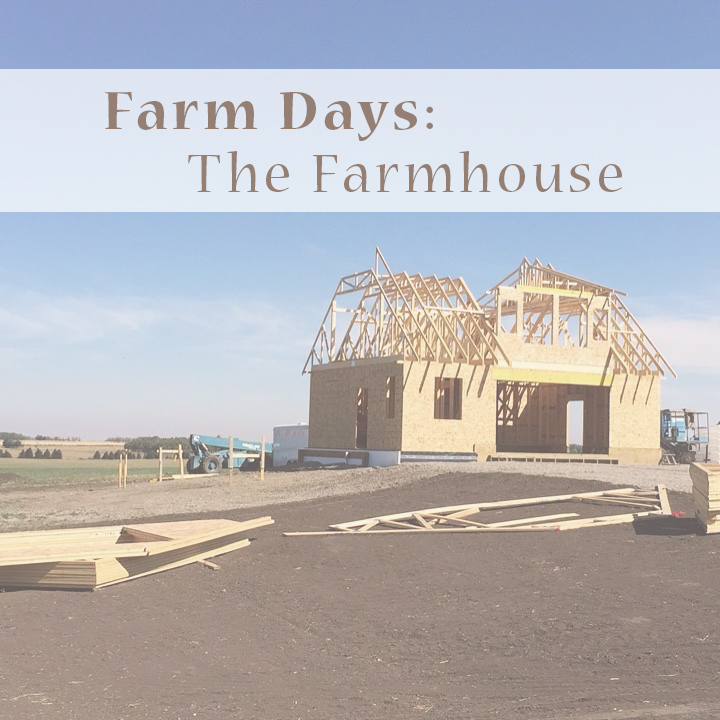
Trick or treat goodness (part 2)

Halloween spider wreath

This post could be alternately titled “Fun with plastic spiders & a hot glue gun”. There were a couple more decorations that I made up last Halloween that I’d like to share with you. My absolute favourite decoration was by far our wreath. It was super simple to make and also fairly inexpensive. You will need a black wreath (which I picked up on sale at Michaels), a bag of plastic Halloween rings (most dollar stores have them), a small pair of wire cutters, hot glue gun, and some wide Halloween wired ribbon. Here’s all you need to do to make a creepy, fun wreath:

Plastic rings, wire cutters, hot glue gunCutting plastic spider ring

1. Sort your plastic rings (I only used the spiders and mainly used the orange ones)
2. Using small wire cutters, snip off the band of each ring
3. Apply a small amount of hot glue on the back of the spider
4. Squeeze the spider onto the wreath (be careful not to burn yourself on the glue)
5. Repeat until you have covered your wreath in as many spiders as you like
6. Using the wired ribbon make a pretty bow (I’m really not very good at this, so any instructions Gluing plastic spiderPlastic spider ribbonyou can find online about making a bow, will be better than anything I can tell you)
7. Once you’re satisfied with your bow, glue some spiders on it
8. Attach the bow on the bottom of your wreath either by hot gluing it or tying it on with thread (depends on how big or what style of bow you make)

While you have the glue gun warmed up and those plastic rings handy, you can also make up some simple clothespin decorations, which I found inspiration for on Martha’s site:

1. Last year I ran out of time (I started making these about an hour before guests began arriving at our Halloween party), but I would suggest either painting or spray painting the clothespins black before you start and let dry
2. Take some plastic rings and snip the band off of each, as done above with the wreath project
3. Apply a dab of hot glue to the back of each ring
4. Squeeze onto the “front” of the clothespin (again be cautious of getting hot glue on your fingers when you do this)

Now you have some creepy decorations to clip onto the edge of bowls or where ever you can think to clip them. I like they way they dress up the treat table at a party and you can’t beat how simple they are to make.

Clothespins and plastic ringsHalloween clothespin decorationHalloween clothespin decoration

Trick or treat goodness (part 1)

Paper cat cutoutLast October was the first time that we got to celebrate Halloween in our very own home . So of course, I delved into making a variety of decorations, which I was able to re-use this year, with the addition of my spooky crochet spiders.

For decorating inspiration I turned to the one and only Martha, queen of Halloween. I don’t subscribe to her magazine, but the two issues each year that I buy are October and December, and there are generally packed with beautiful and fun ideas, some of which I feel like I can even do myself! Then there is the website, which is packed with even more ideas. So when I needed to start from scratch with Halloween decorations, I turned to good ‘ol Martha.

The first thing I was drawn to was a childhood classic. I knew I wanted to cut out some construction paper silhouettes to tape to our front window, which we always did to decorate at my parent’s house. Martha has lots of handy templates to download for free. I used these flying bat and spitting cat templates, although I increased the size of the bat. Buy some black construction paper, trace the templates, cut out, and voila! Pretty simple, eh?

Glitter, spray paint, and white glueThe next thing I tackled was slightly more complicated, but I was thrilled with the results. I found the inspiration for it on The Long Thread. I used the following materials: cardboard, utility knife, black spray paint, white glue, paint brush, black glitter, string, and a big branch. I used the same template from Martha as above, but used both the original and enlarged versions, so there would be two different sizes. Here’s the basics:

1. Cut the bats out of cardboard (I cut out seven total, a few small and a few large)
2. Spray paint the fronts and backs black, let dry
3. Brush one side with basic white glue and sprinkle with black glitter, let dry
4. Use a ball point pen to punch a hole through each bat in the middle of their heads
5. Cut varying lengths of string and thread each bat with one
6. Hang a branch wherever you will be displaying your bats (I put ours outside)
7. Tie each bat onto the branch
8. Stand back and watch them flutter

Cardboard batsCardboard batsOutdoor Halloween decorations

One giant leap

Well, I did it. I submitted an application to my first craft show and have been accepted. Fees have been paid. Confirmation has been sent. It looks like this is it! The beginning of a big ‘ol adventure! My friend and I are actually going to share a table since neither of us have done this before. There’s so much to do in preparation. I’ve been reading tons online about selling at craft shows and setting up your booth/table. Every spare hour in the evening is spent making items. Lists are being compiled of what I need to prepare, buy, design, etc. I hope to share my experience through the whole process here, so I guess you’re in for a crafty ride! Thanks in advance for reading and learning alongside with me! Oh, and by the way, the show I am participating in is the Market Collective, December 11-12, in Calgary.

The lonely tale of Mr. Sage and Mr. Thyme

Sage sproutWell, after letting more and more days pass without seeing any activity in the rosemary, oregano, and catnip pots, I’ve decided to add some fresh seeds to each of these and give them another go. I don’t really have a Plan B for the herb garden, but I have my dirt-covered fingers crossed that at least one of these will join my happy sage and thyme sprouts.

Speaking of which, the sage is looking lovely and healthy if not a bit odd in shape. Since I rotated the pot last week, they have curved completely in the other direction to follow the sunlight. I’m curious to see how they will shape themselves as I continue to turn their pot once a week. Oh, and how lovely, their itty-bitty leaves smell! I am truly enjoying my herb garden, even if only a couple of the plants are growing.

Good day Mr. Sage, hello Mr. Thyme

I have been saying hello to Mr. Sage everyday this week. He has returned the kindness by sprouting a couple more stems! It now appears that both types of sage that I planted have managed to grow. I’m not sure have very different they will be taste-wise, but the last time I had a herb garden, sage was one of the plants I wished I had more of to experiment in my cooking. Well, I’ve certainly got my wish!

Thyme sproutSo many people in the world wish for more thyme or maybe they wish for more “time”. In either case, I am happy to report that the thyme pot is no longer void of greenness. There are bunch of itty-bitty sprouts that have popped up, unfortunately all in one clump. I say “unfortunately” because I’m not sure that it’s such a good thing. I was hoping to have two or three separate thyme plants in the pot, but all the seeds I dropped in one hole seemed to have emerged. For now, I just keep cheering them all on.

There’s been no activity in the rosemary, oregano, or catnip pots. I’m not too sure how long I should wait before I decide re-try those. The catnip feels like it was a bit of a long shot, but I would happily give it another try. I have noticed how much my little sage and thyme sprouts reach towards the window for the sunlight and I’m still trying to decide if they are in the best spot or not. Obviously they are getting sunshine, but they sure do seem to want more. I think I will rotate the pots around, which should help straighten the sprouts up a bit.